Rough Opening Size For Garage Door

One of the most frustrating experiences for a homeowner can be a garage door that just won't fit properly. Perhaps you're installing a new door, or maybe your existing door is suddenly sticking or binding. Often, the culprit isn't the door itself, but the rough opening – the unfinished framed opening where the garage door sits. A rough opening that's out of spec, even by a little, can lead to a whole host of problems. This article will guide you through diagnosing issues with your rough opening and offer simple, safe DIY fixes. We'll also pinpoint when it's time to call in a professional.
Understanding the Rough Opening
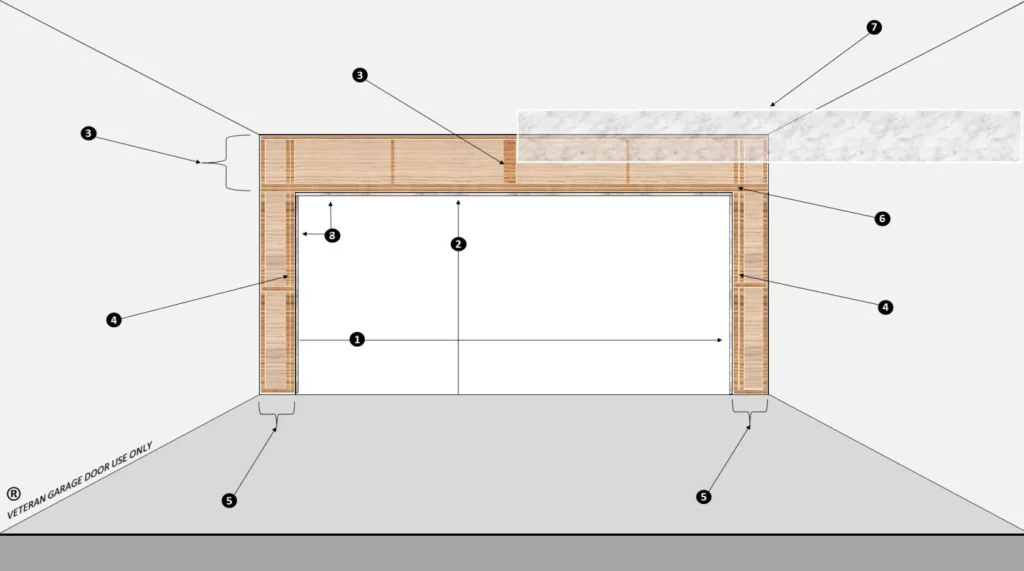
Before we dive into troubleshooting, let's define what the rough opening actually is. The rough opening is the framed opening in your garage wall that the garage door and its tracks will be installed within. It's usually made of 2x4 or 2x6 lumber and forms the basic structure for the entire door system. The accuracy of the rough opening's dimensions is crucial for a smooth-operating and secure garage door.
There are three key measurements for a rough opening:
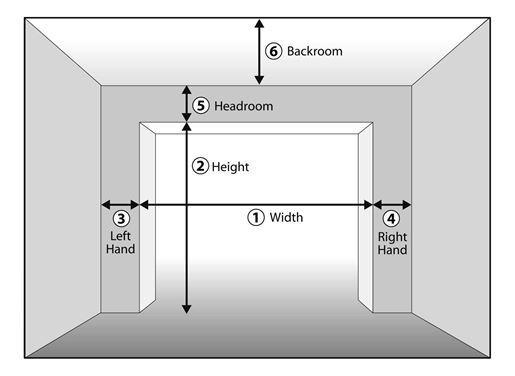
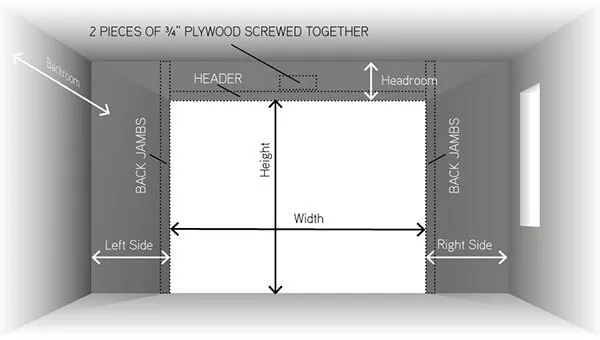
- Width: The horizontal distance between the inner faces of the side jambs.
- Height: The vertical distance from the floor to the underside of the header.
- Squareness: Ensuring the opening forms perfect 90-degree angles at each corner.
Common Problems Caused by an Improper Rough Opening
A flawed rough opening can manifest in several ways. Here are some common symptoms:
- The garage door is difficult to open or close: Binding or sticking points indicate misalignment, likely caused by an out-of-square or undersized opening.
- Gaps between the door and the frame: This allows drafts, pests, and even water to enter your garage.
- Uneven door operation: One side of the door may seem to lag behind the other during opening or closing.
- Premature wear and tear on door components: Forcing a door to operate in a misaligned opening puts undue stress on rollers, hinges, and the opener.
- The door won't stay closed: This can be a serious security issue.
- Difficulty installing a new garage door: The new door simply doesn't fit within the existing opening.
Diagnosis: Is Your Rough Opening the Problem?
Before assuming the worst, systematically rule out other potential causes, such as damaged rollers, a malfunctioning opener, or obstructions in the tracks. Once you've eliminated those, it's time to focus on the rough opening.
Step 1: Gather Your Tools
You'll need the following tools for accurate measurement and basic adjustments:
- Tape measure: A sturdy, long tape measure (at least 25 feet) is essential.
- Level: A 4-foot level is ideal for checking horizontal and vertical alignment. A shorter level can be used, but a longer one provides greater accuracy.
- Square: A large carpenter's square helps verify 90-degree angles.
- Pencil: For marking measurements and problem areas.
- Shims: Thin pieces of wood used to fill gaps and level surfaces. Cedar or composite shims are good choices.
- Hammer: For gently tapping shims into place.
- Safety glasses: Protect your eyes from dust and debris.
- Gloves: Protect your hands.
Step 2: Measure the Width
Measure the width of the rough opening at three points: the top, the middle, and the bottom. Record each measurement. Ideally, all three measurements should be identical. Any significant difference indicates that the jambs are not parallel.
Compare your measurements to the garage door manufacturer's specifications. The required rough opening width should be clearly stated in the door's installation instructions. If your opening is too narrow, the door won't fit. If it's too wide, you'll have excessive gaps.
Step 3: Measure the Height
Measure the height of the rough opening on both the left and right sides, from the floor to the underside of the header. Again, record each measurement. These measurements should also be the same. A difference indicates that the header is not level.
Compare your measurements to the manufacturer's specifications. The height requirement is just as critical as the width. Pay close attention to any headroom requirements specified by the manufacturer. Headroom refers to the space above the top of the door required for the track and opener mechanism.
Step 4: Check for Squareness
This is where the carpenter's square comes in handy. Place the square in each of the four corners of the rough opening. The square should fit snugly against both surfaces, forming a perfect 90-degree angle. If there's a gap, the opening is not square.
Another method for checking squareness is the 3-4-5 rule. Measure 3 feet along one jamb from the corner and mark the spot. Then, measure 4 feet along the adjacent jamb from the same corner and mark that spot. Finally, measure the distance between the two marks. If the opening is perfectly square, this distance should be exactly 5 feet. Repeat this process for all four corners.
Step 5: Inspect for Level and Plumb
Use your level to check if the header is level and the jambs are plumb (perfectly vertical). Place the level against the header and observe the bubble. The bubble should be centered between the lines. Repeat this process for both jambs. If the bubble is off-center, the header or jamb is not level or plumb, respectively.
DIY Fixes: Simple Adjustments You Can Make
If your measurements are only slightly off, you may be able to correct the problem with some simple DIY adjustments. Safety is paramount. Always wear safety glasses and gloves, and ensure the garage door is properly supported before making any adjustments.
Fix 1: Shimming
Shimming is the most common way to correct minor imperfections in the rough opening. Shims are used to fill gaps and bring surfaces into alignment.
- Identify the gaps: Use your measurements and visual inspection to pinpoint areas where shims are needed.
- Insert the shims: Carefully slide shims into the gaps between the jambs and the framing. Start with the largest gaps first.
- Adjust the shims: Use a level and square to ensure the jambs are plumb and the opening is square. Tap the shims gently with a hammer to fine-tune their position.
- Secure the shims: Once you're satisfied with the alignment, use nails or screws to secure the shims in place. Be sure the fasteners don't interfere with the garage door's operation.
- Trim excess shims: Use a utility knife or saw to trim any excess shims that protrude beyond the surface of the jambs.
Fix 2: Adjusting Jamb Placement
If the jambs are slightly out of plumb, you may be able to adjust their position by loosening the fasteners holding them in place, nudging them into the correct position, and then re-tightening the fasteners. This is best done with a helper.
- Loosen the fasteners: Carefully loosen the screws or nails that secure the jambs to the framing. Don't remove them completely.
- Adjust the jamb: Use a level to guide you as you gently push or pull the jamb into the correct plumb position.
- Re-tighten the fasteners: Once the jamb is plumb, re-tighten the screws or nails.
- Check your work: Double-check the jamb's plumb and re-shim if necessary.
Fix 3: Adding or Removing Framing
This is a more involved fix, but it may be necessary if the rough opening is significantly undersized. If the opening is too narrow or short, you may need to remove some of the existing framing to create more space. If the opening is too wide or tall, you might need to add framing members to reduce the size.
Important: This type of work can affect the structural integrity of your garage. If you are not comfortable with basic carpentry, consult a professional.
- Remove existing framing: If you need to make the opening larger, carefully remove the necessary framing members using a saw. Be sure to support the surrounding structure to prevent it from collapsing.
- Add framing: If you need to make the opening smaller, cut new framing members to the appropriate size and attach them to the existing framing using nails or screws. Ensure the new framing is level, plumb, and square.
When to Call a Professional
While many rough opening issues can be addressed with DIY fixes, there are certain situations that require professional expertise. Don't hesitate to call a qualified contractor if you encounter any of the following:
- Significant structural damage: If the framing around the rough opening is rotted, damaged by insects, or otherwise compromised, it needs to be repaired or replaced by a professional.
- Major framing alterations: If the rough opening needs to be significantly altered (e.g., widening the opening by several inches), it's best to leave this work to a professional.
- You're uncomfortable with carpentry: If you're not confident in your ability to safely and accurately perform carpentry work, don't risk it.
- You've tried DIY fixes and they haven't worked: If you've attempted to adjust the rough opening yourself and you're still experiencing problems, it's time to call in a professional.
- If the door is new and still under warranty: Altering the rough opening yourself may void the garage door's warranty. Check the warranty terms before proceeding.
A qualified contractor can assess the situation, identify the underlying cause of the problem, and recommend the appropriate solution. They have the experience, tools, and expertise to ensure the job is done safely and correctly.
Prevention is Key
The best way to avoid rough opening problems is to ensure the opening is properly framed from the outset. If you're building a new garage or replacing the framing around an existing garage door, pay close attention to the manufacturer's specifications and take the time to create a precise, level, plumb, and square opening.
Final Thoughts
A properly sized and aligned rough opening is essential for a smooth-operating and secure garage door. By following the steps outlined in this article, you can diagnose common rough opening problems and make simple DIY adjustments. However, remember that safety should always be your top priority. When in doubt, don't hesitate to call a professional.