Seasonal Energy Efficiency Ratio Near Me
Is your home feeling less like a haven and more like a battleground against uncomfortable temperatures? One of the most common frustrations homeowners face is an inconsistent or inadequate heating and cooling system. You might notice rooms that are always too hot or too cold, higher-than-usual energy bills, or the system running constantly without achieving the desired temperature. Before you resign yourself to shivering or sweating, let's explore some troubleshooting steps you can take. This guide focuses on helping you assess your system's performance and identify potential issues affecting its efficiency.
Diagnosing the Problem: A Step-by-Step Approach
Before calling an HVAC technician, let’s systematically investigate the situation. We'll walk through a series of checks, starting with the easiest and progressing towards those requiring a bit more effort and potentially specialized tools.
Step 1: Basic Visual Inspection (No Tools Required)
This is the foundation of any troubleshooting process. It's about using your eyes and senses to gather initial clues.
- Air Vents and Registers: Are all vents open and unobstructed? Make sure furniture, rugs, or curtains aren't blocking airflow. Closed vents in some rooms can throw off the entire system's balance.
- Outdoor Unit (Condenser): Visually inspect the outdoor unit. Is it free of debris like leaves, branches, or snow? Overgrowth around the unit can severely restrict airflow, hindering its ability to release heat (in cooling mode) or absorb heat (in heating mode).
- Indoor Unit (Furnace or Air Handler): Check for any obvious signs of damage or leakage around the indoor unit. Look for rust, water stains, or unusual noises when the system is running.
- Thermostat Settings: This may seem obvious, but double-check that your thermostat is set correctly for heating or cooling and that the desired temperature is appropriate. Ensure the thermostat mode (heat/cool/auto/off) is selected correctly. Someone might have accidentally changed it.
Step 2: Filter Check (No Tools Required)
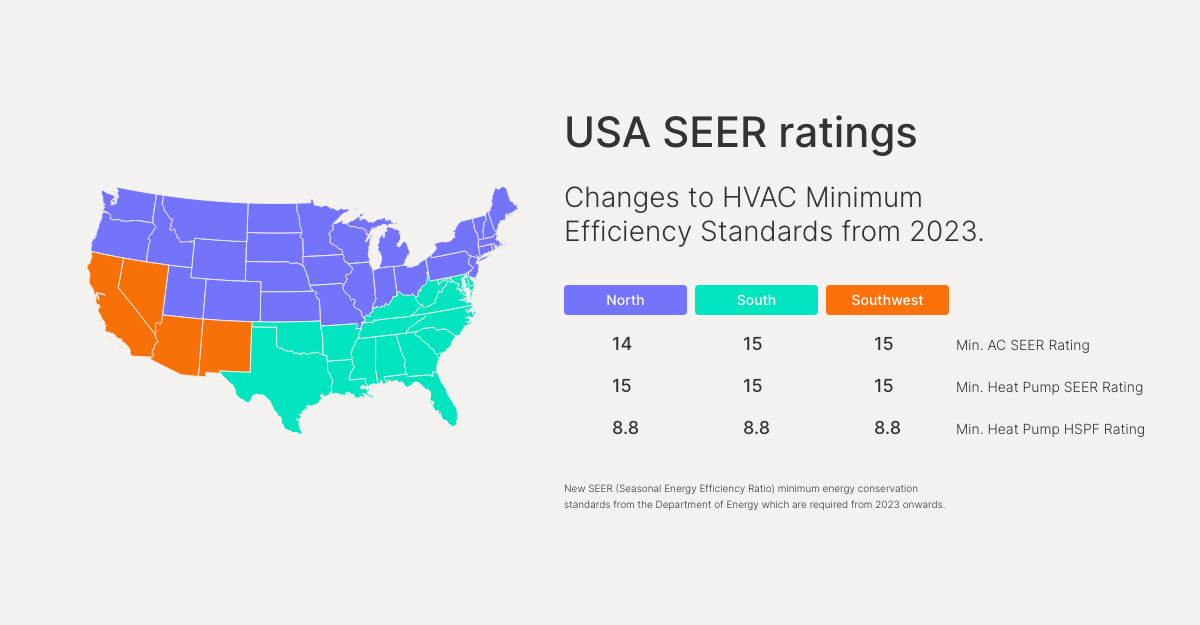
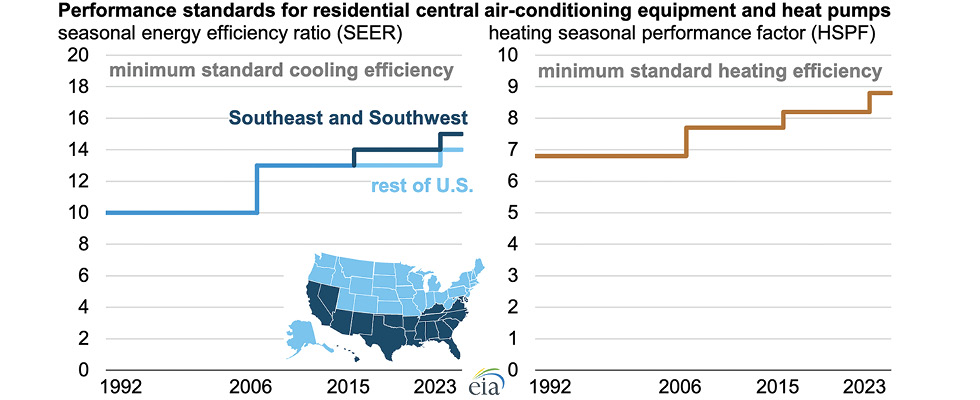
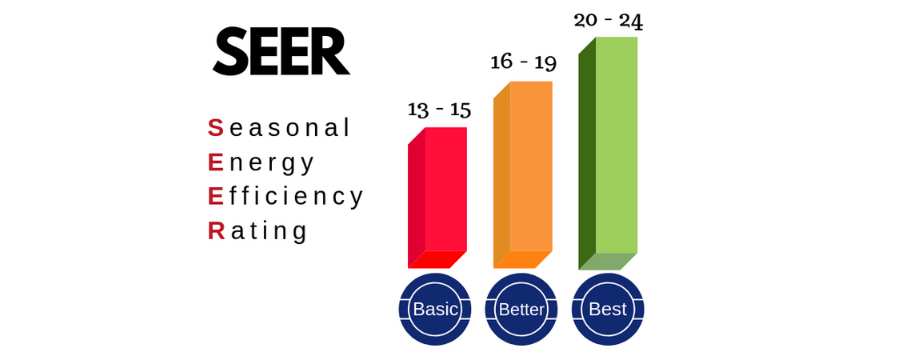
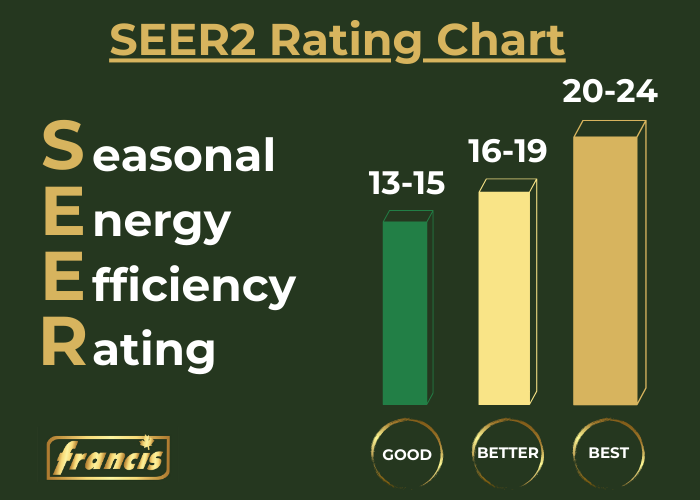
A dirty air filter is the most common culprit behind many HVAC problems. A clogged filter restricts airflow, forcing your system to work harder and reducing its efficiency. This impacts the Seasonal Energy Efficiency Ratio (SEER). A lower SEER will mean your system is operating inefficiently and costing you money.
- Locate the Filter: Typically, the filter is located within the indoor unit (furnace or air handler) or in a wall/ceiling return vent.
- Inspect the Filter: Remove the filter and hold it up to the light. If you can't see light through it, it's definitely time for a change.
- Replace the Filter: Use a filter of the correct size and type recommended by your HVAC system manufacturer. Write the date of the filter change on the filter frame with a marker so you remember when the next change is due.
- Regular Filter Changes: Aim to change your filter every 1-3 months, depending on factors like pets, allergies, and usage.
Step 3: Thermostat Functionality Check (No Tools Required)
The thermostat is the brain of your HVAC system. If it's malfunctioning, your system won't operate correctly.
- Power Check: Ensure the thermostat has power. Replace batteries if it's battery-powered. If it's hardwired, check the circuit breaker.
- Program Check: Verify that the thermostat's program is correctly set for your desired temperature schedule. Incorrect programming can lead to uncomfortable temperatures and wasted energy.
- Calibration Check: Compare the thermostat's temperature reading to a reliable thermometer placed nearby. If there's a significant discrepancy, the thermostat may need to be recalibrated or replaced. Refer to your thermostat's manual for calibration instructions.
Step 4: Basic Electrical Checks (Requires a Multimeter - Use with Caution!)
Warning: Working with electricity can be dangerous. If you're not comfortable using a multimeter or working with electrical components, skip this step and call a qualified HVAC technician.
- Circuit Breaker: Check the circuit breaker for your HVAC system in your electrical panel. Ensure it's not tripped (in the "off" position). If it is, try resetting it. If it trips again immediately, there's likely a more serious electrical problem that requires professional attention.
- Voltage to the Unit: Using a multimeter, carefully check the voltage at the disconnect switch near the outdoor unit (condenser) and the indoor unit (furnace/air handler). Ensure the voltage matches the system's requirements (usually 120V or 240V). If there's no voltage, there's an electrical issue that needs to be addressed by an electrician or HVAC technician. Always turn off the power at the main breaker before working on electrical components.
Step 5: Condensate Drain Line Check (No Tools Required Initially, Shop Vac Optional)
During the cooling season, your air conditioner removes moisture from the air, which drains through a condensate drain line. A clogged drain line can cause water damage and prevent your system from cooling properly.
- Locate the Drain Line: The drain line is typically a PVC pipe that exits the indoor unit (furnace/air handler) and drains into a floor drain or outside.
- Check for Clogs: Look for any visible blockages at the end of the drain line. You might see algae or debris.
- Clear the Drain Line: Try using a wet/dry vacuum (shop vac) to suck out any clogs from the end of the drain line. Be careful not to damage the pipe. You can also try using a stiff wire to break up any blockages.
- Pour Vinegar: Periodically pour a cup of white vinegar down the drain line to help prevent algae growth.
Step 6: Observing System Operation (No Tools Required)
Listen and watch your system while it's running to gather more clues.
- Unusual Noises: Are there any loud banging, rattling, or hissing noises coming from the indoor or outdoor unit? These noises can indicate mechanical problems, such as a failing motor, compressor, or fan.
- Short Cycling: Is the system turning on and off frequently (short cycling)? This can be caused by a variety of issues, including a dirty filter, low refrigerant, or an oversized system.
- Ice on the Outdoor Unit: In cooling mode, ice forming on the outdoor unit (condenser) can indicate a refrigerant leak or airflow problem.
DIY Actions You Can Take (Safely!)
Based on your diagnosis, here are some simple DIY actions you can take:
- Replace the Air Filter: As mentioned earlier, this is the most common and easiest fix.
- Clear Debris from the Outdoor Unit: Remove any leaves, branches, or other debris that are obstructing airflow around the condenser.
- Clean the Condensate Drain Line: Use a shop vac or stiff wire to clear any clogs.
- Adjust Thermostat Settings: Ensure your thermostat is programmed correctly and that the temperature is set to a comfortable level.
- Open Vents and Registers: Make sure all vents are open and unobstructed to allow for proper airflow.
When to Call a Professional HVAC Technician
While DIY troubleshooting can be helpful, there are situations where it's best to call in the experts. Do not attempt to fix these issues yourself.
- Refrigerant Leaks: If you suspect a refrigerant leak (e.g., ice on the outdoor unit, poor cooling performance), do not attempt to handle the refrigerant yourself. Refrigerant is harmful to the environment and requires specialized equipment and training to handle properly.
- Electrical Problems: If you encounter any electrical issues beyond checking the circuit breaker, such as exposed wires or sparking, immediately turn off the power and call a qualified electrician or HVAC technician.
- Compressor Problems: The compressor is the heart of your air conditioning system. If you suspect a compressor issue (e.g., loud noises, failure to start), it's best to leave it to the professionals.
- Major Mechanical Issues: Any significant mechanical problems, such as a broken fan motor, damaged coils, or a malfunctioning blower, require professional diagnosis and repair.
- If You're Unsure: If you've gone through the troubleshooting steps and you're still unsure what the problem is, it's always best to err on the side of caution and call a qualified HVAC technician. They have the experience and expertise to diagnose and repair the problem safely and effectively.
- System is Old or Inefficient: If your system is very old (15+ years), it may be operating inefficiently regardless. Consider a new unit. You can search "Seasonal Energy Efficiency Ratio Near Me" to find qualified contractors who can provide you a home assessment and advise you on how to reduce energy costs and maximize energy efficiency.
Remember: Attempting to fix complex HVAC problems without the proper training and equipment can be dangerous and can potentially damage your system further. It's always best to prioritize safety and call a qualified professional when in doubt.
By following these troubleshooting steps, you can gain a better understanding of your HVAC system and identify potential problems. With a little effort, you might be able to resolve some of the simpler issues yourself, saving you time and money. However, always remember to prioritize safety and call a professional when necessary. A well-maintained HVAC system will provide years of comfortable and efficient service.