Size Of Mini Split Indoor Unit
Frequently Asked Questions About Mini Split Indoor Unit Size
Mini-split systems are an increasingly popular choice for heating and cooling individual rooms or zones. One key consideration when choosing a mini-split is the size of the indoor unit. This FAQ will address common questions about mini-split indoor unit size to help you make an informed decision.
Question 1: How do I determine the appropriate size (BTU) for my mini-split indoor unit?
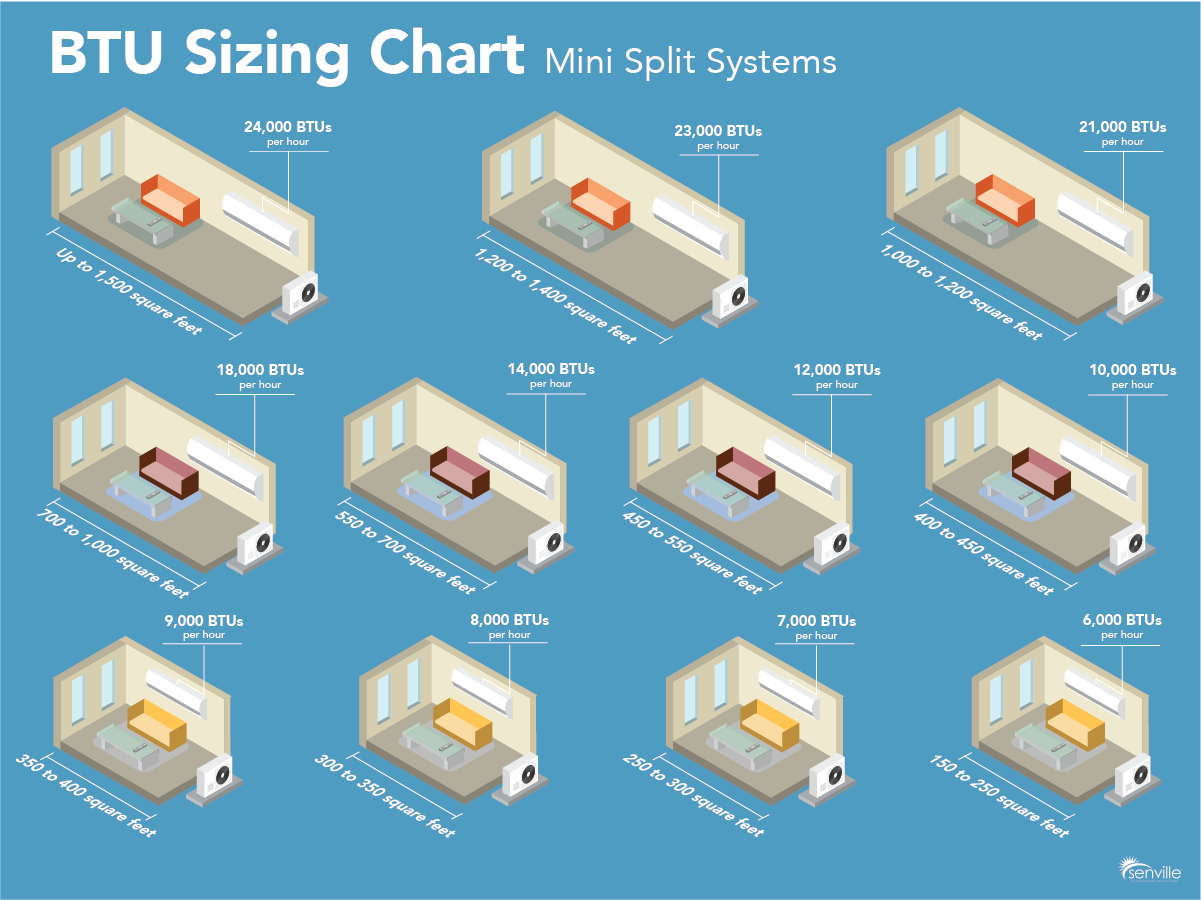
The size of your mini-split indoor unit, measured in BTUs (British Thermal Units), is crucial for efficient and effective heating and cooling. An undersized unit will struggle to maintain the desired temperature, while an oversized unit may cycle on and off too frequently, leading to discomfort and wasted energy. The ideal BTU rating depends on several factors:
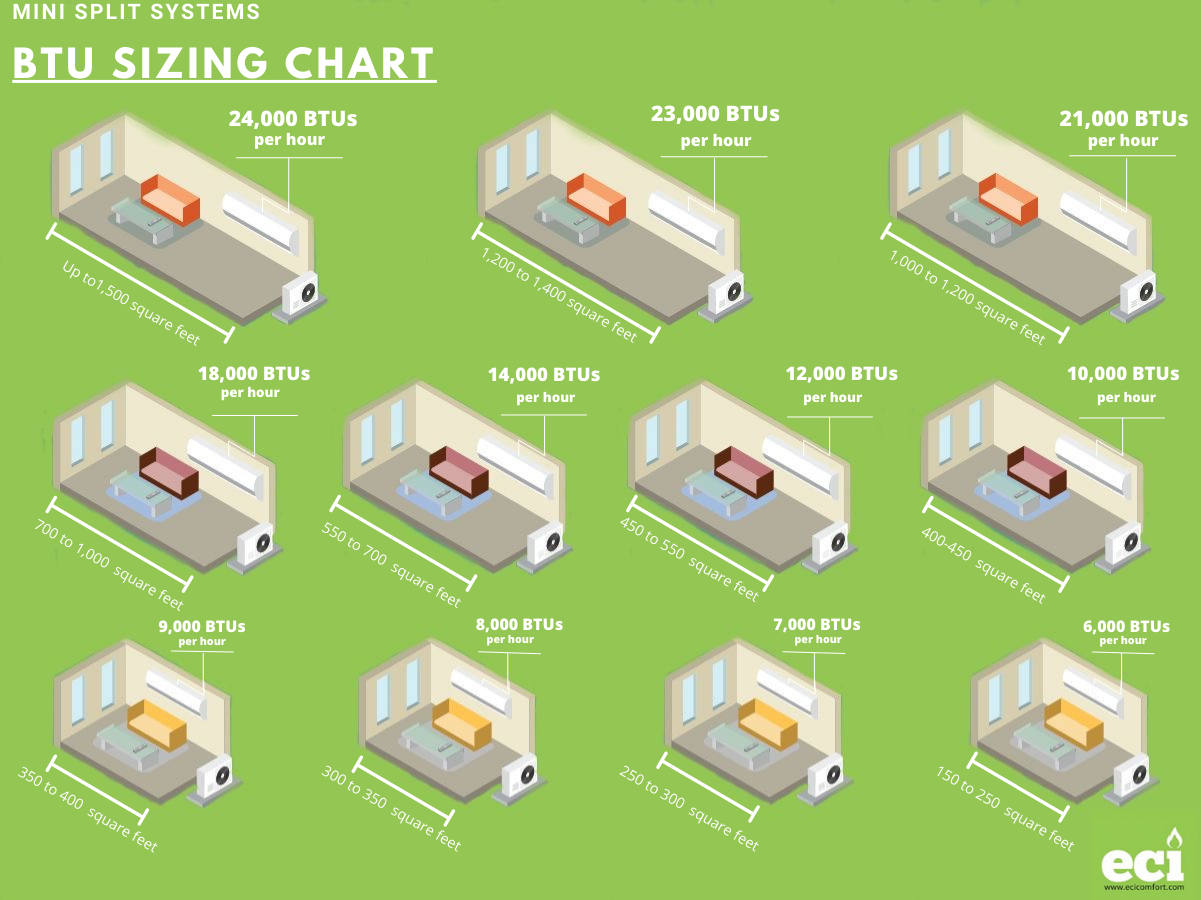
- Room Size: This is the most basic factor. A larger room generally requires a higher BTU rating. As a rule of thumb, you can estimate about 20 BTU per square foot of living space, but other factors (explained below) also have to be considered.
- Climate: If you live in an area with extreme temperatures (very hot summers or very cold winters), you'll need a unit with a higher BTU rating compared to a milder climate.
- Insulation: Well-insulated rooms require less BTU power to maintain a consistent temperature. Poorly insulated rooms lose heat (in winter) or gain heat (in summer) more easily, demanding a higher BTU rating.
- Windows: Large or numerous windows can significantly impact the heating and cooling load. Windows allow sunlight and heat to enter (or escape), increasing the BTU requirement. Single-pane windows are particularly inefficient.
- Sun Exposure: Rooms that receive direct sunlight throughout the day will require a higher BTU rating to compensate for the increased heat gain.
- Occupancy: The number of people who regularly occupy the room also affects the BTU requirement. Each person generates heat, so a room with multiple occupants needs a slightly larger unit.
- Heat-Generating Appliances: Appliances like computers, TVs, and kitchen equipment generate heat. If these are heavily used in the room, you should factor in the additional heat load.
How to calculate roughly the proper BTU:
- Square Footage: Measure the length and width of your room in feet and multiply them to find the square footage.
- Base BTU: Multiply the square footage by 20 BTU.
- Adjustments: Now, increase or decrease the BTU based on the factors above:
- Sunlight: Add 10% if the room gets a lot of direct sunlight.
- Insulation: Decrease 10% for good insulation, increase 10% for poor insulation.
- Occupancy: Add 600 BTU for each additional person who regularly occupies the space.
- Kitchen: If it's a kitchen, add 4,000 BTU.
Example: A 200 square foot bedroom with good insulation, little sunlight, and typically occupied by one person would require approximately (200 sq ft x 20 BTU/sq ft) = 4,000 BTU. Because of the good insulation and little sunlight, you may even consider a unit a little smaller than 4,000 BTU, for example 3,500 BTU. Always consider the lower and upper limit and choose a unit that suits the middle ground, but never a unit too small for the area, as this may cause early system failure.
While these guidelines provide a good starting point, it's always best to consult with a qualified HVAC professional. They can perform a more accurate load calculation to determine the precise BTU requirement for your specific situation.
Question 2: What are the standard physical dimensions of a mini-split indoor unit and how much space do I need?
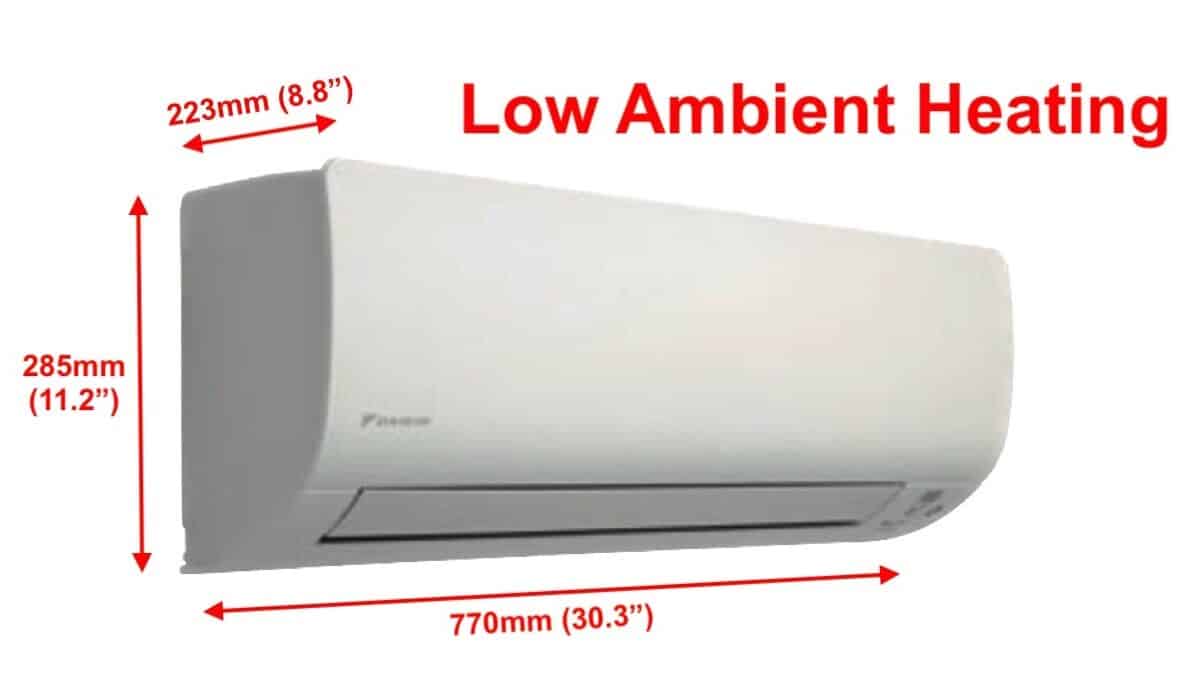
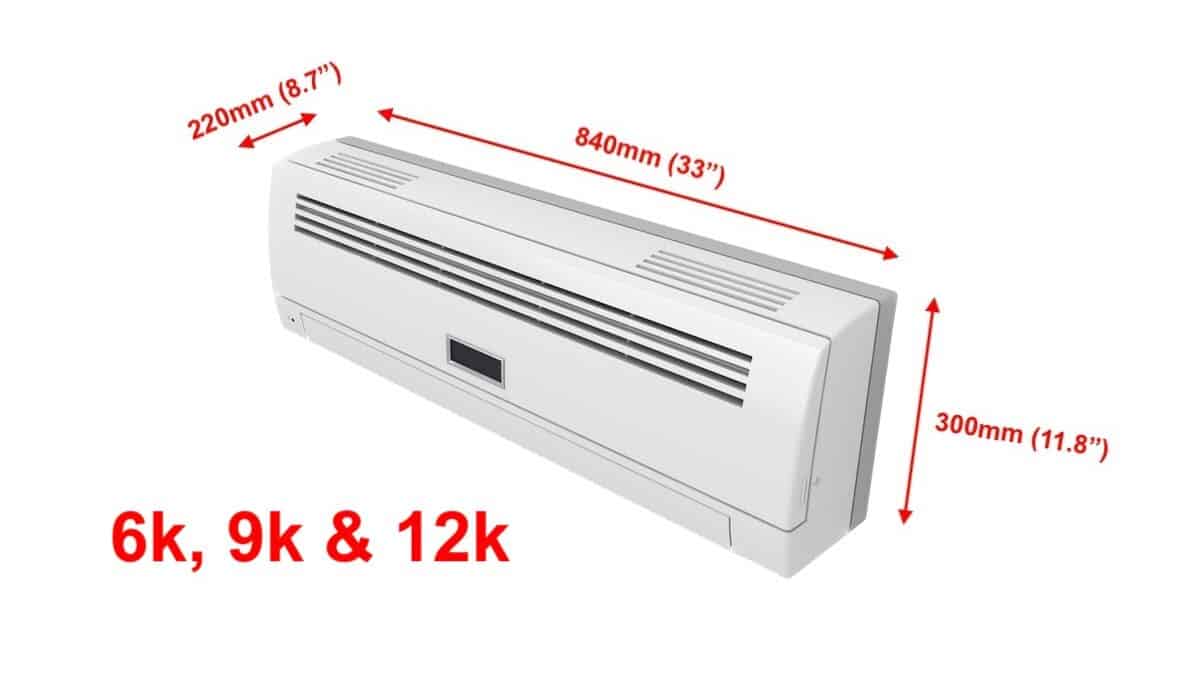
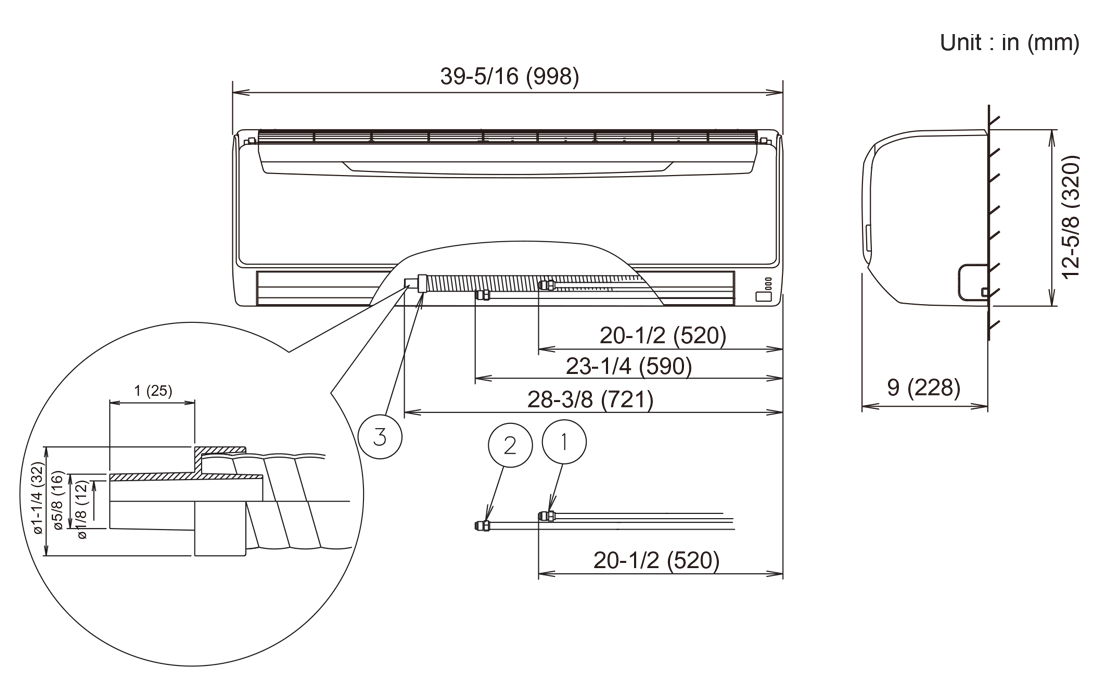
The physical dimensions of a mini-split indoor unit vary depending on the BTU rating and manufacturer, but they generally fall within a relatively consistent range. Typically, they are rectangular and designed to be mounted on a wall near the ceiling. Here are some approximate dimensions:
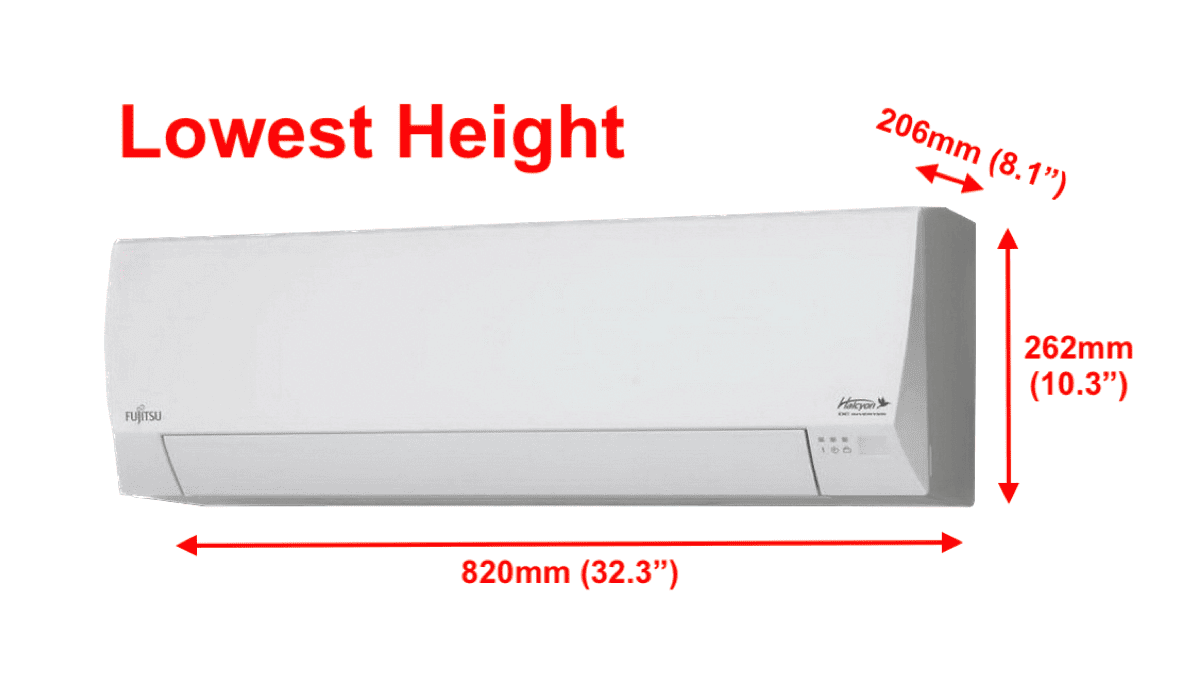
- Width: 30-40 inches (76-102 cm)
- Height: 10-13 inches (25-33 cm)
- Depth: 7-10 inches (18-25 cm)
Space Requirements:
- Wall Space: You need sufficient clear wall space to accommodate the unit's dimensions. Ensure there are no obstructions, such as furniture or shelving, that could block airflow.
- Clearance: It's crucial to maintain adequate clearance around the unit for proper airflow. The manufacturer's instructions will specify the recommended clearances, but generally, you should allow at least 6 inches above the unit, 6 inches below, and several inches on either side. This helps ensure that the unit can draw air in and discharge it effectively.
- Wiring and Refrigerant Lines: Consider the location of the wiring and refrigerant lines that will connect the indoor unit to the outdoor unit. These lines need to be routed discreetly and safely, so factor in the space required for this.
- Service Access: You'll need to be able to access the unit for maintenance and repairs. Make sure the installation location allows for easy access by a technician.
Always consult the manufacturer's specifications for the specific model you're considering to get the most accurate dimensions and clearance requirements. Planning the installation carefully is essential to ensure proper operation and ease of maintenance.
Question 3: Does the style or type of mini-split indoor unit (wall-mounted, ceiling cassette, floor-mounted) affect its size?
Yes, the style of the mini-split indoor unit significantly impacts its size and dimensions. Each type is designed for different applications and has unique physical characteristics:
- Wall-Mounted Units: These are the most common type and are typically rectangular. As mentioned earlier, they range in width from 30-40 inches, height from 10-13 inches, and depth from 7-10 inches. Wall-mounted units are generally the least obtrusive and are suitable for most rooms.
- Ceiling Cassette Units: These units are designed to be recessed into the ceiling, making them less visible. They are typically square, with dimensions ranging from 24x24 inches to 36x36 inches. Ceiling cassettes require sufficient space above the ceiling to accommodate the unit's depth and ductwork. They offer more even air distribution compared to wall-mounted units.
- Floor-Mounted Units: These units are installed at floor level, similar to a radiator. They are typically taller and narrower than wall-mounted units, with a height of around 20-30 inches and a width of around 24-36 inches. Floor-mounted units are a good option for rooms with limited wall space or where aesthetics are a priority.
- Ductless Mini Split Air Handlers (Slim Ducts): These are designed to be hidden inside ceilings or walls and connected to ductwork. They require significantly more space to accommodate the duct system and, depending on the model and desired BTU rating, could be much larger than conventional indoor units.
The choice of style depends on the specific requirements of the room and your personal preferences. Consider the available space, the desired level of visibility, and the desired airflow pattern when selecting the type of indoor unit.
Question 4: What happens if I choose an indoor unit that is too small or too large for the room?
Choosing the wrong size mini-split indoor unit can lead to several problems:
- Undersized Unit:
- Insufficient Heating/Cooling: The unit will struggle to maintain the desired temperature, especially during extreme weather conditions.
- Continuous Operation: The unit will run constantly, trying to reach the setpoint, which can lead to increased energy consumption and higher utility bills.
- Shortened Lifespan: Constant operation puts extra strain on the unit, potentially shortening its lifespan.
- Uneven Temperatures: Some areas of the room may be cooler or warmer than others due to the unit's inability to effectively circulate air.
- Oversized Unit:
- Short Cycling: The unit will cool or heat the room quickly and then shut off, only to start again a short time later. This frequent on-off cycling is inefficient and can lead to temperature fluctuations.
- Poor Dehumidification: Oversized units often cool the air too quickly without removing sufficient moisture, resulting in a damp and uncomfortable environment.
- Increased Wear and Tear: Short cycling puts extra stress on the unit's components, potentially leading to premature failure.
- Higher Initial Cost: Larger units are generally more expensive to purchase.
Sizing is everything! Ensuring that your mini-split system is correctly sized will provide you with optimal comfort, cost savings, and the longest life span for your equipment. Always have an HVAC professional provide an accurate load calculation for your specific space.
Question 5: Are there specific mounting height requirements for mini-split indoor units?
Yes, there are recommended mounting heights for mini-split indoor units, although these can vary slightly depending on the model and manufacturer. Generally, wall-mounted units are installed near the ceiling, typically:
- Minimum Height: At least 6 inches from the ceiling.
- Optimal Height: About 7 to 8 feet from the floor.
Reasons for Mounting Height Recommendations:
- Air Circulation: Mounting the unit high on the wall allows for better air circulation throughout the room. Warm air rises, so placing the unit near the ceiling helps it distribute cool air more effectively. Conversely, placing it high enables better circulation of warm air that rises naturally during the winter.
- Obstructions: Mounting the unit too low can obstruct airflow and reduce its efficiency. Furniture or other objects could block the air intake or outlet.
- Safety: Mounting the unit at a safe height prevents accidental contact and reduces the risk of damage.
- Aesthetics: Mounting the unit at a consistent height creates a cleaner and more visually appealing installation.
Floor-mounted units are designed to be installed at floor level, so there are no specific height requirements. Ceiling cassette units are flush-mounted to the ceiling so height requirements concern the dimensions of the available cavity space for the unit and its associated ductwork above the ceiling.
Always refer to the manufacturer's installation instructions for the specific model you're installing. These instructions will provide detailed guidance on the recommended mounting height and clearance requirements.
Question 6: Do mini split brands usually have different sizes for similar BTU ratings?
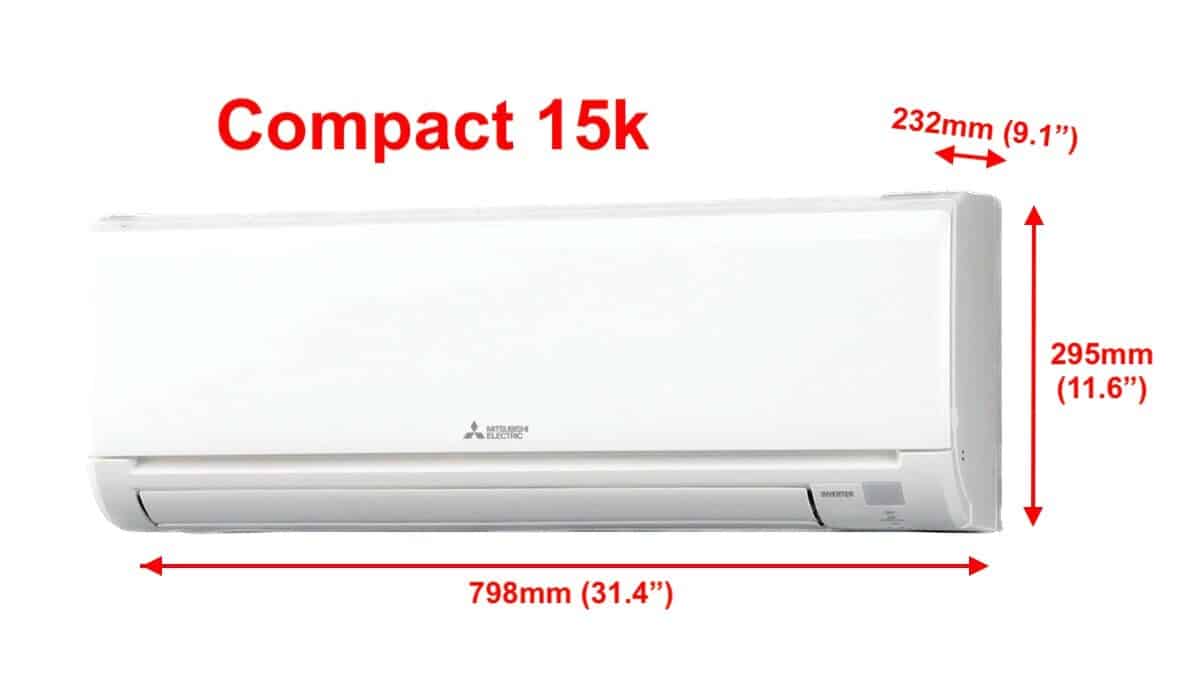
Yes, different mini-split brands and even different models within the same brand can have variations in physical sizes for similar BTU ratings. While the cooling and heating capacity (BTUs) might be the same, the dimensions of the indoor unit can differ due to factors like:
- Design and Aesthetics: Manufacturers often prioritize design and aesthetics, leading to variations in the shape and size of the units. Some brands may opt for a sleeker, more compact design, while others may prioritize maximizing airflow with a larger unit.
- Component Placement: The internal layout and placement of components like the fan, heat exchanger, and control board can affect the overall dimensions of the unit.
- Material Selection: The materials used in construction can also influence the size. Some manufacturers may use lighter or more compact materials, resulting in a smaller unit.
- Features: Advanced features like built-in air purification systems or smart controls can add to the unit's size.
Because of these differences, it's important to always check the specific dimensions of the model you're considering, rather than assuming that all units with the same BTU rating will have the same size. This is especially important if you have limited space or specific aesthetic requirements.
Question 7: Can I hide my mini split indoor unit? Are there any aesthetic considerations regarding size?
While mini-split indoor units are designed to be relatively unobtrusive, some homeowners prefer to conceal them for aesthetic reasons. Here are some considerations and options:
- Concealing Options:
- Decorative Covers: You can purchase decorative covers that fit over the indoor unit, blending it in with the room's décor. These covers are available in various styles and materials.
- Custom Enclosures: You can build a custom enclosure around the unit, such as a cabinet or shelving unit. This allows you to completely hide the unit and integrate it seamlessly into the room's design. When building an enclosure, ensure that adequate ventilation is provided to avoid overheating.
- Paint or Wrap: Although not advised for all models, you could consider painting the unit, or applying a vinyl wrap to match your wall color, or room color scheme. This can make the unit less noticeable. Check with the manufacturer regarding the impact on warranty and unit operations.
- Strategic Placement: Sometimes, simply placing the unit strategically can minimize its visual impact. For example, you could mount it above a doorway or behind a piece of furniture.
- Things to consider when thinking about concealing the indoor unit:
- Airflow: Ensure that any concealment method does not restrict airflow to or from the unit. Restricted airflow will reduce efficiency and can damage the unit.
- Accessibility: Make sure the unit remains accessible for maintenance and repairs.
- Heat Dissipation: Consider how the concealment method will affect heat dissipation. The unit needs to be able to dissipate heat effectively to operate efficiently.
From an aesthetic perspective, consider the size and style of the unit in relation to the room's overall design. A smaller, more streamlined unit may be less obtrusive and easier to integrate into the décor. If you're concerned about aesthetics, explore the various concealing options available and choose a solution that meets your needs without compromising performance. Remember to always check the manufacturer's recommendations and consult with a qualified HVAC professional for advice.