Strongback Ceiling Joist
This article focuses on troubleshooting issues related to your strongback ceiling joist, a critical structural element often overlooked until problems arise. We'll cover common signs of trouble, what causes them, and how you can assess and potentially address them. Remember, structural repairs can be complex and involve safety considerations. When in doubt, consult a qualified contractor or structural engineer.
Understanding Your Strongback Ceiling Joist
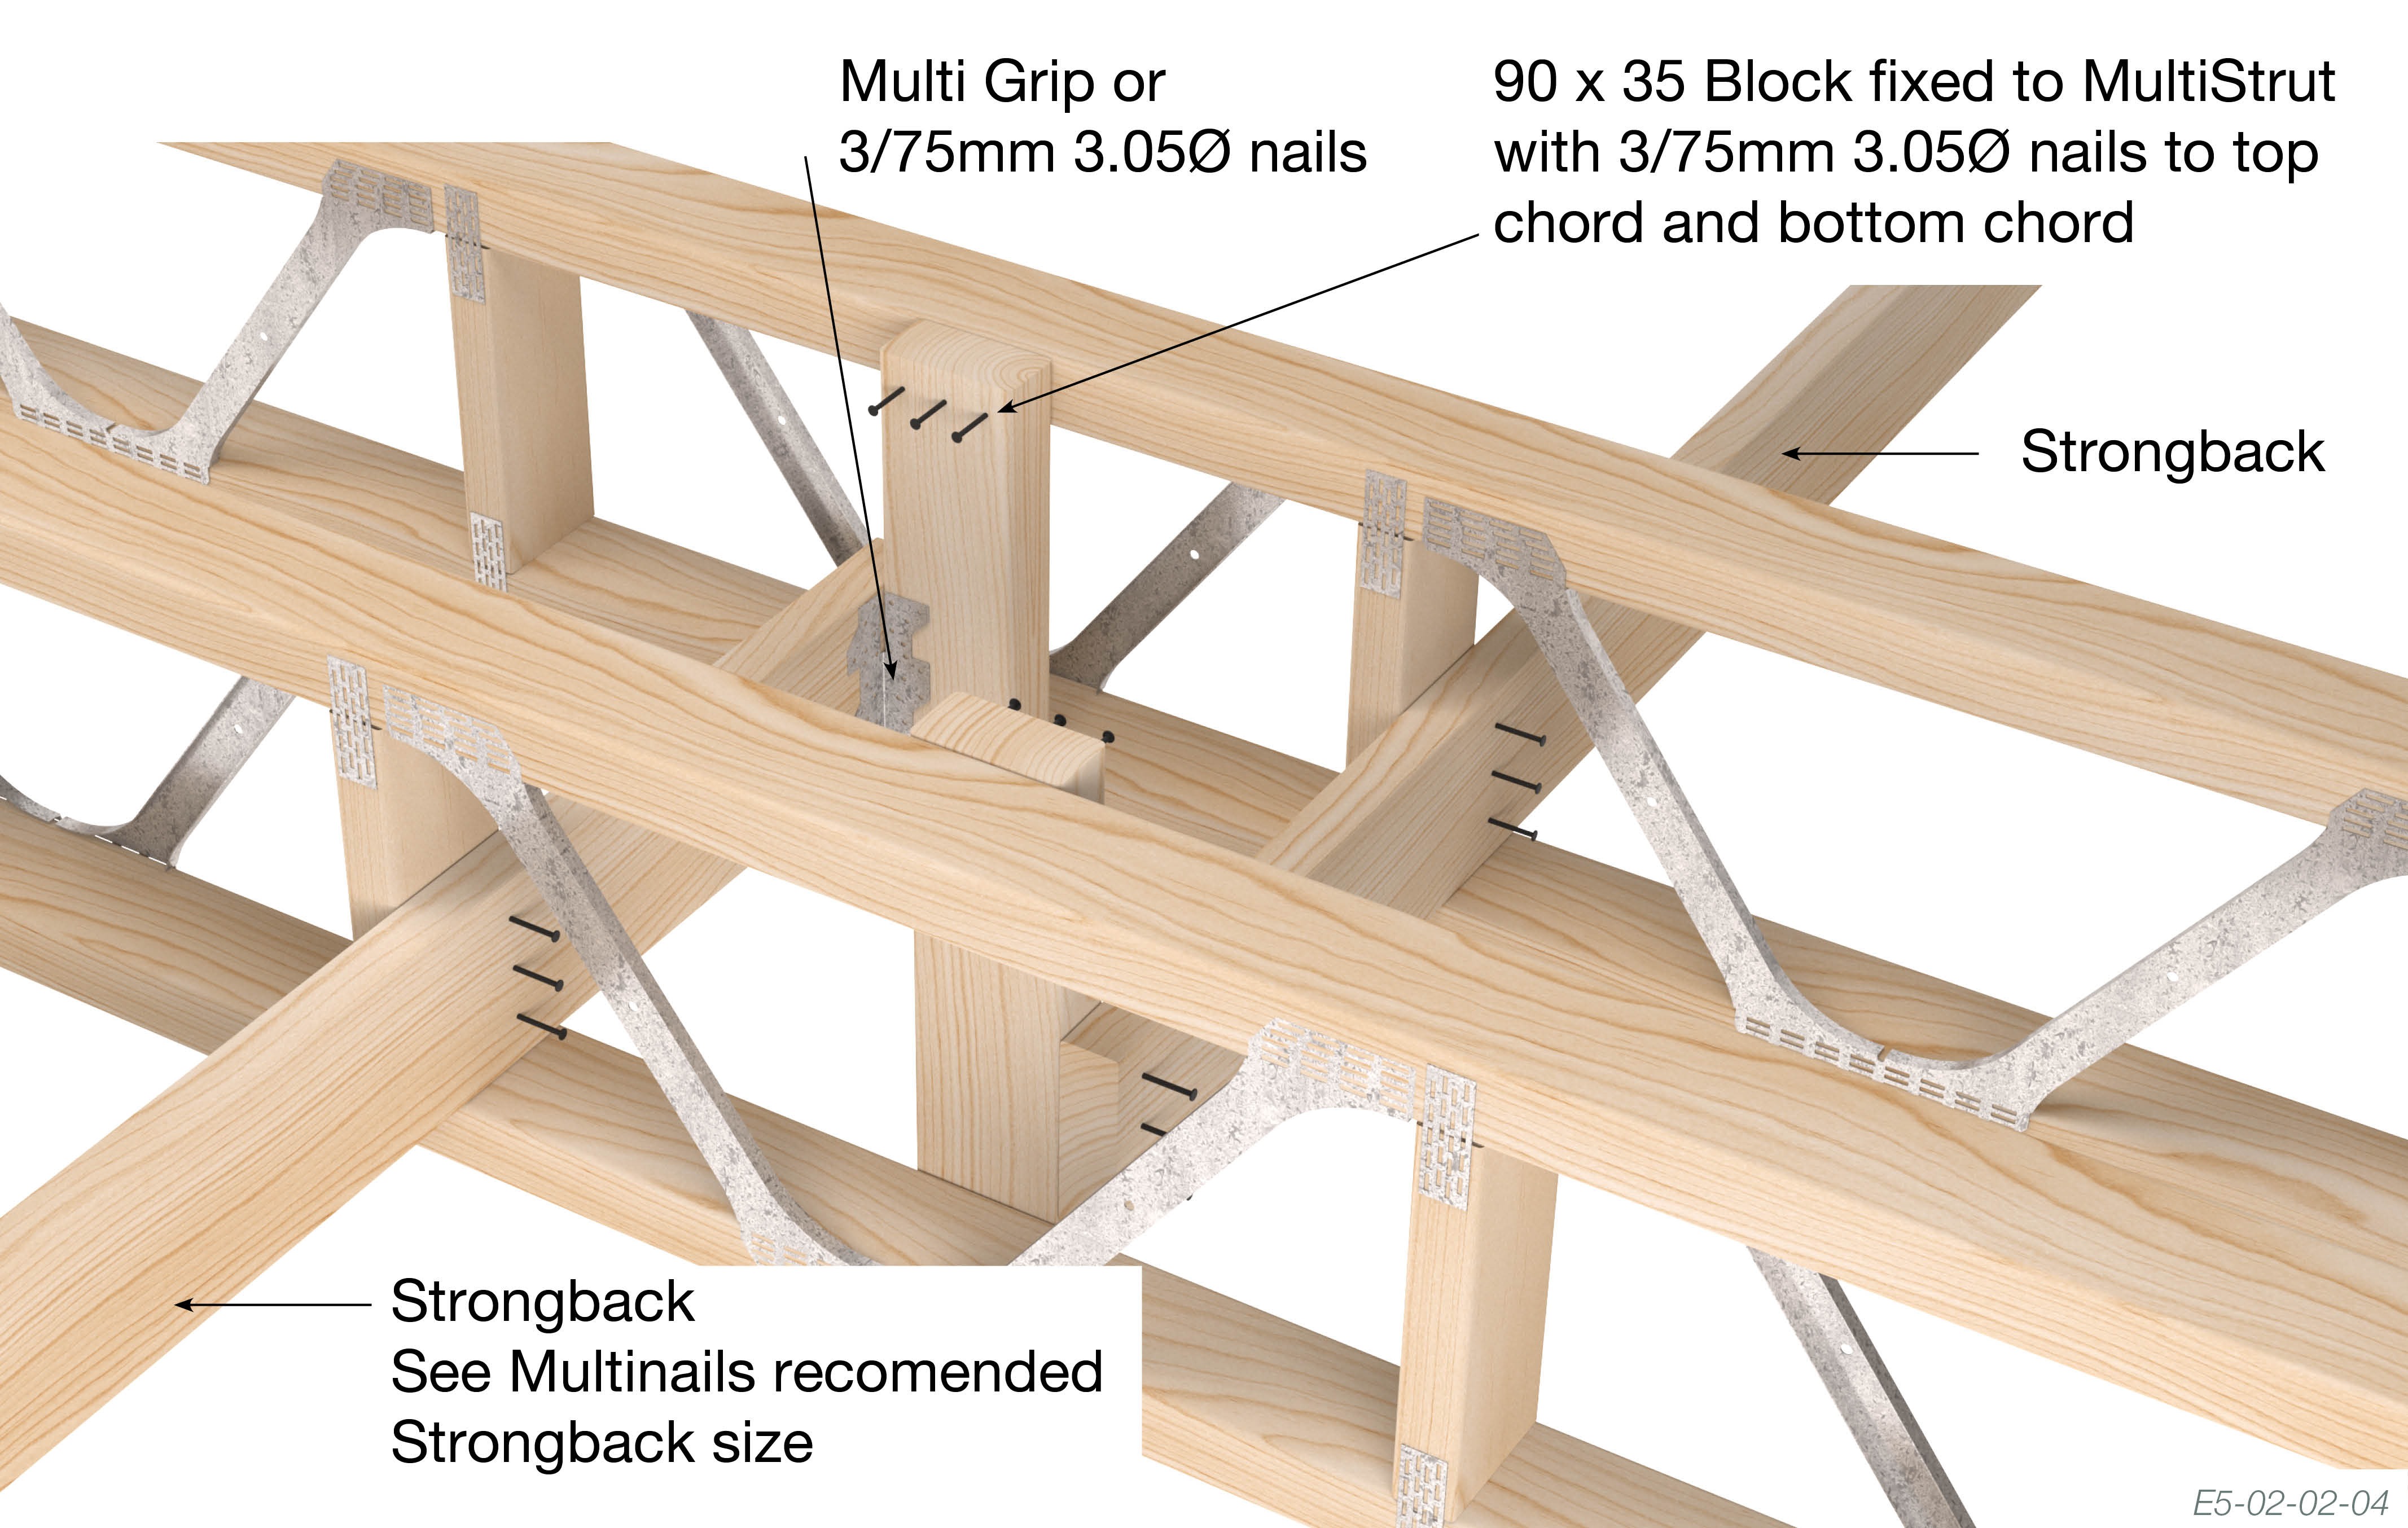
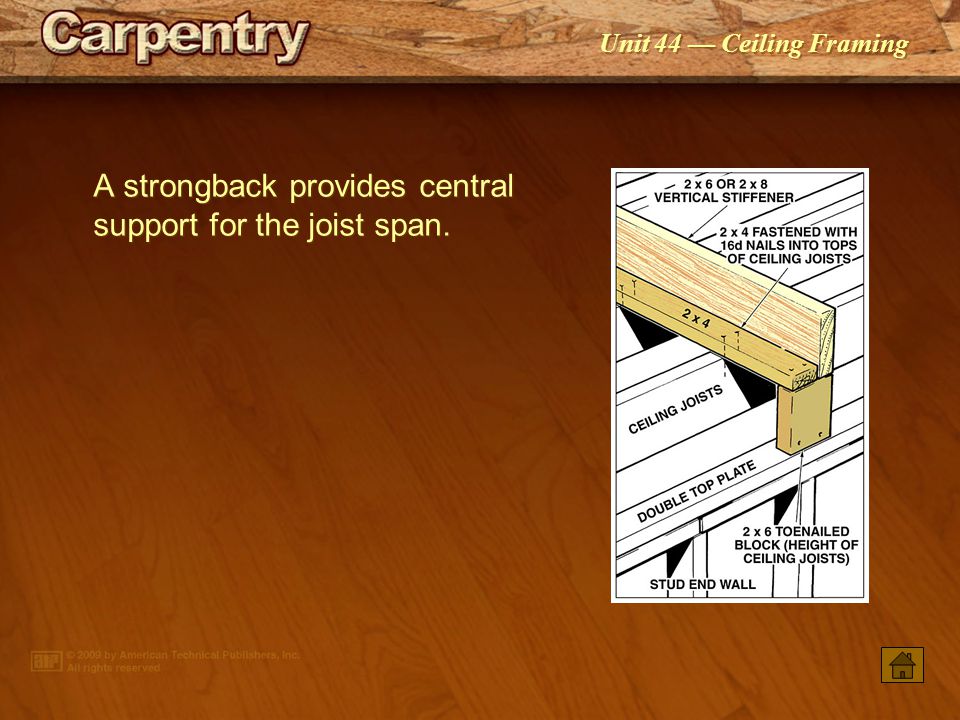
Before troubleshooting, let's define what a strongback is. A strongback ceiling joist (often simply called a strongback) is a horizontal support member typically installed perpendicularly to your ceiling joists. Its purpose is to:
- Reduce joist deflection (sagging), especially over long spans.
- Distribute loads across multiple joists, preventing one joist from bearing the full weight.
- Help prevent twisting or lateral movement of the joists.
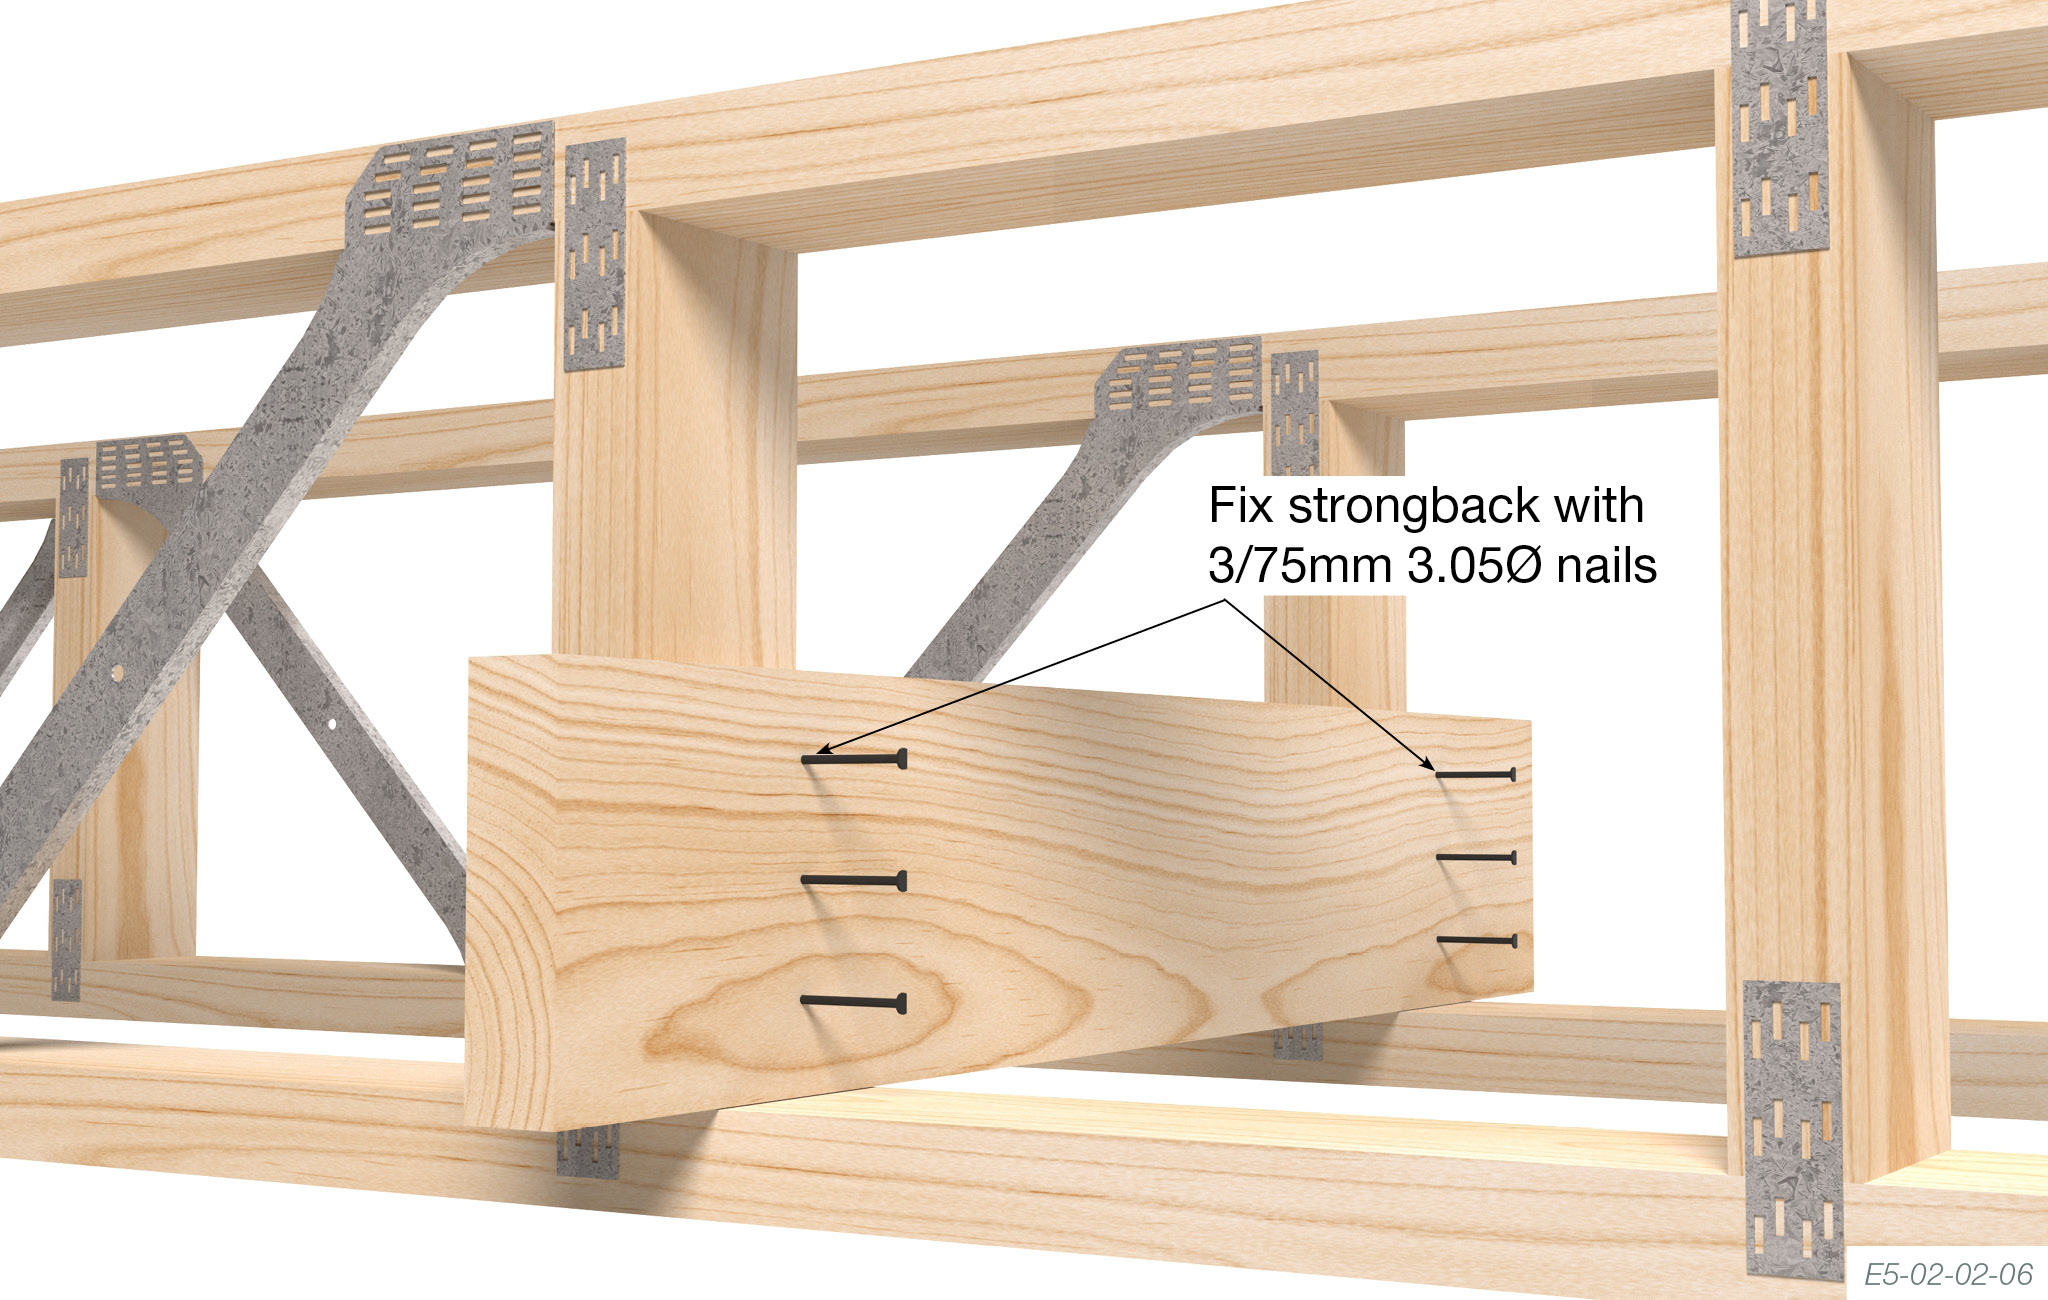
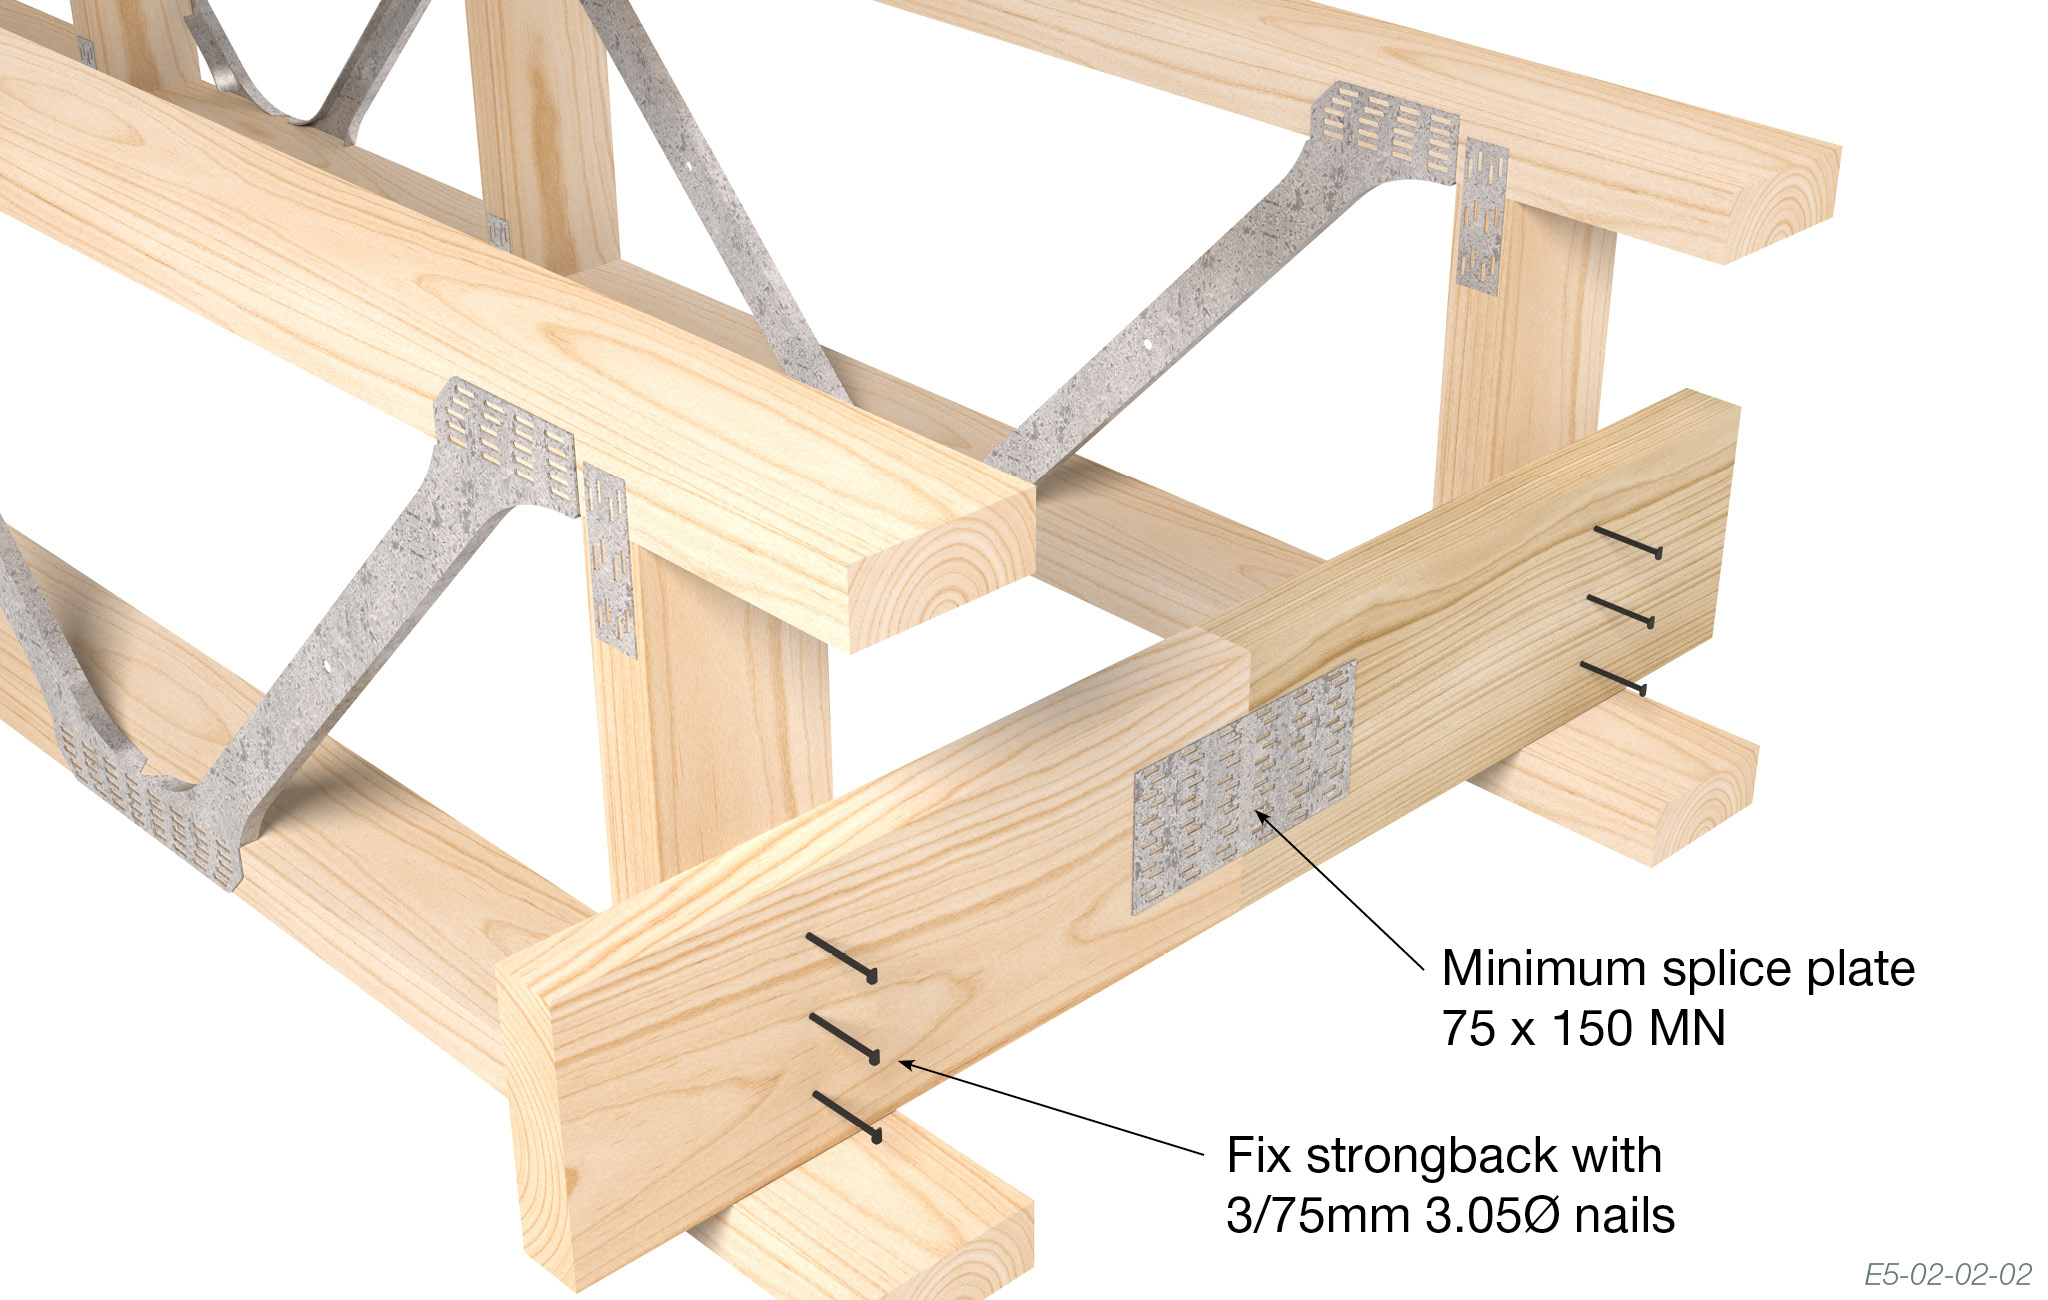
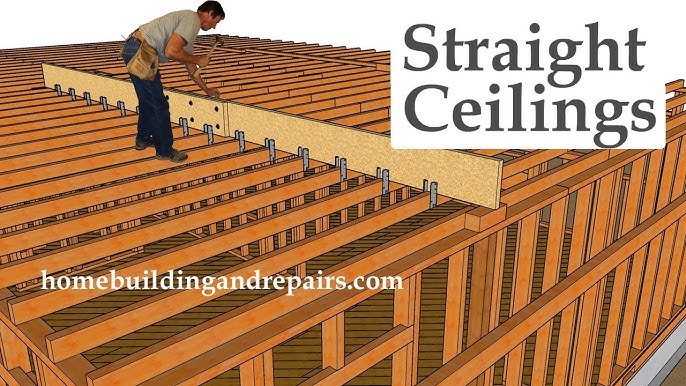
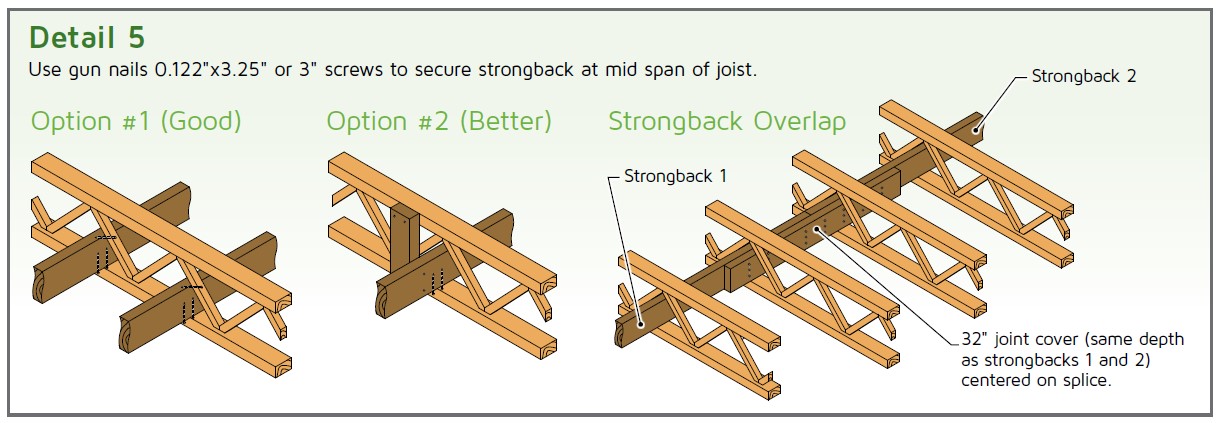
Strongbacks significantly contribute to a more stable and level ceiling. They are usually made of lumber, similar in dimensions to the ceiling joists themselves. Installation methods vary, but they are often nailed or screwed to the sides of the joists.
Common Symptoms of a Strongback Ceiling Joist Problem
Detecting a problem early can prevent further damage and costly repairs. Here are common signs to look for:
- Ceiling cracks: New or widening cracks, especially those running perpendicular to the joists, can indicate excessive deflection or movement. Hairline cracks are usually not cause for concern, but monitor them.
- Sagging ceilings: A visible dip or unevenness in the ceiling is a clear sign of structural issues. Use a long level or string line to check for sagging.
- Bouncing floors above: If you notice excessive floor bounce when walking upstairs, it could be related to issues with the ceiling joists or the strongback system.
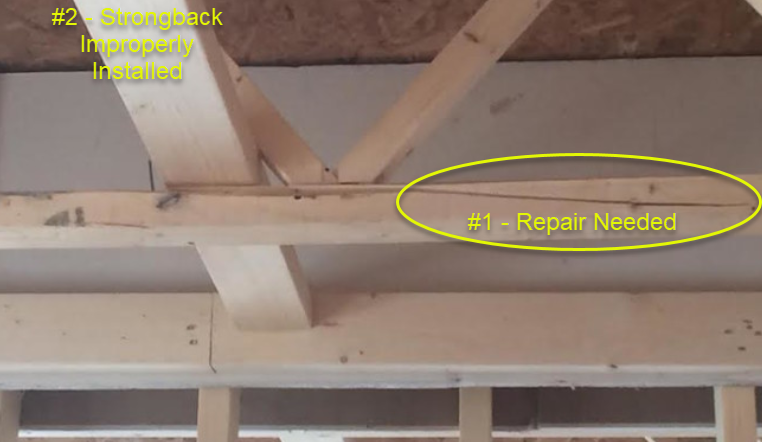
- Nails popping or screws loosening: This suggests movement and stress on the connections.
- Visible gaps or separation between the strongback and the joists.
- Water stains: While not directly caused by a weak strongback, water damage weakens wood. Check if leaks have compromised the integrity of the joists and strongbacks.
Troubleshooting Steps
The following steps provide a structured approach to diagnosing strongback ceiling joist problems. Always prioritize safety when working in attics or crawl spaces. Wear appropriate safety gear, including eye protection, gloves, and a dust mask. Ensure adequate lighting.
Step 1: Initial Assessment and Safety Check
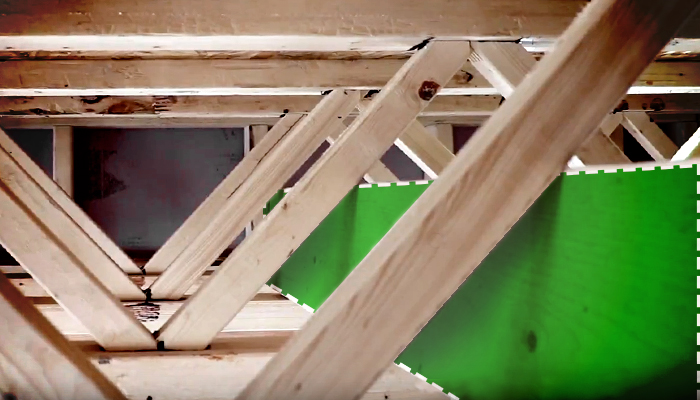
- Access the Area: Safely access the attic or crawl space where the ceiling joists and strongbacks are located.
- Visual Inspection: Conduct a thorough visual inspection of the entire area. Look for any of the symptoms listed above. Take photos or videos to document your findings.
- Safety First: Before proceeding, check for any electrical wiring or plumbing that may be near the strongbacks or joists. Never work near exposed wiring or leaking pipes. Consult a qualified professional if you encounter these hazards. Ensure the area is well-ventilated, especially if you suspect mold or mildew.
Step 2: Identifying the Problem Area
- Locate the Source: Try to pinpoint the specific area where the problem is most pronounced. For example, is the sagging concentrated in one section of the ceiling? Are the cracks localized?
- Measure Deflection: Use a long level (at least 4 feet) or a string line to measure the amount of deflection (sag). Place the level across the joists and measure the distance between the level and the lowest point of the sag. This measurement will help you track progress if you attempt repairs.
- Check for Rot or Damage: Carefully inspect the wood for signs of rot, insect damage (termites, carpenter ants), or water damage. Use a screwdriver to probe the wood. If the screwdriver easily penetrates the wood, it is likely damaged and needs to be addressed.
Step 3: Evaluating the Strongback and Joist Connections
- Inspect Fasteners: Examine the nails or screws connecting the strongback to the joists. Are they loose, rusted, or missing? Are they the correct type and size for the application?
- Check for Gaps: Look for gaps between the strongback and the joists. A small gap (less than 1/8 inch) may be acceptable, but larger gaps indicate a loss of connection.
- Assess Joist Condition: While examining the strongback, also check the condition of the ceiling joists themselves. Look for cracks, knots, warping, or any other signs of weakness.
Step 4: Addressing Minor Issues (DIY Possible with Caution)
Only attempt the following repairs if you are comfortable working with hand tools and have a basic understanding of carpentry. If you are unsure about any step, consult a qualified professional.
- Tightening Loose Fasteners: If the nails or screws are loose, try tightening them with a screwdriver or drill. If they are stripped, replace them with slightly larger screws. Consider using construction adhesive in addition to screws for a stronger connection.
- Adding Additional Fasteners: If the existing fasteners seem inadequate, add more screws to reinforce the connection. Use screws that are long enough to penetrate deep into both the strongback and the joist. Pre-drilling pilot holes can prevent the wood from splitting.
- Shimming Gaps: If there are small gaps between the strongback and the joists, you can try shimming them with wood shims. Apply construction adhesive to the shims before inserting them into the gaps. Tap them in firmly to create a tight fit.
- Addressing Minor Rot: If you find small areas of superficial rot (not structural), you can treat them with a wood preservative. Follow the manufacturer's instructions carefully. Note: This is a temporary fix; severely rotted wood must be replaced.
Step 5: When to Call a Professional
The following situations require the expertise of a qualified contractor or structural engineer:
- Significant Sagging: If the ceiling is sagging more than an inch or two, it is likely a sign of a serious structural problem that requires professional evaluation.
- Widespread Cracking: Extensive or rapidly worsening cracks are a cause for concern and should be inspected by a professional.
- Structural Damage: Any evidence of significant rot, insect damage, or cracks in the joists themselves requires professional attention.
- Water Damage: If water damage has compromised the integrity of the joists or strongbacks, a professional is needed to assess the extent of the damage and recommend appropriate repairs.
- Unsure or Uncomfortable: If you are uncomfortable performing any of the troubleshooting steps or repairs, or if you are unsure about the cause of the problem, it is always best to consult a professional.
- Modifying Load-Bearing Structures: Never attempt to modify or remove load-bearing structural elements without consulting a structural engineer. This includes any major repairs or alterations to the ceiling joists or strongbacks.
- Working with Electrical or Plumbing: If the repair involves working near electrical wiring or plumbing, leave it to licensed professionals.
Preventive Measures
Taking proactive steps can help prevent future problems with your strongback ceiling joists:
- Regular Inspections: Inspect your attic or crawl space annually for any signs of water damage, rot, or insect infestation.
- Maintain Proper Ventilation: Ensure adequate ventilation in the attic or crawl space to prevent moisture buildup, which can lead to rot.
- Address Leaks Promptly: Repair any roof leaks or plumbing leaks immediately to prevent water damage.
- Control Humidity: Use a dehumidifier in damp areas to reduce humidity levels.
- Professional Inspections: Consider having a professional conduct a structural inspection every few years, especially if your home is older or has a history of structural problems.
Conclusion
Troubleshooting strongback ceiling joist problems requires a careful and systematic approach. By understanding the function of the strongback, recognizing common symptoms, and following the troubleshooting steps outlined in this article, you can assess the situation and potentially address minor issues yourself. However, always prioritize safety and do not hesitate to consult a qualified professional when dealing with significant structural problems or when you are unsure about any aspect of the repair. A proactive approach to maintenance and timely intervention can help ensure the long-term stability and safety of your home.