Supply And Return Air Duct Placement

Imagine this: It's a sweltering summer day, or a frigid winter evening, and your HVAC system just isn't cutting it. Some rooms are stuffy and hot, others are drafty and cold. You've checked the thermostat, the filter's clean, and the unit seems to be running, but the temperature is all over the place. What's going on? Often, the culprit is something many homeowners overlook: the placement of your supply and return air ducts.
Understanding Supply and Return Air Duct Basics
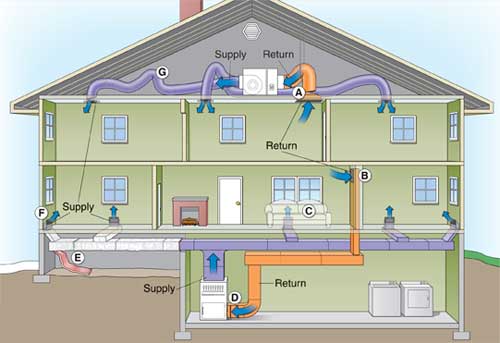
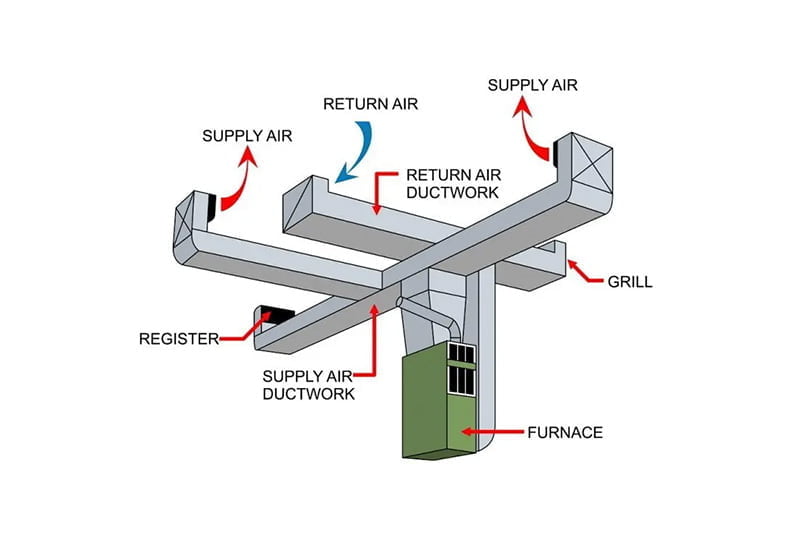
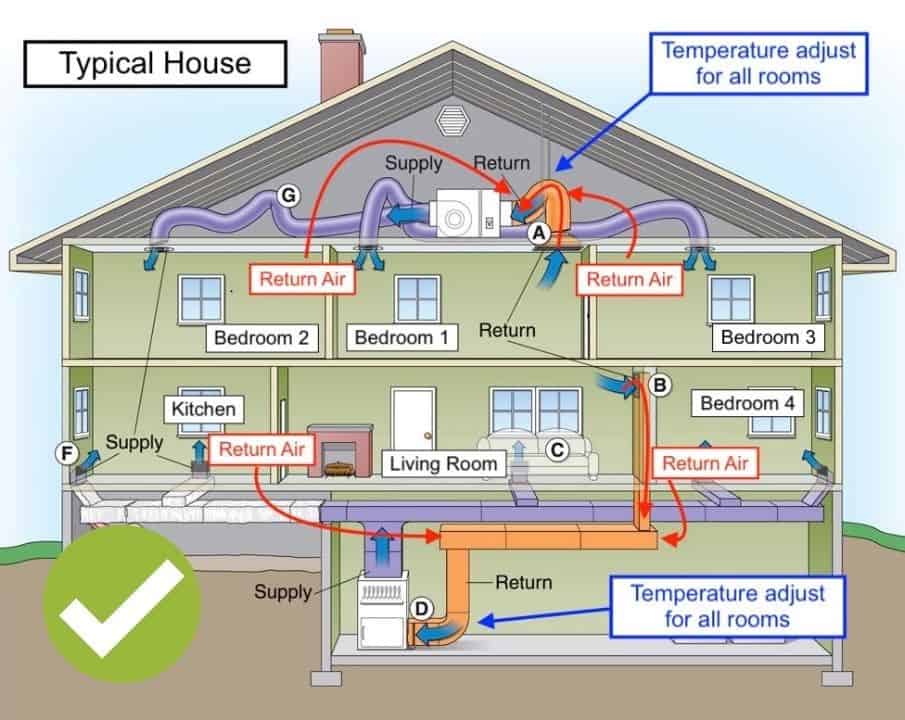
Before we dive into troubleshooting, let's quickly recap what supply and return air ducts do. Supply ducts are the pathways that deliver conditioned air (heated or cooled) from your HVAC unit into your rooms. Return ducts draw air from the rooms back to the HVAC unit to be reconditioned. Proper placement of these ducts is crucial for even temperature distribution and efficient system operation.
Troubleshooting Uneven Temperatures: A Step-by-Step Guide
Here's a logical approach to diagnosing and addressing issues related to supply and return air duct placement. Remember, safety first. If you're uncomfortable working with any part of your HVAC system, or if you suspect a gas leak or electrical problem, call a qualified professional immediately.
Step 1: Preliminary Checks
- Thermostat Settings: Double-check your thermostat settings. Is it set to "Heat" or "Cool" correctly? Is the fan set to "Auto" or "On"? Setting the fan to "On" can help circulate air more evenly, but it also uses more energy.
- Air Filter: A clogged air filter restricts airflow, which can impact the performance of your system and create temperature imbalances. Replace your air filter regularly (typically every 1-3 months).
- Registers and Vents: Make sure all supply and return air registers and vents are open and unobstructed. Furniture, rugs, or curtains can block airflow.
- HVAC Unit Operation: Listen to your HVAC unit. Is it cycling on and off frequently? Is it making unusual noises? If so, there may be a problem with the unit itself, not just the ductwork. Consult a professional if you suspect a mechanical issue.
Step 2: Identifying Problem Areas
Walk through your home and identify the rooms that are consistently too hot or too cold. Note which rooms have supply and return air vents. This will help you narrow down the potential causes.
- Record Temperatures: Use a thermometer to measure the temperature in each room. Note the time of day and outdoor temperature when you take the measurements. This will provide a baseline for comparison.
- Airflow Assessment: Feel the airflow coming from each supply vent. Is it strong, weak, or non-existent? Also, check the airflow at the return vents. You should feel air being drawn in.
- Visual Inspection of Ductwork (If Accessible): If you have access to exposed ductwork in your basement, attic, or crawlspace, look for obvious problems such as:
- Disconnected Ducts: Gaps or separations in ductwork can lead to significant air leaks.
- Damaged Ducts: Dents, tears, or punctures in the ductwork can also cause leaks.
- Uninsulated Ducts: Ducts located in unconditioned spaces (like attics) should be properly insulated to prevent heat loss or gain.
Step 3: Addressing Common Ductwork Issues
Based on your observations, you can attempt some basic DIY fixes.
Addressing Air Leaks
Air leaks are a common problem that can significantly reduce the efficiency of your HVAC system. Sealing these leaks can improve temperature consistency and lower energy bills.
- Materials Needed:
- Aluminum Foil Tape: This is the preferred tape for sealing ductwork because it is heat-resistant and durable. Do not use duct tape, as it tends to dry out and crack over time.
- Mastic Sealant: A brush-on sealant that provides a more airtight seal than tape alone.
- Procedure:
- Clean the Area: Wipe down the area around the leak with a clean cloth to remove any dust or debris.
- Apply Mastic Sealant: Apply a thin layer of mastic sealant to the joint or seam. Let it dry according to the manufacturer's instructions.
- Apply Aluminum Foil Tape: Overlap the mastic sealant with aluminum foil tape, pressing firmly to ensure a good seal.
- Reinforce Large Gaps: For larger gaps, you may need to use a combination of fiberglass mesh tape and mastic sealant.
- Safety Note: Turn off your HVAC system before working on any ductwork.
Improving Insulation
Uninsulated or poorly insulated ducts in unconditioned spaces can lose a significant amount of heat in the winter and gain heat in the summer. Adding insulation can improve efficiency and temperature consistency.
- Materials Needed:
- Fiberglass Duct Wrap: This is a common type of insulation for ductwork.
- Foil-Faced Bubble Wrap Insulation: Another option, offering good insulation and ease of installation.
- Aluminum Foil Tape: To seal the insulation.
- Procedure:
- Measure and Cut: Measure the length and circumference of the duct and cut the insulation to size.
- Wrap the Duct: Wrap the insulation around the duct, ensuring that it overlaps slightly.
- Secure the Insulation: Use aluminum foil tape to secure the insulation in place, sealing all seams and edges.
- Safety Note: Wear gloves and a dust mask when working with fiberglass insulation. Turn off your HVAC system before working on any ductwork.
Balancing Airflow with Damper Adjustments
Many ductwork systems have dampers, which are adjustable plates inside the ducts that control airflow. These can be used to fine-tune the amount of air delivered to different rooms.
- Locate Dampers: Dampers are typically located near the main trunk lines of the ductwork, often accessible through small access panels.
- Identify the Lever: Dampers have a lever or handle that indicates their position.
- Adjust the Damper:
- To Increase Airflow: Open the damper further by moving the lever towards the "open" position.
- To Decrease Airflow: Close the damper slightly by moving the lever towards the "closed" position.
- Test and Adjust: After making an adjustment, wait a few hours and then re-check the temperature and airflow in the affected rooms. Repeat the process as needed until you achieve a more balanced temperature.
- Caution: Don't completely close off any dampers, as this can put undue stress on your HVAC system. If you are unsure how to adjust the dampers, consult a professional.
Step 4: When to Call a Professional
While the above steps can address many common ductwork issues, there are situations that require professional expertise.
- Complex Ductwork Issues: If you suspect that your ductwork system is poorly designed or improperly sized, it's best to consult with a qualified HVAC contractor. They can perform a load calculation to determine the correct duct size and layout for your home.
- Asbestos Concerns: If you have an older home (built before the 1980s), your ductwork may contain asbestos. Do not attempt to remove or repair asbestos-containing materials yourself. Contact a licensed asbestos abatement professional.
- Mold Growth: If you find mold growth inside your ductwork, it's important to address it promptly. Do not attempt to clean the mold yourself. Contact a professional mold remediation company.
- Gas Leaks: If you suspect a gas leak near your furnace or ductwork, evacuate your home immediately and call your gas company or 911.
- Electrical Problems: If you suspect an electrical problem with your HVAC system, turn off the power to the unit at the breaker and call a qualified electrician.
- Refrigerant Leaks: If your AC unit is not cooling properly and you suspect a refrigerant leak, contact a qualified HVAC technician. Refrigerant is a hazardous substance that should only be handled by trained professionals.
Preventive Maintenance for Ductwork
Regular maintenance can help prevent ductwork problems and keep your HVAC system running efficiently.
- Regularly Inspect and Clean: Visually inspect your ductwork periodically for any signs of damage or leaks. Clean the registers and vents regularly to remove dust and debris.
- Change Air Filters Regularly: As mentioned earlier, a clean air filter is essential for maintaining good airflow.
- Seal Air Leaks Promptly: Address any air leaks as soon as you discover them.
- Consider Professional Duct Cleaning: Over time, dust, dirt, and other allergens can accumulate inside your ductwork. Consider having your ducts professionally cleaned every few years to improve indoor air quality.
Final Thoughts
Troubleshooting supply and return air duct placement issues can seem daunting, but by following a systematic approach and knowing your limits, you can often improve the comfort and efficiency of your home. Remember to prioritize safety and consult with a professional when necessary. By taking proactive steps to maintain your ductwork, you can ensure that your HVAC system provides consistent and comfortable temperatures for years to come. Always remember if a task seems to be over your head, then it probably is and you should contact a qualified professional. Happy troubleshooting!