Tankless Water Heater With Storage Tank Piping Diagram
Understanding Tankless Water Heater with Storage Tank Piping Diagrams
If you're considering boosting your tankless water heater's performance or troubleshooting issues, understanding the piping diagram for a tankless water heater with a storage tank is crucial. This article provides a detailed guide for homeowners and DIY enthusiasts, covering everything from basic diagrams to common problems and when to call a professional.
Why Add a Storage Tank to a Tankless System?
Tankless water heaters are great for on-demand hot water, but they can sometimes struggle with high-demand situations, like multiple showers running simultaneously. Adding a small storage tank after the tankless unit can help smooth out these demand spikes, providing a buffer of hot water and preventing temperature fluctuations. This setup also reduces the strain on the tankless heater, potentially extending its lifespan.
Deciphering the Piping Diagram: A Step-by-Step Guide
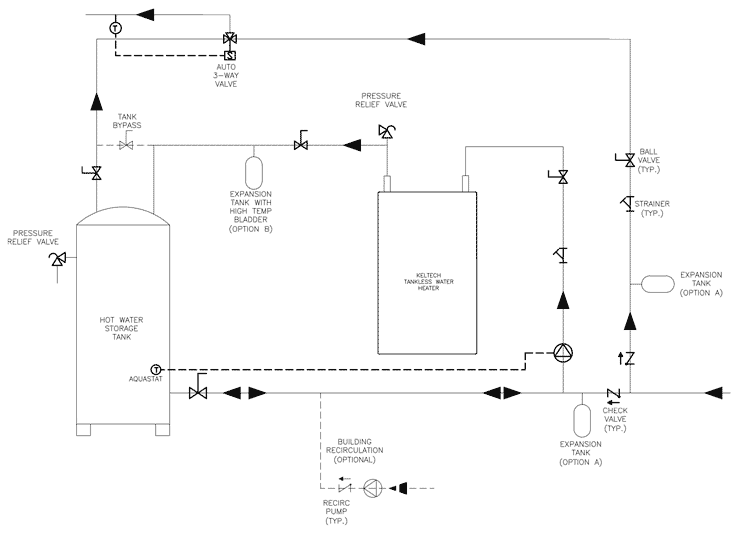
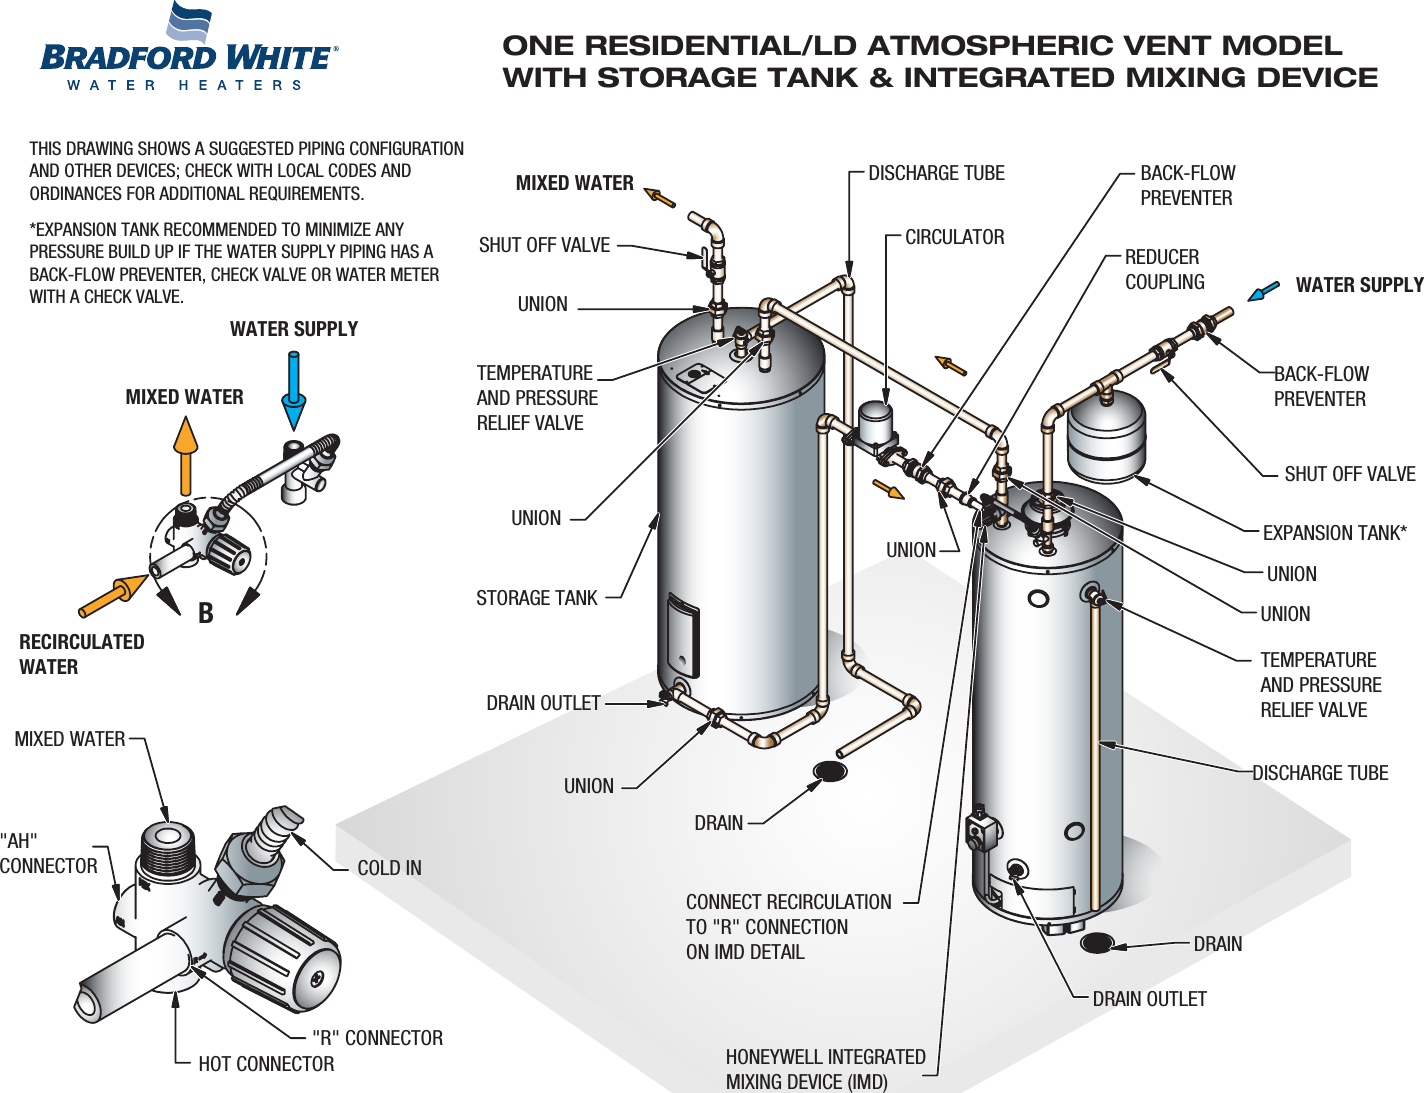
Let's break down a typical piping diagram. Here's what you'll generally find:
- Cold Water Inlet: This is where the cold water supply enters the system. Trace the pipe back to your main water line.
- Shut-Off Valve (Cold): This valve allows you to shut off the cold water supply to the entire system for maintenance or repairs.
- Filter: A sediment filter removes debris from the incoming water, protecting the tankless heater.
- Tankless Water Heater: The unit itself. Note the inlet and outlet connections.
- Shut-Off Valve (Hot – Tankless Outlet): Another shut-off valve, this one controls the hot water leaving the tankless unit.
- Check Valve: A crucial component that prevents backflow from the storage tank into the tankless heater. It ensures water flows in one direction only.
- Storage Tank: The buffer tank holding pre-heated water. Notice the hot water outlet at the top and the cold water inlet at the bottom.
- Expansion Tank: This tank absorbs water pressure fluctuations caused by heating, preventing damage to the system. It's typically connected to the cold water inlet of the storage tank.
- Temperature and Pressure (T&P) Relief Valve: A safety device that releases water if the temperature or pressure inside the storage tank gets too high. This valve must have a discharge pipe leading to a safe location.
- Mixing Valve (Optional): A thermostatic mixing valve (TMV) blends hot water from the storage tank with cold water to deliver a consistent and safe temperature at your fixtures. This is highly recommended to prevent scalding.
- Hot Water Outlet: This is where the hot water is distributed to your home's plumbing system.
Essential Tools and Materials
Before attempting any work, gather these tools and materials:
- Pipe wrenches (various sizes)
- Adjustable wrench
- Pipe cutter or tubing cutter
- Teflon tape or pipe sealant
- Screwdrivers (Phillips and flathead)
- Pliers
- Soldering torch and solder (if working with copper pipes)
- PEX crimping tool and crimp rings (if working with PEX pipes)
- New pipes and fittings (as needed)
- Bucket and towels
- Safety glasses
- Work gloves
Common Problems and Troubleshooting
Here are some common issues you might encounter with a tankless water heater and storage tank setup:
1. Cold Water Sandwiches
Problem: A brief burst of cold water followed by hot water at the faucet.
Possible Causes:
- Check valve failure: If the check valve is not functioning correctly, cold water from the storage tank can flow back into the tankless heater when it's not in use.
- Improper piping: The piping might not be configured correctly, allowing cold water to mix with the hot water.
Troubleshooting Steps:
- Inspect the check valve for proper operation. Replace it if necessary.
- Verify the piping configuration against a reliable diagram. Correct any errors.
2. Temperature Fluctuations
Problem: Inconsistent hot water temperature at the faucet.
Possible Causes:
- Tankless heater undersized: The tankless heater might not be powerful enough to meet the demand, even with the storage tank.
- Sediment buildup: Sediment in the storage tank can reduce its efficiency and affect water temperature.
- Mixing valve malfunction: If you have a mixing valve, it might be failing.
Troubleshooting Steps:
- Consider upgrading to a larger tankless heater.
- Flush the storage tank to remove sediment.
- Test or replace the mixing valve.
3. Leaks
Problem: Water leaking from pipes, fittings, or the tank itself.
Possible Causes:
- Corrosion: Over time, pipes and fittings can corrode, leading to leaks.
- Loose connections: Fittings may loosen due to vibration or temperature changes.
- Tank failure: The storage tank itself can develop leaks, especially if it's old.
Troubleshooting Steps:
- Inspect all pipes and fittings for signs of corrosion or leaks.
- Tighten any loose connections.
- If the tank is leaking, it needs to be replaced.
4. High Energy Bills
Problem: Unexpectedly high energy bills after installing the storage tank.
Possible Causes:
- Poor insulation: The storage tank might not be properly insulated, leading to heat loss.
- Excessive standby losses: The tank may be losing heat to the environment, requiring the tankless heater to cycle on more frequently.
Troubleshooting Steps:
- Ensure the storage tank is well-insulated. Add more insulation if necessary.
- Consider wrapping the pipes with insulation to reduce heat loss.
5. No Hot Water
Problem: Complete lack of hot water.
Possible Causes:
- Gas supply issues: If it’s a gas unit, there might be a problem with the gas supply.
- Electrical issues: If it’s an electric unit, there might be a breaker tripped.
- Tankless heater malfunction: The tankless heater itself may have failed.
Troubleshooting Steps:
- Check the gas supply to the tankless heater.
- Check the circuit breaker for the tankless heater.
- Consult the tankless heater's manual for troubleshooting steps or contact a professional.
Safety First!
Before starting any work, always:
- Turn off the power to the tankless water heater at the circuit breaker (for electric models).
- Turn off the gas supply to the tankless water heater (for gas models).
- Turn off the water supply to the system at the main shut-off valve.
- Release any pressure in the system by opening a hot water faucet.
When to Call a Professional
While some tasks are suitable for DIYers, others require the expertise of a qualified HVAC professional. Call a pro if:
- You're uncomfortable working with gas lines or electrical wiring.
- You suspect a major malfunction in the tankless heater itself.
- You're dealing with complex plumbing issues.
- You're unsure about any step of the process.
Ignoring these warnings can lead to serious injury or property damage. Always prioritize safety!
Repair Cost Estimates
Repair costs can vary widely depending on the nature of the problem, the parts needed, and your location. Here are some rough estimates:
- Replacing a check valve: $50 - $150 (including parts and labor)
- Flushing the storage tank: $100 - $200
- Replacing a mixing valve: $150 - $300 (including parts and labor)
- Replacing a storage tank: $500 - $1500 (including parts and labor)
- Tankless Water Heater Repair: $200-$1000+ depending on the needed repair
These are just estimates. Always get a quote from a qualified HVAC professional before proceeding with any repairs.
Preventative Maintenance
Regular maintenance can help prevent problems and extend the life of your tankless water heater and storage tank system:
- Flush the storage tank annually to remove sediment.
- Inspect the T&P relief valve regularly to ensure it's functioning correctly.
- Check for leaks around pipes and fittings.
- Consider having a professional inspect the system annually.
Final Thoughts
Understanding the piping diagram of your tankless water heater with a storage tank can empower you to diagnose and fix minor problems yourself. However, always prioritize safety and don't hesitate to call a professional when needed. With proper maintenance and care, your system will provide years of reliable hot water.