Temperature And Pressure Chart For 410a
Is your home feeling stuffy even though your AC is running? Or maybe your heat pump isn't keeping you warm enough during those chilly nights? One common culprit behind these heating and cooling woes is an issue with the refrigerant, specifically in systems using R-410A. This article provides a practical guide to understanding and troubleshooting 410A systems using a temperature and pressure chart, focusing on safe and basic homeowner checks.
Understanding R-410A and Why Pressure Matters
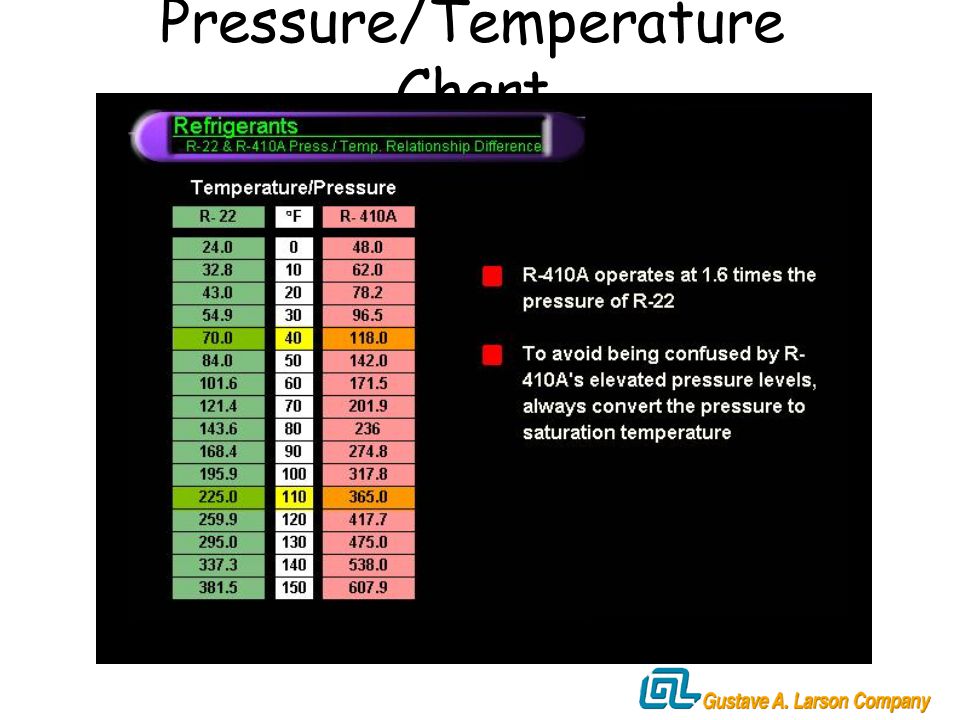
R-410A is a refrigerant commonly used in modern air conditioning and heat pump systems. It's crucial for absorbing and releasing heat, enabling your system to cool or heat your home. The pressure of R-410A is directly related to its temperature – a relationship that's essential for proper system operation. The temperature/pressure chart provides a quick reference for these relationships at different points in your system.
Think of it like this: if your system's pressure is too low, it might not be able to cool effectively. If it's too high, it could damage components. The temperature and pressure chart acts as a diagnostic tool to help you pinpoint potential problems.
A Common Problem: Inadequate Cooling or Heating
The scenario is familiar: the thermostat is set to your desired temperature, but the air coming from your vents isn't cold (or hot) enough. This could be caused by various factors, but refrigerant issues are frequently to blame.
Step-by-Step Troubleshooting Using a Temperature/Pressure Chart
Before we dive in, a crucial safety warning: working with refrigerant can be dangerous. Improper handling can lead to frostbite, chemical burns, or even explosion. If you're not comfortable with basic HVAC maintenance and safety precautions, call a qualified HVAC technician. This guide is for basic checks; any work involving touching refrigerant lines, adding refrigerant, or repairing components should be left to the pros.
Phase 1: Preliminary Checks (No Tools Required)
These initial checks don't require any tools and can help you rule out simple causes.
- Check the Thermostat: Ensure it's set to the correct mode (cooling or heating) and the desired temperature. Make sure the batteries are good.
- Inspect the Air Filter: A dirty air filter restricts airflow, which can affect system performance and refrigerant pressures. Replace a dirty filter with a clean one. This is one of the easiest and most important maintenance tasks you can perform.
- Examine the Outdoor Unit: Is the outdoor unit (condenser) free of obstructions? Leaves, debris, and overgrown vegetation can block airflow. Clear away any obstructions.
- Check for Ice Buildup: Look for ice on the refrigerant lines or the outdoor unit. Ice buildup indicates a potential problem, such as low refrigerant or restricted airflow. If you see ice, turn off the system immediately and call a professional.
- Listen for Unusual Noises: Any unusual hissing, bubbling, or rattling sounds from the indoor or outdoor unit could indicate a refrigerant leak or a failing component. If you hear strange noises, it's best to consult with a technician.
Did any of these checks reveal a problem? If so, addressing that issue might resolve the problem without needing to delve into refrigerant pressures.
Phase 2: Using a Temperature/Pressure Chart (Basic Equipment Required)
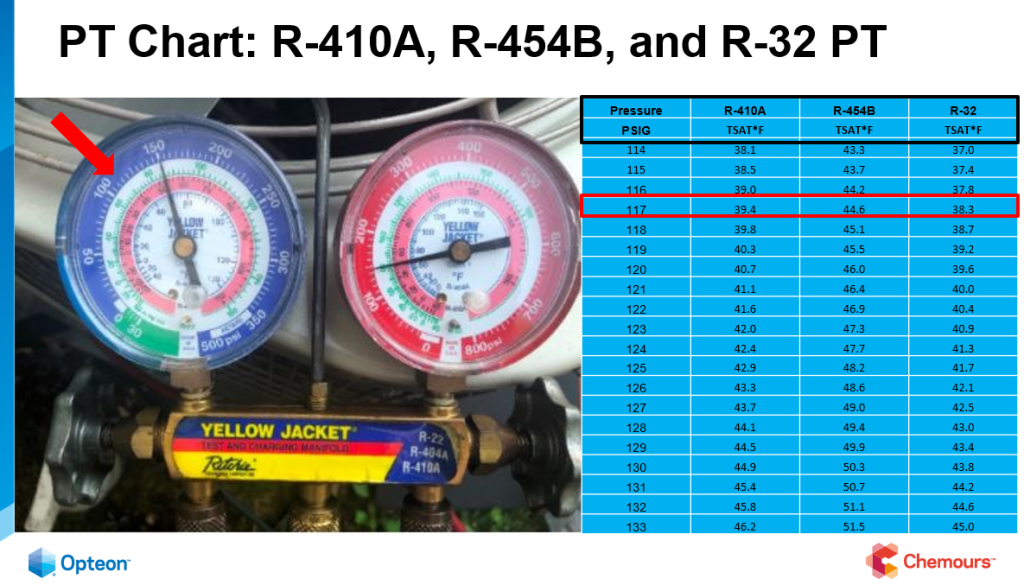
If the preliminary checks don't identify the problem, you can use a temperature/pressure chart to get a better understanding of your system's refrigerant levels. You'll need a manifold gauge set designed for R-410A. Never use a manifold gauge set intended for other refrigerants. You'll also need an accurate thermometer.
Important safety precautions: Wear safety glasses and gloves when working with refrigerant lines. Ensure the area is well-ventilated.
- Locate the Service Ports: The service ports are typically located on the outdoor unit's refrigerant lines. They're usually covered with caps.
- Connect the Manifold Gauge Set: Carefully connect the hoses of the manifold gauge set to the service ports. The blue hose connects to the low-pressure port (suction line), and the red hose connects to the high-pressure port (liquid line). The yellow hose is typically used for connecting to a refrigerant tank (which we will NOT be doing in this basic troubleshooting guide). Ensure the connections are tight to prevent leaks.
- Start the System: Turn on your AC system and let it run for at least 15 minutes to stabilize.
- Measure the Suction Line Temperature: Use an accurate thermometer to measure the temperature of the suction line (the larger copper pipe connected to the outdoor unit) near the service port.
- Read the Low-Side Pressure: Observe the pressure reading on the low-side (blue) gauge of the manifold gauge set.
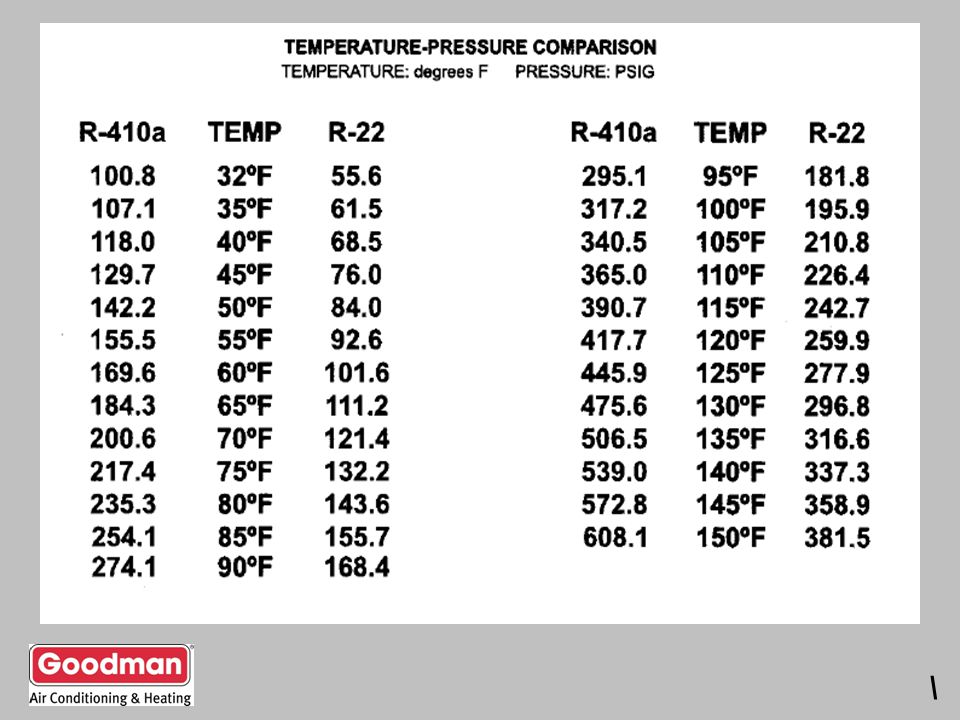
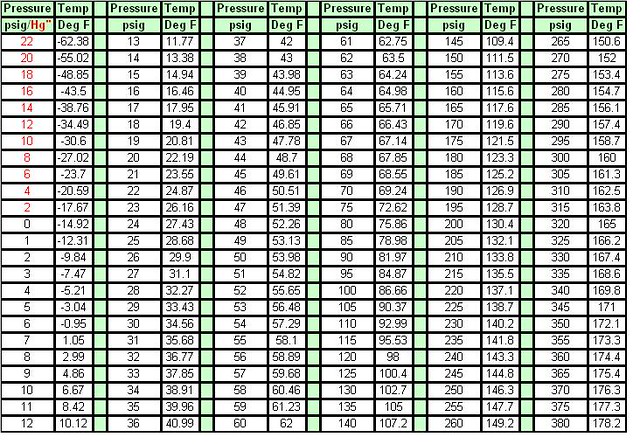
- Compare to the Temperature/Pressure Chart: Find a reliable R-410A temperature/pressure chart online or in an HVAC manual. Match the measured suction line temperature to the corresponding pressure on the chart.
- Assess the Results: Is the measured low-side pressure close to the pressure indicated on the chart for the measured temperature?
- Pressure Too Low: If the pressure is significantly lower than the chart indicates, it could indicate a refrigerant leak. A small difference might be normal, but a significant discrepancy warrants further investigation by a professional.
- Pressure Too High: If the pressure is significantly higher than the chart indicates, it could indicate overcharging, a restricted airflow (e.g., dirty condenser coil), or a problem with the compressor.
- Pressure Within Range: If the pressure is within the expected range, the refrigerant level is likely not the primary cause of the problem. Other issues, such as a faulty compressor or a malfunctioning expansion valve, might be responsible.
Example: Let's say you measure a suction line temperature of 65°F. The R-410A temperature/pressure chart indicates that the corresponding pressure should be around 120 psi. If your low-side gauge reads only 90 psi, it suggests a potential refrigerant leak.
Phase 3: Basic DIY Actions (If Applicable)
Based on your findings, here are a few *very limited* DIY actions you can take. Remember, if you suspect a refrigerant leak, do not attempt to add refrigerant yourself. Call a professional.
- Clean the Condenser Coils: If the pressure is high and the condenser coils are dirty, gently clean them with a soft brush or a garden hose (avoid high pressure, which can damage the fins). Ensure the power is off before cleaning.
- Ensure Proper Airflow: Double-check that the air vents in your home are open and unobstructed. Ensure furniture isn't blocking them.
After performing these DIY actions, monitor the system for improvements.
When to Call a Professional
The following situations require professional HVAC service:
- Suspected Refrigerant Leak: If you suspect a leak (low pressure, hissing sound, oily residue), do not attempt to fix it yourself. Refrigerant leaks require specialized equipment and expertise to locate and repair.
- High Refrigerant Pressure: If the pressure is significantly higher than expected, it could indicate a serious problem with the compressor or other components.
- Icing on the Coils: Significant ice buildup usually indicates a more complex issue.
- You are Uncomfortable: If you're not comfortable working with the manifold gauge set or handling refrigerant lines, it's best to call a professional.
- Compressor Issues: Compressor problems require specialized knowledge and tools to diagnose and repair.
- You've added refrigerant before: Adding refrigerant without finding the leak is dangerous and potentially illegal.
Preventative Maintenance
The best way to avoid refrigerant issues is to perform regular preventative maintenance:
- Change Air Filters Regularly: Check and replace air filters every 1-3 months, or more often if needed.
- Clean Condenser Coils Annually: Clean the condenser coils at least once a year.
- Schedule Professional Maintenance: Have your HVAC system professionally inspected and serviced annually. A technician can check refrigerant levels, identify potential problems, and ensure your system is running efficiently.
Conclusion
Understanding how to use a temperature and pressure chart can be a valuable tool for troubleshooting your R-410A air conditioning or heat pump system. By following these steps and knowing when to call a professional, you can keep your system running efficiently and maintain a comfortable home. Remember, safety is paramount. When in doubt, consult a qualified HVAC technician.