Temperature Pressure Chart For 410a Refrigerant

Many homeowners experience the frustration of their air conditioner blowing warm air on a scorching summer day, or their heat pump struggling to provide adequate warmth during the winter. Often, the culprit behind these comfort issues lies within the refrigerant system. Specifically, a low refrigerant charge can significantly impact your system's performance. Let's explore how to use a temperature-pressure (PT) chart for R-410A refrigerant to diagnose potential issues and take appropriate action.
Understanding the Basics: R-410A and the PT Chart
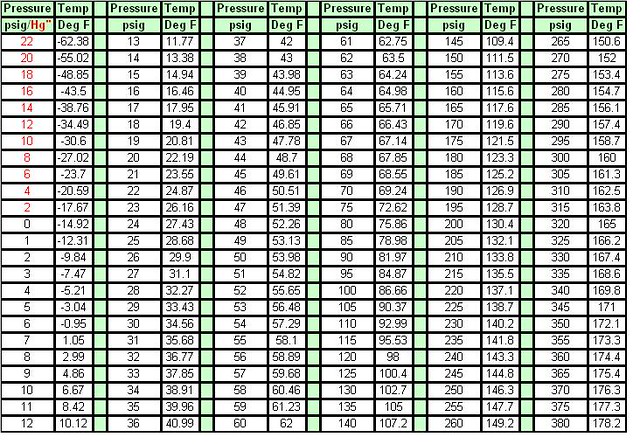
R-410A is a common refrigerant used in modern air conditioning and heat pump systems. The temperature-pressure relationship is fundamental to understanding how your system functions. At a given temperature, R-410A will exist at a specific pressure. A PT chart simply maps out these relationships. Think of it as a cheat sheet that helps you translate pressure readings into temperature and vice versa.
Before diving in, a crucial safety note: Refrigerant handling should be approached with caution. Improper handling can lead to frostbite and other injuries. Never attempt to vent refrigerant into the atmosphere – it's harmful to the environment and often illegal. If you're uncomfortable with any of these steps, please call a qualified HVAC technician.
The Homeowner's Troubleshooting Guide: Warm Air Woes
Let’s say your air conditioner is blowing warm air, despite the thermostat being set to cool. Here’s a systematic approach to diagnosing the problem, utilizing the R-410A PT chart as a guide:
Step 1: Initial Visual Inspection (No Tools Required)
Begin with a thorough visual inspection of your outdoor unit (the condenser). This is where you can often spot obvious problems without needing any tools.
- Check for ice buildup: Ice on the refrigerant lines or the condenser coil indicates a possible refrigerant leak or airflow restriction. This prevents proper heat transfer and lowers the refrigerant temperature, leading to low pressure.
- Inspect the condenser fan: Ensure the fan is running when the unit is supposed to be cooling. If it's not running, the system can overheat and shut down. A faulty fan motor might be the cause.
- Clean the condenser coil: Over time, dirt, leaves, and debris can accumulate on the coil, restricting airflow. Use a garden hose (with a gentle spray nozzle) to clean the coil from the inside out. Turn off the power to the unit at the breaker box before cleaning!
- Check refrigerant line insulation: Inspect the insulation on the refrigerant lines running between the indoor and outdoor units. Damaged or missing insulation can lead to heat gain (in cooling mode) or heat loss (in heating mode), reducing efficiency.
If you find any of these issues, address them and see if the problem resolves itself. For example, cleaning a dirty coil might be enough to restore proper cooling.
Step 2: Basic Checks with Simple Tools (Optional)
If the visual inspection doesn't reveal the issue, you can proceed with some basic checks using readily available tools.
- Air filter: A clogged air filter restricts airflow to the indoor coil, which can cause it to ice up and lead to low refrigerant pressure. Replace the filter regularly (usually every 1-3 months).
- Thermometer: Use a thermometer to measure the temperature of the air coming out of the vents when the AC is running. Compare this to the temperature setting on your thermostat. A significant difference (e.g., more than 15-20 degrees Fahrenheit) suggests a problem.
Step 3: Utilizing the R-410A PT Chart and Gauges (Requires Basic Equipment)
This step requires a manifold gauge set designed for R-410A refrigerant. If you don't have experience using these gauges, it's best to consult a professional. Incorrectly connecting the gauges can damage your system or cause personal injury.
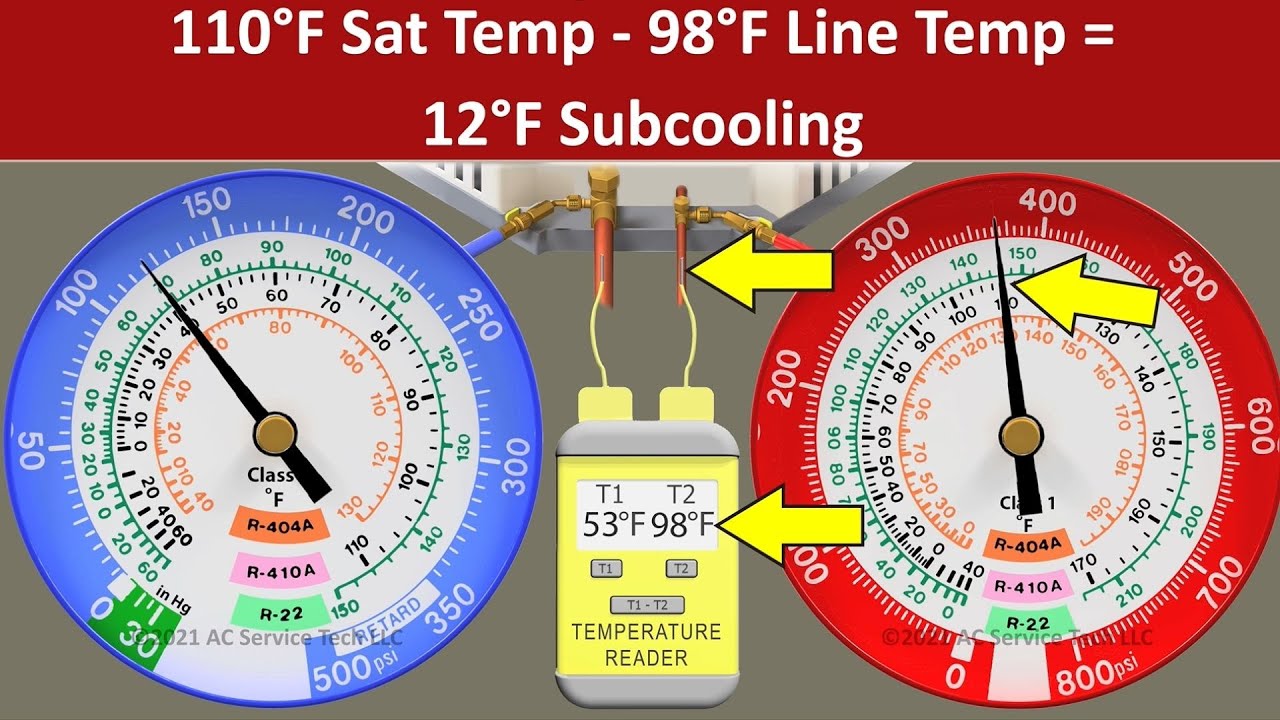
- Connect the gauges: Attach the high-pressure (usually red) and low-pressure (usually blue) hoses to the corresponding service ports on the outdoor unit. The high-pressure port is typically smaller than the low-pressure port. The yellow hose connects to the refrigerant source (if adding refrigerant) or a vacuum pump (if evacuating the system).
- Read the pressure: With the AC running, observe the pressure readings on both gauges. It's crucial to let the system run for at least 15 minutes to stabilize the pressures before taking readings.
- Measure the outdoor temperature: Use a thermometer to accurately measure the outdoor ambient temperature. This is essential for interpreting the pressure readings using the PT chart.
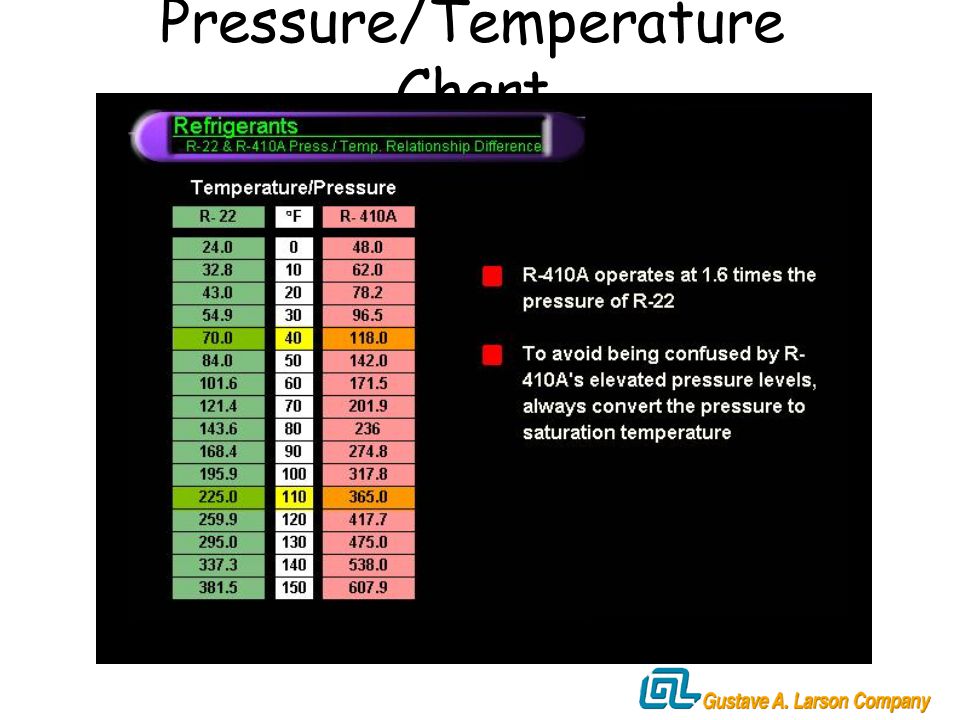
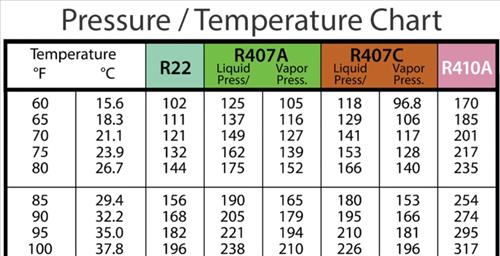
- Consult the R-410A PT Chart: Locate an R-410A PT chart. You can easily find one online by searching for "R-410A PT Chart." Find the outdoor ambient temperature you measured in the chart. The chart will show the corresponding saturated refrigerant pressure.
- Compare readings: Compare the pressure reading on the low-pressure gauge to the saturated pressure shown on the PT chart for the measured outdoor temperature.
- Analyze the results:
- Low Suction Pressure: If the low-pressure reading is significantly lower than what the PT chart indicates for the measured outdoor temperature, this often suggests a refrigerant leak or undercharge. Do not attempt to add refrigerant yourself. This requires specialized equipment and knowledge to avoid overcharging the system, which can be equally damaging. Call a professional.
- High Suction Pressure: A high suction pressure might indicate other issues, such as a restriction in the system, a non-condensables in the system, or a faulty compressor. This also necessitates professional diagnosis.
- High Head Pressure: Elevated high-side pressure could indicate a dirty condenser coil, a faulty condenser fan, or a overcharge of refrigerant. It could also be due to non-condensables in the system. Clean the coil and check the fan. If the issue persists, call a technician.
Example: Let's say the outdoor temperature is 85°F. According to the R-410A PT chart, the saturated pressure should be around 160 psig (pounds per square inch gauge). If your low-pressure gauge reads significantly lower, say 110 psig, this points towards a low refrigerant charge.
Step 4: Safe DIY Actions (Limited)
Based on your findings, here are a few safe DIY actions you might be able to take:
- Clean the condenser coil: If you haven't already, thoroughly clean the outdoor condenser coil. This can improve airflow and heat transfer, potentially raising the refrigerant pressure.
- Replace the air filter: Ensure the air filter is clean and not restricting airflow to the indoor coil.
- Ensure proper airflow: Make sure vents are open and unobstructed throughout your home to allow for proper air circulation.
Important Note: Never attempt to add refrigerant to your system unless you are a licensed HVAC technician. Overcharging the system can be just as damaging as undercharging it.
When to Call a Professional
It's crucial to recognize when the problem is beyond your DIY capabilities. Call a qualified HVAC technician in the following situations:
- You suspect a refrigerant leak: Refrigerant leaks require specialized equipment to locate and repair. Furthermore, adding refrigerant to a leaking system is only a temporary fix; the leak must be repaired to prevent further refrigerant loss.
- You are uncomfortable using gauges or handling refrigerant: Safety is paramount. If you're not confident in your abilities, it's best to leave it to the professionals.
- The system is still not cooling (or heating) properly after your DIY attempts: There may be more complex issues at play, such as a faulty compressor, a restricted refrigerant line, or a problem with the expansion valve.
- You see signs of oil around refrigerant line connections: This can indicate a refrigerant leak.
- Your system is old or has not been serviced in a long time: A professional tune-up can help identify potential problems before they become major issues.
Preventative Maintenance: Avoiding Future Problems
The best way to avoid air conditioning and heat pump problems is through regular preventative maintenance. Here are some tips:
- Change your air filter regularly: This is the easiest and most effective way to maintain your system's efficiency.
- Clean the outdoor condenser coil annually: Remove any dirt, leaves, and debris that may have accumulated on the coil.
- Schedule annual professional maintenance: A qualified HVAC technician can inspect your system, clean the coils, check the refrigerant charge, and identify any potential problems before they lead to breakdowns.
Conclusion
Understanding the R-410A PT chart and performing basic troubleshooting steps can empower you to diagnose common air conditioning and heat pump problems. However, it's essential to prioritize safety and recognize when professional help is needed. By following this guide and implementing preventative maintenance practices, you can keep your system running efficiently and ensure a comfortable home environment for years to come.