Testing A Thermocouple With A Multimeter

Thermocouples are essential sensors used to measure temperature in a wide range of applications, from ovens and furnaces to HVAC systems and industrial equipment. They are durable and relatively inexpensive, but like any component, they can fail. Knowing how to test a thermocouple with a multimeter is a valuable skill that can save you time and money by allowing you to identify a faulty sensor quickly. This guide provides a comprehensive, step-by-step approach to testing thermocouples, explaining the underlying principles and common troubleshooting techniques.
Understanding Thermocouples: The Basics
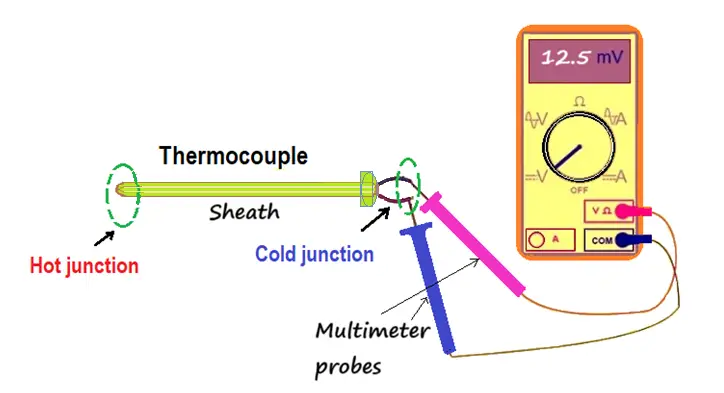
A thermocouple is a temperature sensor made by joining two dissimilar metal wires at one end, called the "hot junction" or measuring junction. The other ends of the wires are connected to a measuring instrument, such as a multimeter or temperature controller, and form the "cold junction" or reference junction. When the hot junction experiences a temperature difference compared to the cold junction, a small voltage is generated, known as the Seebeck effect. This voltage is directly proportional to the temperature difference and is used to determine the temperature being measured.
Different types of thermocouples exist, designated by letters like K, J, T, E, etc. Each type uses a specific combination of metals, making them suitable for different temperature ranges and applications. For instance, a K-type thermocouple is commonly used in high-temperature applications like furnaces because of its wide operating range. A J-type thermocouple is often found in plastic processing equipment. Knowing the type of thermocouple you are testing is crucial, as each type produces a different voltage output for the same temperature.
Think of a thermocouple like a tiny generator. Heat is the "fuel" that drives it, creating a small electrical current (voltage) proportional to the heat applied. This voltage is then read by your multimeter to give you a temperature reading.
Tools You'll Need
Before you begin testing, gather the following tools:
- Multimeter: A digital multimeter (DMM) is preferred for its accuracy and ease of reading. Ensure it can measure millivolts (mV).
- Thermocouple: The thermocouple you wish to test.
- Heat Source (Optional): A heat gun, lighter, or even a cup of hot water can be used to apply heat to the hot junction. A calibrated temperature source is best for accurate testing.
- Reference Thermometer (Optional): To verify the accuracy of the thermocouple reading.
- Sandpaper or Wire Brush: To clean the thermocouple leads if they are corroded.
- Safety Glasses: To protect your eyes.
Safety Precautions
Always prioritize safety when working with electrical components and heat sources:
- Wear safety glasses to protect your eyes from debris or accidental splashes.
- Be careful when using a heat source. Avoid touching the hot junction immediately after heating.
- Disconnect the thermocouple from any live circuits before testing to prevent electrical shock.
- Ensure the multimeter is set to the correct voltage range to avoid damaging the instrument.
Testing a Thermocouple with a Multimeter: Step-by-Step Guide
There are two primary methods for testing a thermocouple: measuring voltage output and checking for continuity.
Method 1: Measuring Voltage Output
This method involves measuring the voltage generated by the thermocouple when exposed to a temperature difference. This is the most common and reliable way to check a thermocouple's functionality.
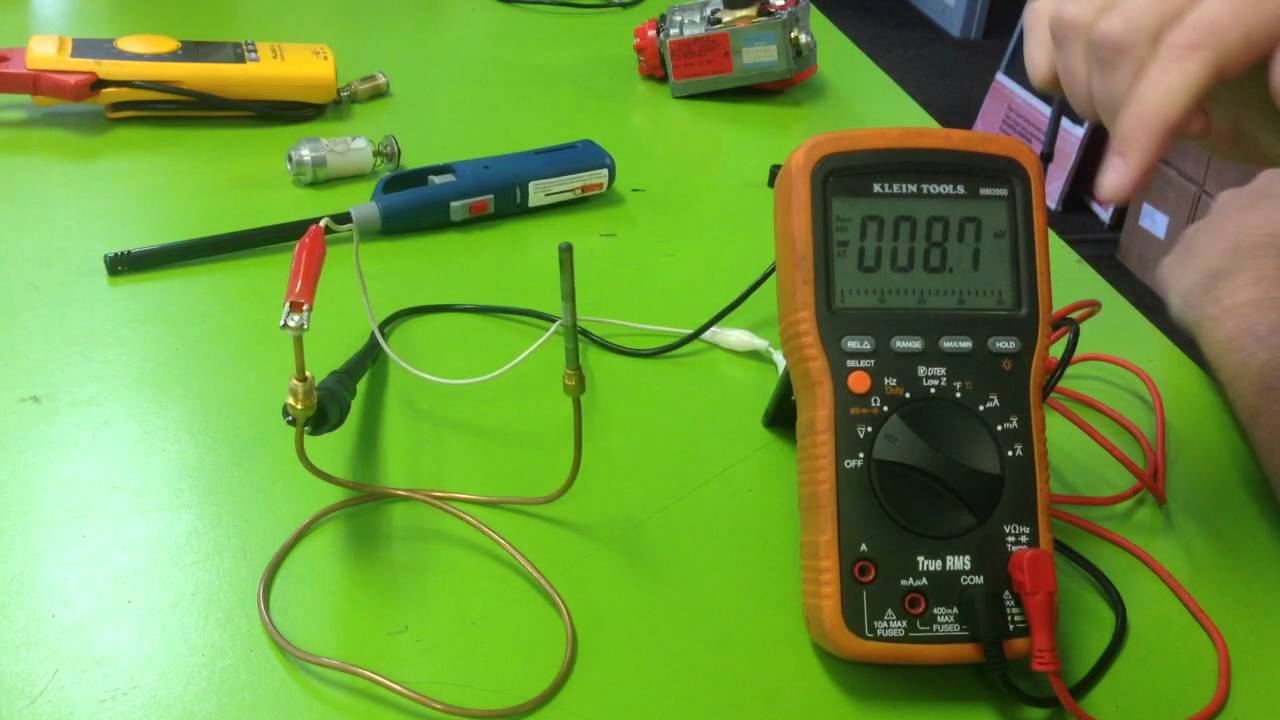
- Set the Multimeter to Millivolts (mV): Turn on your multimeter and select the DC millivolt (mV) range. Thermocouples generate very small voltages, so this setting is essential for accurate readings.
- Connect the Multimeter Leads: Connect the multimeter's red lead (positive) to the positive lead of the thermocouple and the black lead (negative) to the negative lead of the thermocouple. Thermocouples have polarity, so it's important to connect the leads correctly. If you reverse the leads, you'll get a negative voltage reading.
- Apply Heat to the Hot Junction: Use your heat source (heat gun, lighter, or hot water) to carefully heat the hot junction of the thermocouple. Avoid overheating it, especially if you don't know the thermocouple type and its temperature limits.
- Observe the Multimeter Reading: As you heat the hot junction, the multimeter should display a voltage reading. The voltage should increase as the temperature increases. The amount of voltage depends on the type of thermocouple and the temperature difference between the hot and cold junctions.
- Compare the Reading to a Thermocouple Chart: To verify the accuracy, compare the voltage reading to a thermocouple reference chart or table for the specific thermocouple type. These charts show the expected voltage output for a given temperature. You can easily find these charts online by searching for "thermocouple voltage chart" followed by the thermocouple type (e.g., "K-type thermocouple voltage chart").
- Interpreting the Results:
- Expected Voltage: If the voltage reading is close to the value predicted by the thermocouple chart for the applied temperature, the thermocouple is likely functioning correctly.
- No Voltage: If the multimeter displays zero or a very low voltage even when the hot junction is heated, the thermocouple is likely faulty. It could be an open circuit, a short circuit, or a degradation of the thermocouple material.
- Inconsistent Voltage: If the voltage reading fluctuates erratically or is significantly different from the expected value, the thermocouple may be damaged or corroded.
Method 2: Checking for Continuity (Less Reliable, Use with Caution)
This method checks if there is a complete electrical circuit through the thermocouple. However, it's less reliable than measuring voltage output because it only confirms that the wires are connected, not that the thermocouple is producing the correct voltage signal. It's generally used as a preliminary check.
- Set the Multimeter to Continuity Mode: Turn on your multimeter and select the continuity testing mode. This mode is usually indicated by a diode symbol or a sound wave symbol. When the circuit is complete, the multimeter will beep.
- Disconnect the Thermocouple: Ensure the thermocouple is disconnected from any circuit.
- Connect the Multimeter Leads: Connect the multimeter leads to the two leads of the thermocouple.
- Observe the Multimeter Reading:
- Continuity (Beep): If the multimeter beeps, it indicates that there is continuity through the thermocouple. This suggests that the wires are intact, but it doesn't guarantee that the thermocouple is functioning correctly.
- No Continuity (No Beep): If the multimeter does not beep, it indicates that there is no continuity through the thermocouple. This means there is an open circuit, and the thermocouple is likely faulty.
Important Note: A thermocouple can show continuity even if it's producing an inaccurate voltage signal. This is why measuring voltage output is the preferred method for testing thermocouples.
Troubleshooting Common Issues
If your thermocouple is not working correctly, consider the following troubleshooting steps:
- Check the Connections: Ensure that the thermocouple leads are securely connected to the multimeter and the measuring instrument. Loose or corroded connections can cause inaccurate readings or complete failure. Clean the leads with sandpaper or a wire brush if necessary.
- Inspect the Thermocouple Wires: Examine the thermocouple wires for any signs of damage, such as cracks, breaks, or corrosion. Replace the thermocouple if you find any damage.
- Verify the Thermocouple Type: Make sure you know the type of thermocouple you are testing and that you are using the correct thermocouple chart for comparison. Using the wrong chart will result in inaccurate readings.
- Check for Ground Loops: Ground loops can occur when multiple devices in a circuit are grounded at different points, creating unwanted current flow. This can interfere with the thermocouple signal. Ensure that all devices are properly grounded to a common point.
- Consider Environmental Factors: Extreme temperatures, corrosive environments, and mechanical stress can damage thermocouples over time. If the thermocouple is exposed to harsh conditions, it may need to be replaced more frequently.
Tips for Accurate Measurement
To ensure accurate thermocouple measurements, follow these tips:
- Use a High-Quality Multimeter: A multimeter with good accuracy and resolution is essential for measuring the small voltages generated by thermocouples.
- Compensate for Cold Junction Temperature: The voltage generated by a thermocouple depends on the temperature difference between the hot and cold junctions. Many modern multimeters and temperature controllers have built-in cold junction compensation to account for this effect. If your instrument doesn't have this feature, you may need to manually compensate for the cold junction temperature.
- Use Extension Wires: When extending thermocouple wires, use thermocouple extension wire of the same type as the thermocouple. Using ordinary copper wire will introduce errors in the measurement.
- Minimize Noise: Electrical noise can interfere with the thermocouple signal. Use shielded thermocouple wire and avoid running the wires near sources of electromagnetic interference (EMI), such as motors, transformers, and high-voltage cables.
- Allow Time for Stabilization: When applying heat to the hot junction, allow enough time for the temperature to stabilize before taking a reading.
When to Replace a Thermocouple
Here are some signs that a thermocouple needs to be replaced:
- Inconsistent Readings: If the thermocouple readings are erratic or fluctuate wildly, it may be a sign of internal damage.
- No Voltage Output: If the thermocouple consistently produces no voltage output, even when heated, it is likely faulty.
- Visible Damage: If the thermocouple wires are cracked, broken, or corroded, it should be replaced.
- Age: Thermocouples can degrade over time, especially when exposed to harsh conditions. Even if they appear to be working, it's a good idea to replace them periodically as part of a preventative maintenance program.
Conclusion
Testing a thermocouple with a multimeter is a straightforward process that can help you diagnose temperature-related issues in various applications. By understanding the principles of thermocouple operation and following the steps outlined in this guide, you can quickly determine whether a thermocouple is functioning correctly and take appropriate action. Remember to prioritize safety and use the correct tools and techniques for accurate measurements. Regular testing and maintenance of thermocouples can help ensure reliable temperature control and prevent costly downtime.