Threaded Fitting Take Off Chart Pdf
Let's tackle a common household headache: a leaky washing machine. Before you panic, remember many issues are simple to diagnose and fix. This guide walks you through basic troubleshooting steps, but always prioritize safety. If you're uncomfortable with any step, call a qualified appliance repair technician.
Understanding the Problem
A washing machine leak can stem from various sources. Identifying the leak's location is crucial for accurate diagnosis.
- Front of the machine: Often related to the door seal or detergent dispenser.
- Back of the machine: Likely caused by the water supply hoses or drain hose.
- Underneath the machine: Could be a leaking pump, hose, or tub seal.
Safety First!
Before you start poking around, unplug the washing machine from the power outlet. Turn off both the hot and cold water supply valves located behind the machine. This prevents electric shock and uncontrolled water flow.
Step-by-Step Troubleshooting
1. Inspect the Water Supply Hoses
These hoses connect the washing machine to the hot and cold water supply. They are a common source of leaks.
- Check for visible cracks or bulges: If you see any damage, the hose needs replacement.
- Tighten the connections: Use pliers to gently tighten the hose connections at both the faucet and the washing machine. Don't overtighten, as this can damage the fittings.
- Inspect the rubber washers: Disconnect the hoses and examine the rubber washers inside the fittings. If they're cracked, worn, or missing, replace them. New washers are inexpensive and readily available at hardware stores.
2. Examine the Drain Hose
The drain hose carries wastewater from the washing machine to the drainpipe. Look for these issues:
- Kinks or clogs: Straighten any kinks and clear any visible clogs.
- Loose connections: Ensure the hose is securely connected to the washing machine and the drainpipe. Use a clamp to secure it if necessary.
- Cracks or holes: Replace the hose if you find any damage.
3. Check the Door Seal (Front-Load Washers)
The rubber seal around the door of a front-load washer can develop cracks, tears, or mold, leading to leaks.
- Visually inspect the seal: Look for any visible damage.
- Clean the seal: Wipe the seal with a damp cloth and mild detergent to remove any dirt or debris. Mold can be treated with a diluted bleach solution (follow safety precautions: wear gloves and eye protection).
- Check for obstructions: Ensure no clothing or debris is trapped between the seal and the door.
If the seal is damaged, it needs to be replaced. This can be a more complex repair and might be best left to a professional, especially if it involves disassembling the front panel of the machine.
4. Inspect the Detergent Dispenser
A clogged detergent dispenser can cause water to overflow and leak.
- Remove the dispenser drawer: Most dispensers slide out.
- Clean the dispenser: Rinse the dispenser with warm water to remove any detergent residue. Use a brush to scrub away stubborn buildup.
- Check the water inlet: Look for any clogs or obstructions in the water inlet that feeds the dispenser.
5. Check the Leveling Legs
An unlevel washing machine can vibrate excessively, which can stress the hoses and seals, leading to leaks.
- Use a level: Place a level on top of the washing machine.
- Adjust the leveling legs: Turn the leveling legs on the bottom of the machine until it's level. Tighten the lock nuts to secure the legs in place.
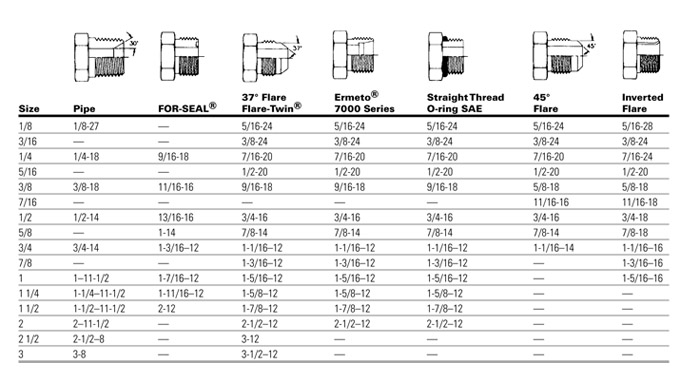
6. Threaded Fitting Take Off Chart (For Advanced Troubleshooting - Professional Help Recommended)
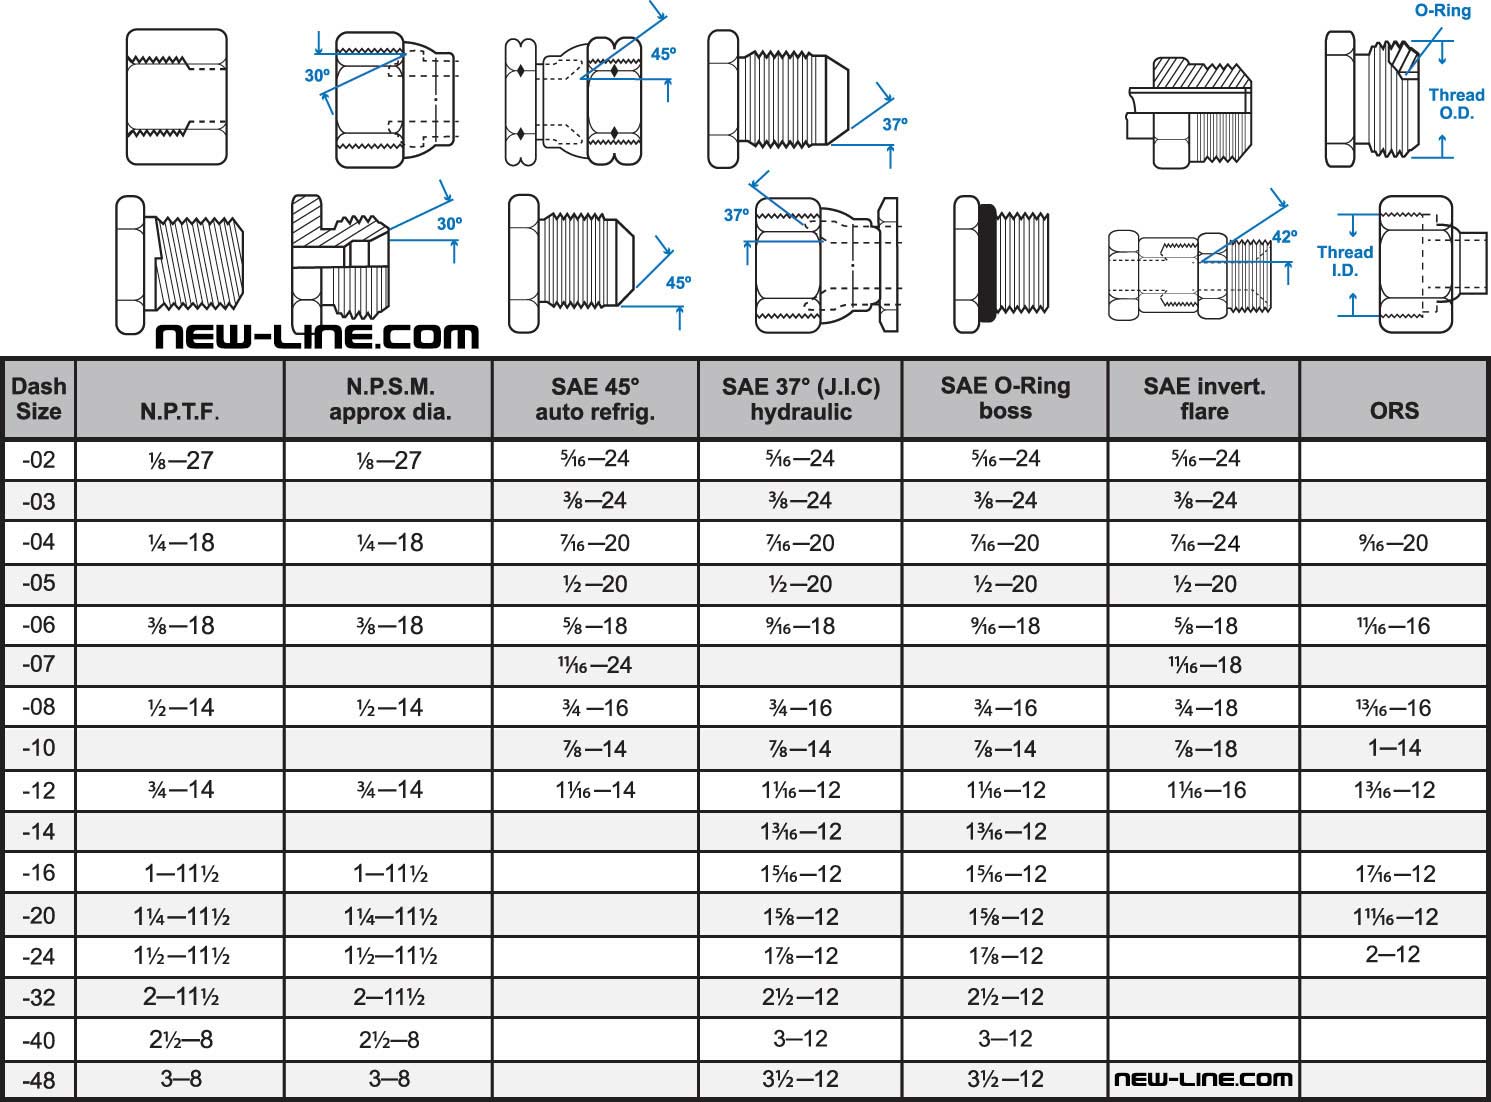
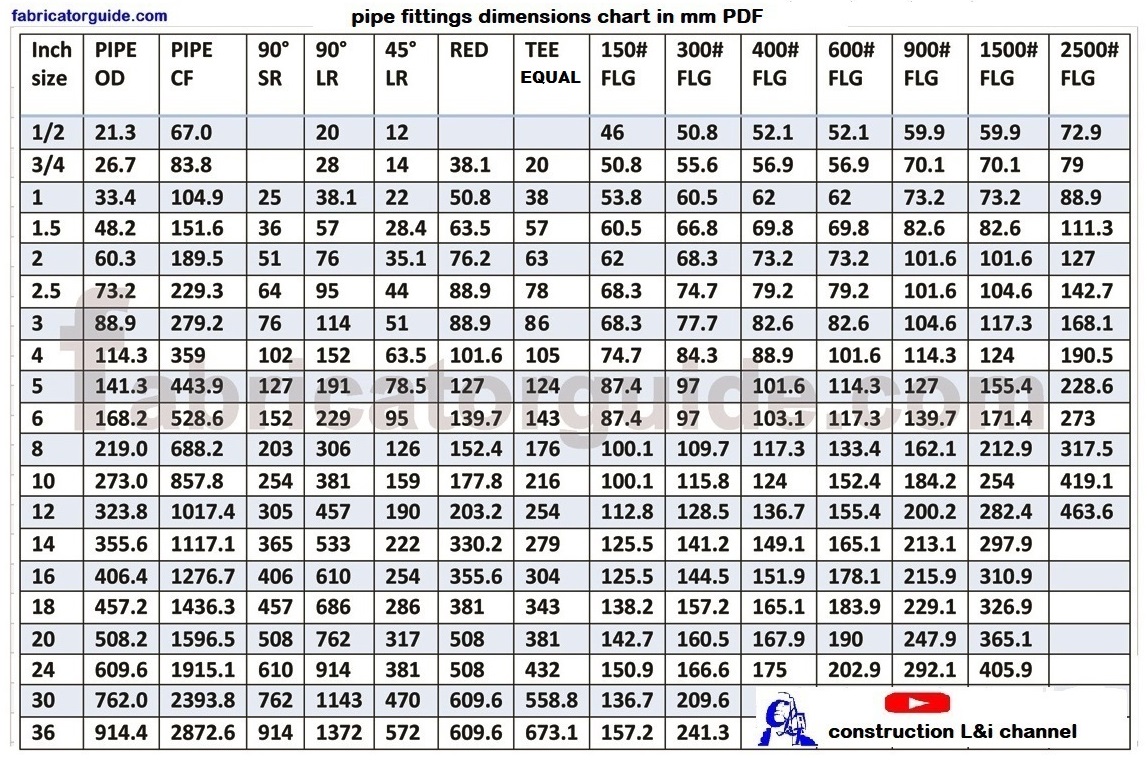
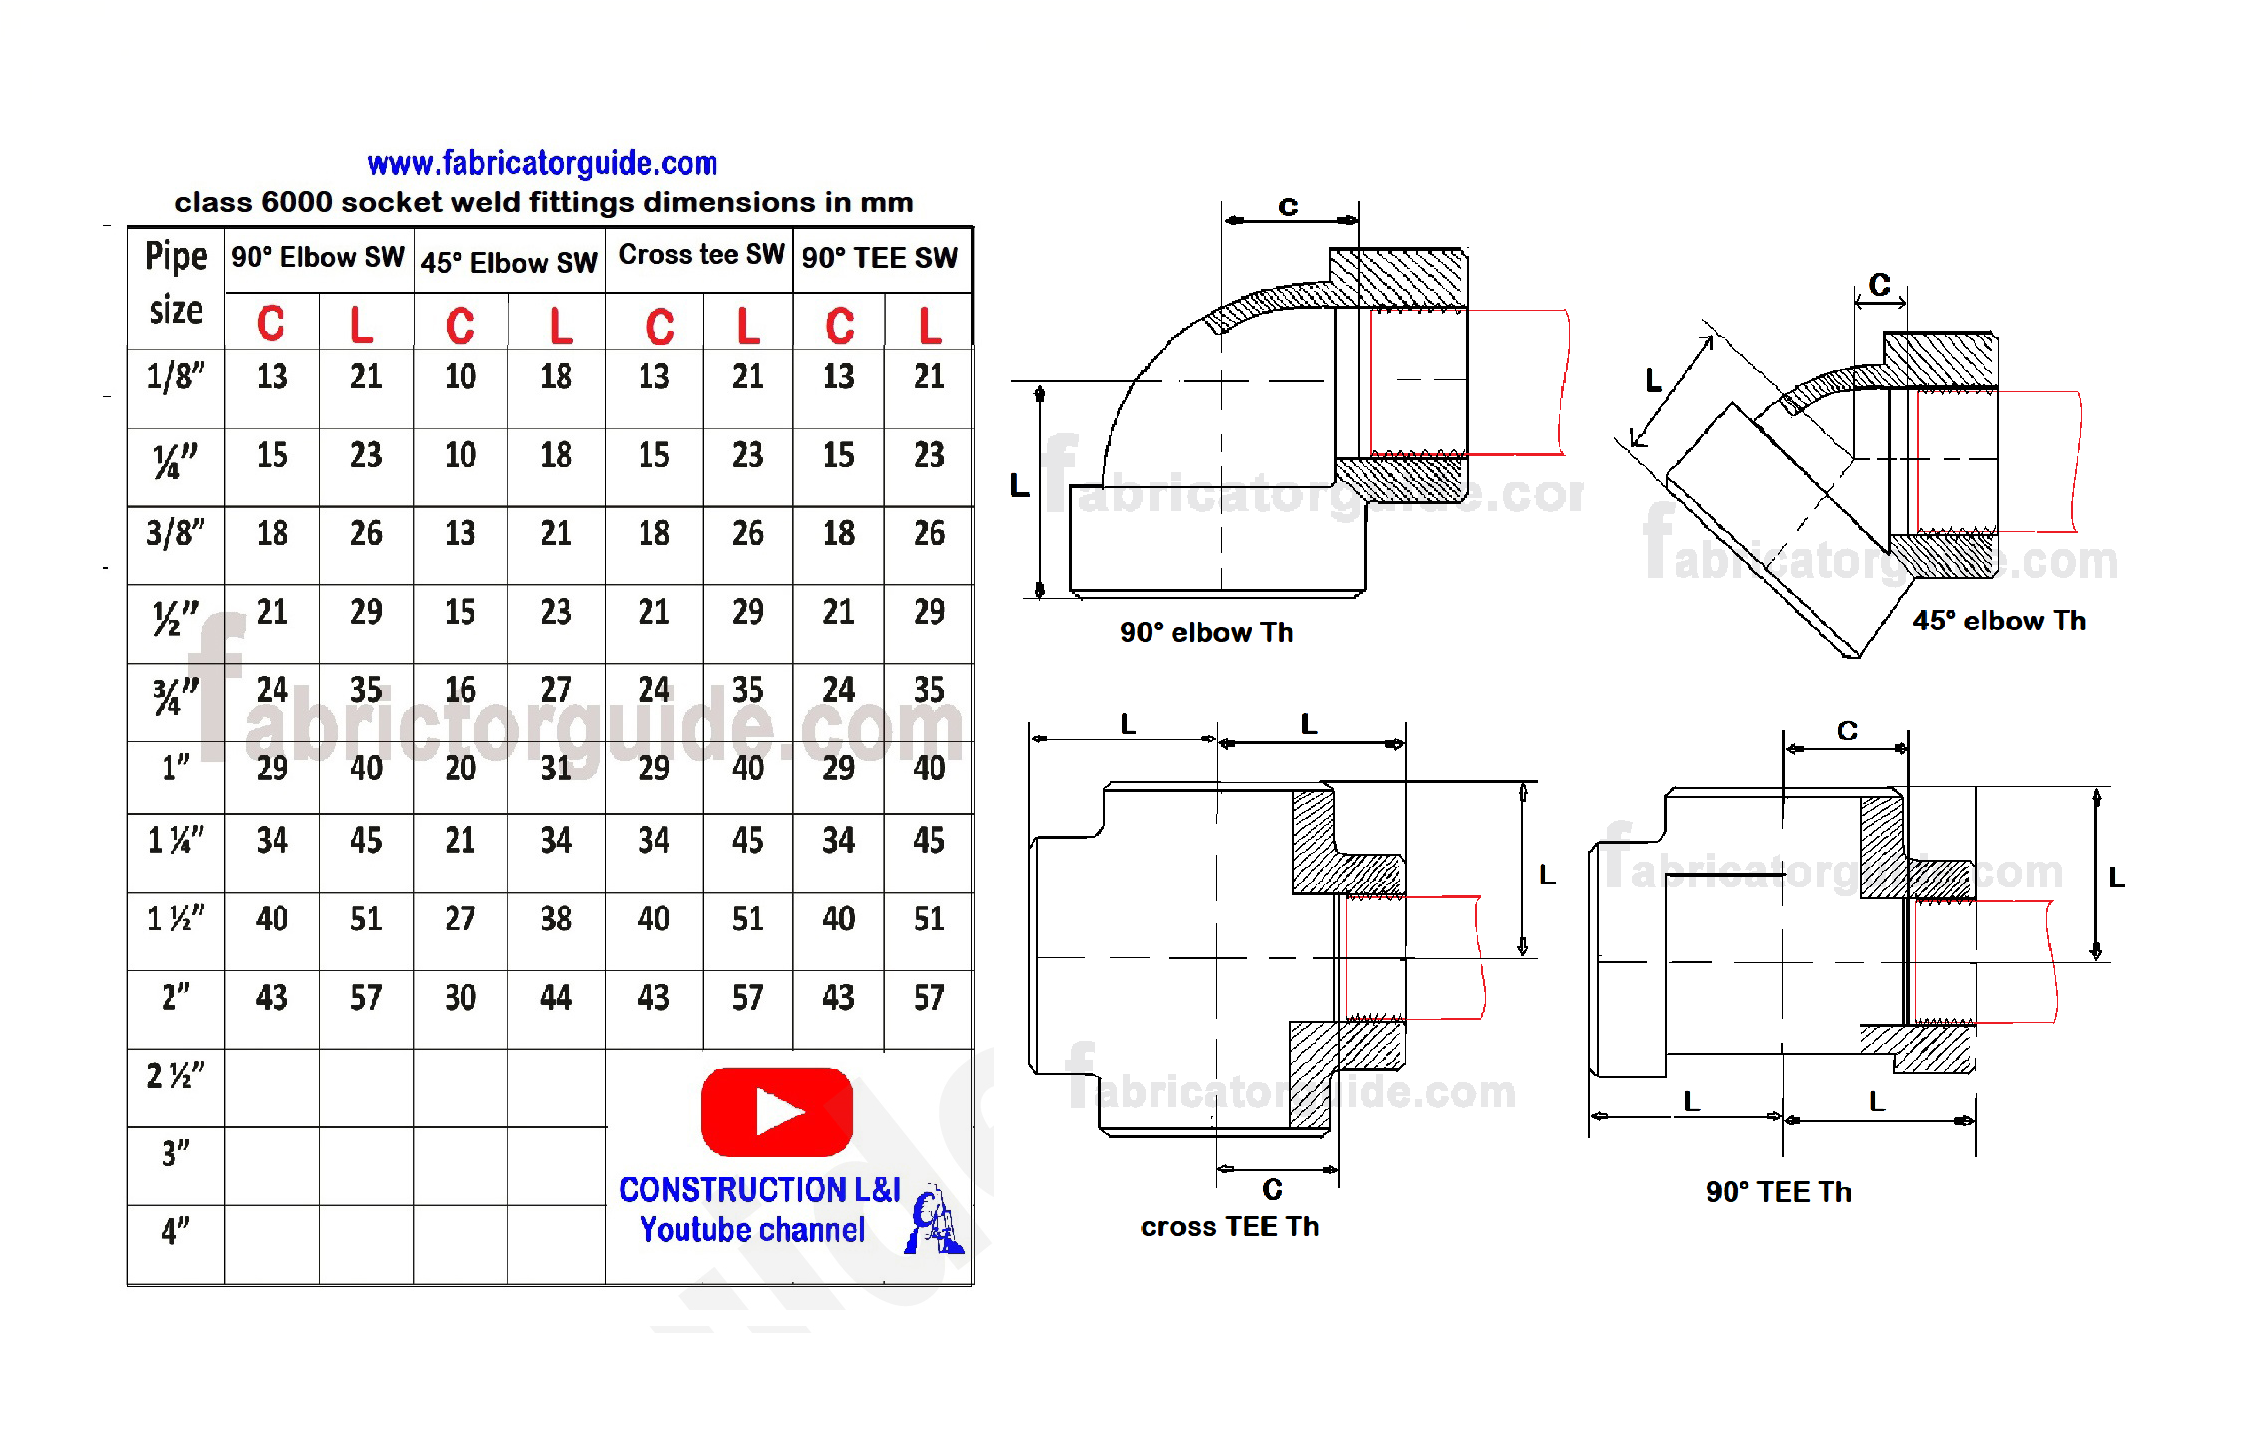
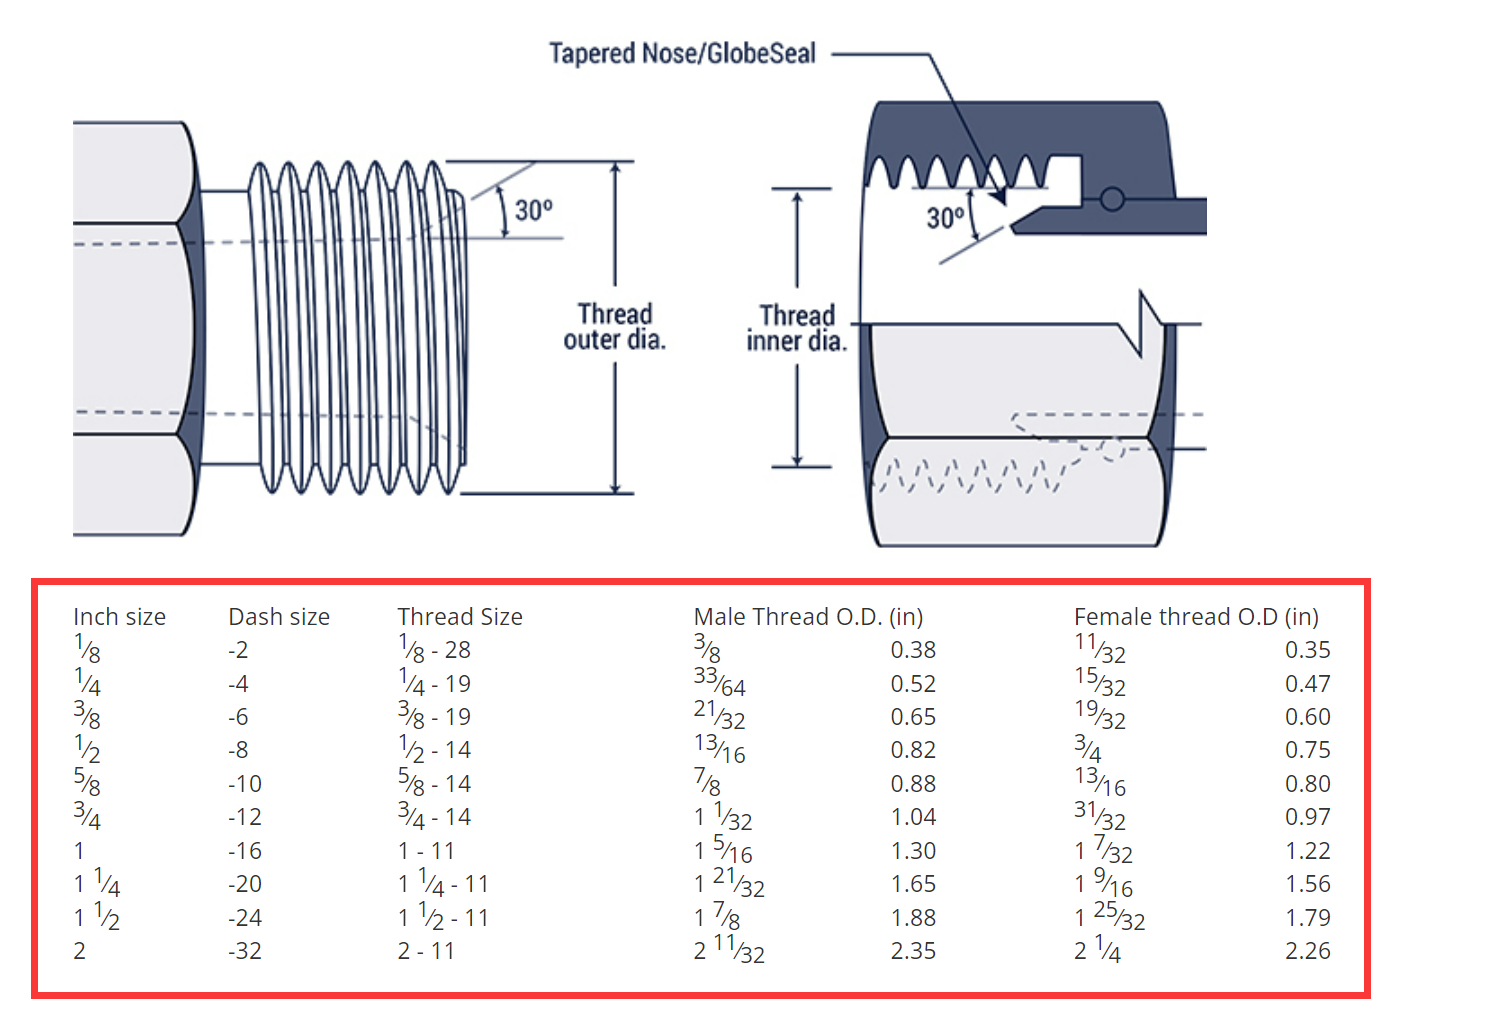
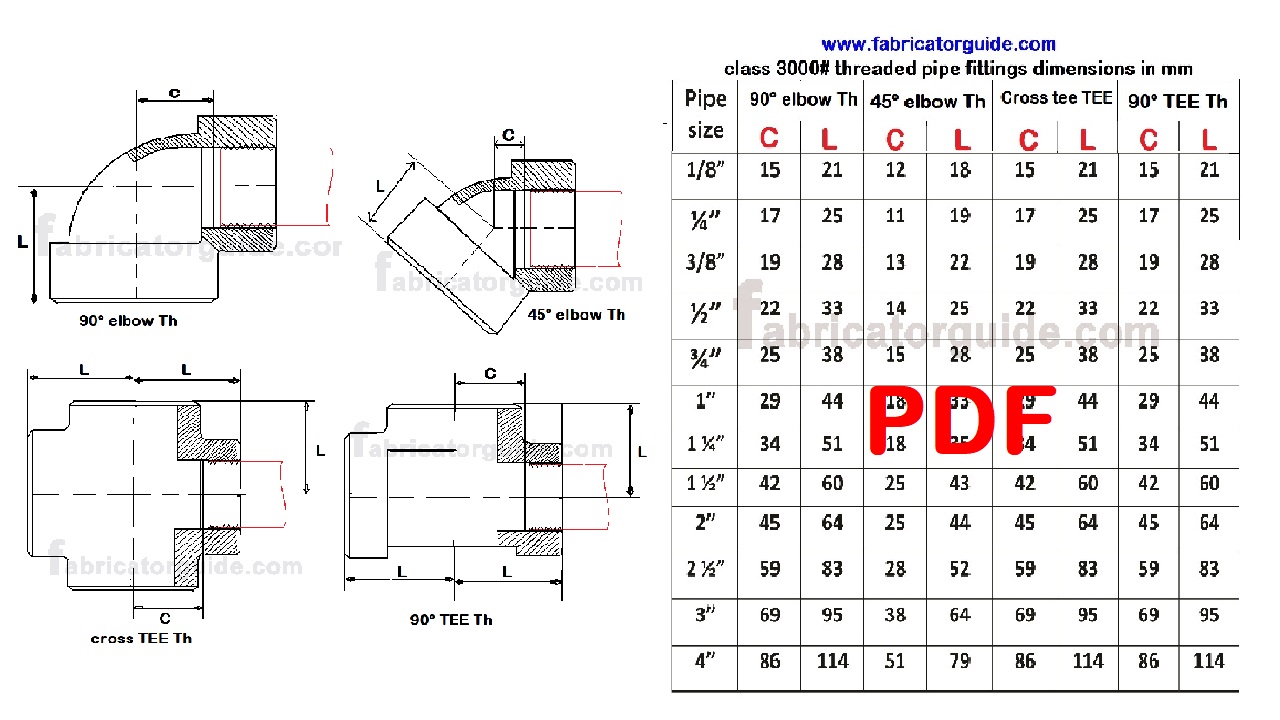
If the above steps haven't resolved the leak, the problem may lie deeper within the washing machine's plumbing. This is where understanding threaded fittings and their dimensions becomes crucial, though disassembling the machine's internal components is best left to qualified technicians. A "Threaded Fitting Take Off Chart" is a resource that details the dimensions and types of threaded fittings used in various plumbing applications, including appliances.
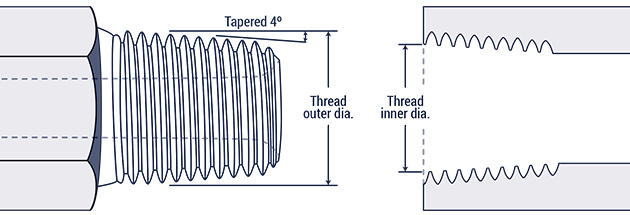
Understanding the chart's use: A technician would use this chart to identify the correct replacement fitting when a leak originates from within the machine's internal plumbing. The chart specifies the nominal pipe size (NPS), thread type (e.g., NPT, BSPT), and overall dimensions of the fitting.
Why it's important to seek professional help at this stage:
- Complexity: Accessing internal plumbing requires disassembling the washing machine, which can be complex and potentially damage other components.
- Specialized Tools: Removing and replacing threaded fittings often requires specialized plumbing tools.
- Correct Fit: Using the wrong type or size of fitting can cause leaks and further damage. The take-off chart is useless without the expertise to properly identify the existing fitting.
- Safety: Some internal components may be connected to electrical circuits.
Here are some example components where threaded fittings are frequently used within a washing machine (but remember, leave these repairs to professionals):
- Water inlet valve connections: Where the water supply hoses connect to the machine internally.
- Pump connections: Where hoses connect to the drain pump and recirculation pump (if present).
- Tub connections: Where hoses connect to the wash tub itself.
Example Scenario (Professional Use): A technician observes a leak coming from a connection near the drain pump. Using the take-off chart and physical examination, they identify the fitting as a 1/2" NPT (National Pipe Thread) elbow. They then source a replacement elbow with the same specifications to ensure a leak-free repair.
7. When to Call a Professional
If you've tried the above steps and the leak persists, or if you're uncomfortable with any of the procedures, it's time to call a qualified appliance repair technician. Specifically, contact a professional if:
- The leak is coming from inside the washing machine cabinet.
- You suspect a problem with the pump, motor, or other internal components.
- You are unsure about any of the steps outlined above.
- You have to work with electricity or gas (for gas dryers)
Preventative Maintenance
Regular maintenance can help prevent leaks and other problems with your washing machine.
- Inspect hoses regularly: Check for cracks, bulges, and leaks. Replace hoses every 3-5 years, even if they look okay.
- Clean the detergent dispenser: Regularly clean the dispenser to prevent clogs.
- Run a cleaning cycle: Use a washing machine cleaner to remove buildup and odors. Follow the manufacturer's instructions.
- Avoid overloading the machine: Overloading can stress the components and lead to leaks.
- Leave the door ajar after use (front-load washers): This helps to prevent mold and mildew growth in the seal.
Final Thoughts
Troubleshooting a washing machine leak can be a rewarding experience. By following these steps and prioritizing safety, you can often diagnose and fix the problem yourself. However, remember that some repairs are best left to the professionals. Knowing when to call for help can save you time, money, and potential headaches.
Disclaimer: This guide provides general troubleshooting tips and should not be considered a substitute for professional advice. Always follow the manufacturer's instructions for your specific washing machine model.