Trane Air Conditioner Parts Diagram

Many homeowners experience the frustration of an air conditioner that suddenly stops cooling effectively. Often, it's not a complete breakdown but a minor issue easily addressed with a little troubleshooting. This article focuses on using a Trane air conditioner parts diagram to diagnose and potentially fix common problems. Remember, safety is paramount. Always disconnect power to your AC unit before beginning any work.
Understanding Your Trane AC Unit: The Parts Diagram Advantage
Before diving into troubleshooting, familiarize yourself with the basic components of your Trane AC unit using a parts diagram. You can usually find a diagram in your owner's manual or by searching online with your unit's model number. Knowing the names and locations of key parts will make diagnosis much easier. Key components include:
- Compressor: The heart of the system, responsible for compressing the refrigerant.
- Condenser Coil: Located in the outdoor unit, it releases heat from the refrigerant.
- Evaporator Coil: Located in the indoor unit, it absorbs heat from the air.
- Expansion Valve (or Metering Device): Controls the flow of refrigerant into the evaporator coil.
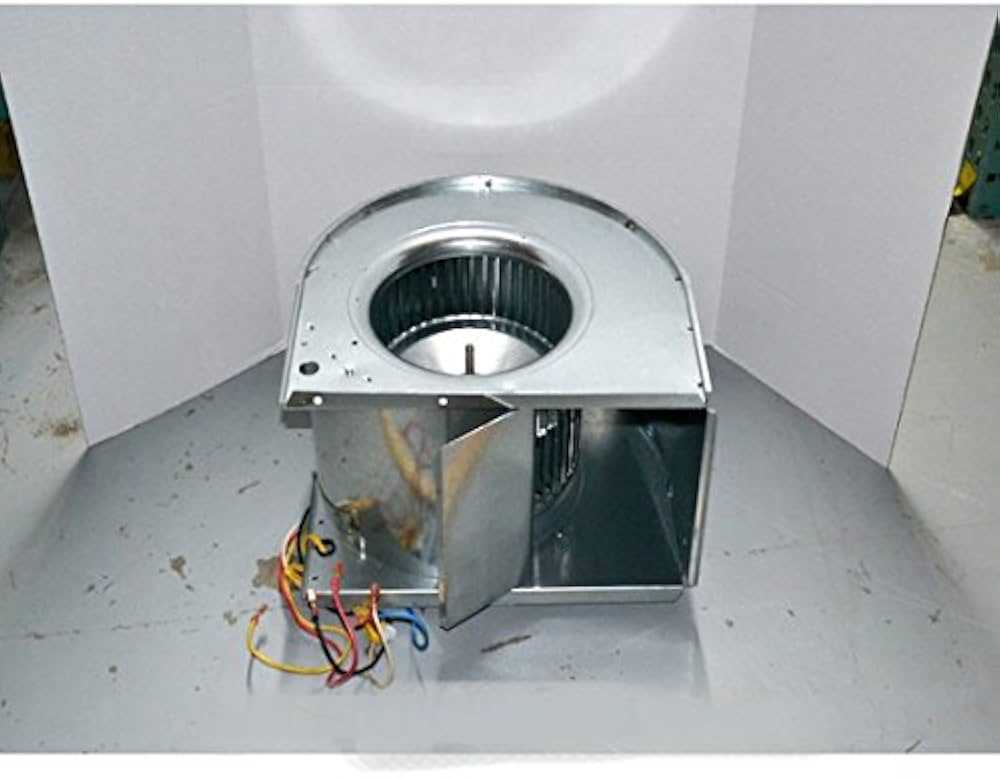
- Blower Motor: Circulates air through the evaporator coil and into your home.
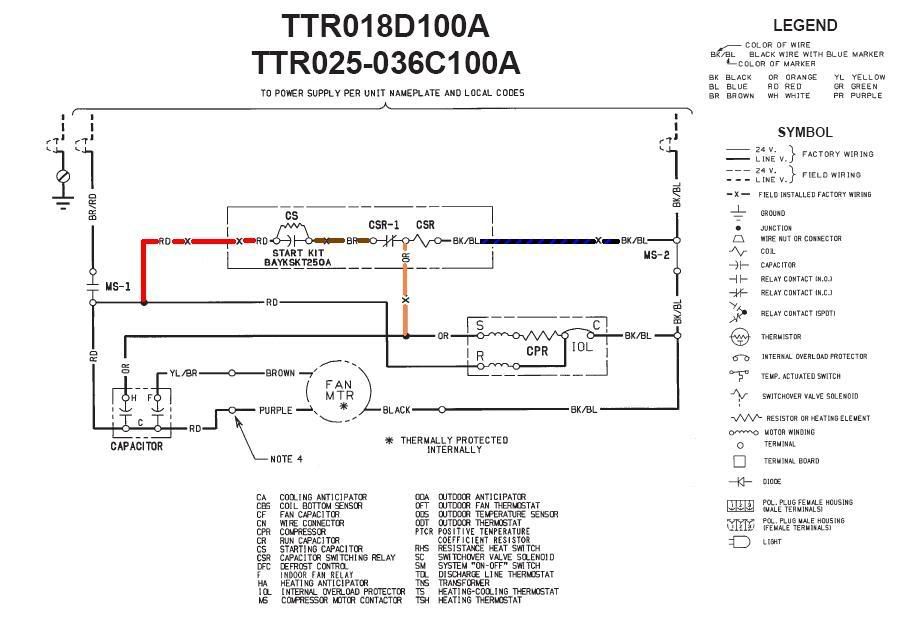
- Capacitor: Provides the electrical boost needed to start the compressor and fan motors.
- Contactor: An electrical switch that controls power to the compressor and condenser fan motor.
- Refrigerant Lines: Copper pipes that carry refrigerant between the indoor and outdoor units.
Having a parts diagram allows you to visually identify these components and understand their relationships within the system. This visual aid is invaluable when trying to pinpoint the source of a problem.
The Common Culprit: The Dirty Air Filter
One of the most common reasons for poor AC performance is a dirty air filter. This seemingly small component plays a crucial role in maintaining proper airflow and protecting the system from dust and debris. A clogged filter restricts airflow, forcing the AC unit to work harder, reducing its efficiency, and potentially causing it to overheat. This can lead to a tripped breaker, frozen evaporator coil, or even compressor failure.
Diagnosis:
- Locate the Air Filter: Consult your Trane AC parts diagram or owner's manual to find the air filter location. It's typically located in the indoor unit, often near the blower motor compartment. Common locations include a slot in the side of the unit or behind a removable panel.
- Visual Inspection: Remove the filter and hold it up to the light. If you can't see through it easily, or if it's visibly covered in dust and debris, it's dirty.
DIY Fix:
- Replacement: Replace the dirty filter with a new one of the same size and type. Ensure the arrow on the filter points in the direction of airflow.
- Regular Maintenance: Aim to replace your air filter every 1-3 months, depending on usage and the amount of dust in your home.
When to Call a Professional: If replacing the air filter doesn't improve cooling performance, or if you find significant amounts of dust and debris inside the unit despite regular filter changes, it's time to consult a qualified HVAC technician. This could indicate a more serious problem with the system's airflow or ductwork.
Troubleshooting the Condenser Unit (Outdoor Unit)
The outdoor condenser unit is another area prone to problems. It's responsible for releasing heat from the refrigerant, and if it's not functioning correctly, your AC won't cool efficiently.
Diagnosis:
- Visual Inspection: Check the condenser unit for obstructions like plants, leaves, or debris blocking the fins. Also, inspect the fins themselves for damage (bent or crushed fins).
- Listen for Unusual Noises: Pay attention to any unusual noises coming from the unit, such as loud humming, buzzing, or rattling. These noises could indicate a problem with the fan motor, compressor, or other components. Refer to your Trane AC parts diagram to identify the source of the noise.
- Check the Contactor: The contactor is an electrical switch that controls power to the compressor and condenser fan motor. Carefully (with the power OFF), inspect the contactor for signs of burning or pitting.
DIY Fixes (with caution!):
- Clear Obstructions: Remove any plants, leaves, or debris blocking the condenser unit. Ensure there is adequate airflow around the unit (at least 2-3 feet of clearance).
- Clean the Condenser Fins: Use a fin comb to gently straighten any bent or crushed fins. You can also use a garden hose (with a gentle spray nozzle) to clean the fins from the inside out. *Be very careful not to bend the fins further.*
- Check the Disconnect Switch: Make sure the disconnect switch (usually located near the condenser unit) is in the "ON" position. Sometimes these switches can be accidentally tripped.
When to Call a Professional: If you suspect a problem with the contactor (burning or pitting), hear unusual noises coming from the compressor, or the condenser fan is not running, do not attempt to fix it yourself. These issues require specialized knowledge and tools. Contact a qualified HVAC technician for diagnosis and repair.
Addressing a Frozen Evaporator Coil
A frozen evaporator coil is another common problem. It occurs when the evaporator coil becomes too cold, causing moisture in the air to freeze on its surface. This ice buildup restricts airflow and reduces the cooling capacity of the AC unit.
Diagnosis:
- Check Airflow: As mentioned earlier, a dirty air filter is a primary cause. Ensure the air filter is clean and properly installed. Also, check for blocked vents or closed registers in your home.
- Inspect the Evaporator Coil: If possible, visually inspect the evaporator coil (located in the indoor unit). You may need to remove an access panel to see it. Look for signs of ice buildup. *Be very careful not to damage any components while removing the panel.* Refer to your Trane AC parts diagram if you are unsure how to access the coil.
DIY Fixes:
- Turn Off the AC: Turn off the AC unit and switch the fan to the "ON" position. This will circulate air over the frozen coil and help it thaw.
- Check for Air Leaks: Inspect the ductwork for any air leaks. Seal any leaks you find with duct tape or mastic sealant.
When to Call a Professional: If the evaporator coil freezes repeatedly, even after cleaning the air filter and ensuring proper airflow, there may be a more serious problem, such as a refrigerant leak or a malfunctioning metering device. Contact a qualified HVAC technician for diagnosis and repair. Do not attempt to add refrigerant yourself.
Capacitor Issues
Capacitors are essential for starting the compressor and fan motors in your Trane AC unit. A failing capacitor can prevent the unit from starting or cause it to run inefficiently.
Diagnosis:
- Listen for a Humming Noise: If the compressor or fan motor is humming but not starting, it could indicate a capacitor problem.
- Visual Inspection (with caution!): *Only attempt this if you are comfortable working with electrical components and have the necessary safety precautions in place.* Turn off the power to the AC unit at the breaker box. Carefully inspect the capacitor for signs of bulging, leaking, or corrosion. Capacitors can store an electrical charge even after the power is turned off, so be extremely cautious and discharge the capacitor with an insulated screwdriver before handling it.
DIY Fix (with EXTREME caution and if you are qualified):
- Replacement: If you are comfortable and qualified to do so, you can replace a faulty capacitor. Ensure you purchase a replacement capacitor with the exact same voltage and capacitance ratings as the original. Carefully disconnect the wires from the old capacitor (taking note of their positions) and connect them to the new capacitor in the same way.
When to Call a Professional: If you are not comfortable working with electrical components or are unsure about how to safely discharge and replace a capacitor, do not attempt to fix it yourself. Contact a qualified HVAC technician for assistance. Incorrectly replacing a capacitor can damage the AC unit or cause electrical shock.
Refrigerant Leaks: A Major Concern
Refrigerant is the lifeblood of your AC system. If there's a leak, your AC won't cool properly. Refrigerant leaks are best left to professionals.
Diagnosis:
- Poor Cooling Performance: The most obvious sign is that your AC isn't cooling as well as it used to.
- Ice Buildup on Refrigerant Lines: You may notice ice forming on the refrigerant lines, especially near the connections.
- Hissing Sound: You might hear a hissing sound coming from the AC unit, indicating escaping refrigerant.
DIY Fix:
There are NO DIY fixes for refrigerant leaks. Adding refrigerant without fixing the leak is illegal and environmentally irresponsible.
When to Call a Professional: If you suspect a refrigerant leak, contact a qualified HVAC technician immediately. They have the necessary tools and expertise to locate and repair the leak and recharge the system with refrigerant.
Using Your Trane AC Parts Diagram for Identifying Components
Throughout this troubleshooting guide, the importance of a Trane AC parts diagram has been emphasized. Always refer to your specific model's diagram to accurately locate components. Diagrams vary depending on the unit. Knowing the exact location of the capacitor, contactor, evaporator coil, and other parts will save you time and prevent accidental damage during inspection or repair.
Preventative Maintenance: Keeping Your Trane AC Running Smoothly
The best way to avoid AC problems is to perform regular preventative maintenance. Here are a few tips:
- Change the Air Filter Regularly: As discussed earlier, this is crucial for maintaining proper airflow.
- Clean the Condenser Unit: Remove any debris and clean the fins regularly.
- Schedule Professional Maintenance: Have your AC unit inspected and serviced by a qualified HVAC technician at least once a year. They can identify and address potential problems before they become major issues.
By following these tips and using your Trane AC parts diagram to understand your system, you can troubleshoot common problems and keep your AC running smoothly for years to come. Remember, when in doubt, always consult a qualified HVAC professional.