
Trane Air Handler Filter Location

One of the most frustrating homeowner experiences is when your heating or cooling system suddenly stops working efficiently, leaving you either shivering in the winter or sweating in the summer. Often, the culprit is something surprisingly simple, and the good news is that you might be able to fix it yourself without calling a professional. Let's focus on one common cause: a dirty or blocked air filter in your Trane air handler. This article will guide you through finding your filter, diagnosing the issue, and performing some basic DIY fixes.
Diagnosing the Problem: Is It the Filter?
Before we dive into finding the filter, let's make sure a dirty filter is the likely cause of your HVAC woes. Consider these symptoms:
- Reduced airflow from vents: This is a primary indicator. Feel the air coming from your vents. Is it weaker than usual?
- Uneven heating or cooling: Some rooms might be warmer or colder than others.
- Increased energy bills: A struggling system works harder, consuming more energy.
- The system runs constantly: It's trying to reach the set temperature but can't due to restricted airflow.
- Strange noises: The blower motor might be straining, leading to unusual sounds.
- Visible dust accumulation: Check around vents and registers for excessive dust buildup.
If you're experiencing several of these symptoms, a dirty air filter is a prime suspect.
Locating the Air Filter in Your Trane Air Handler
Trane air handlers come in various models, and filter locations can vary. However, here’s a general guide to help you find it:
Step 1: Safety First!
Before you do *anything*, turn off the power to your air handler at the breaker box. This prevents accidental electrical shock. Confirm the power is off by checking that the blower fan isn't running.
Step 2: Identify Your Air Handler
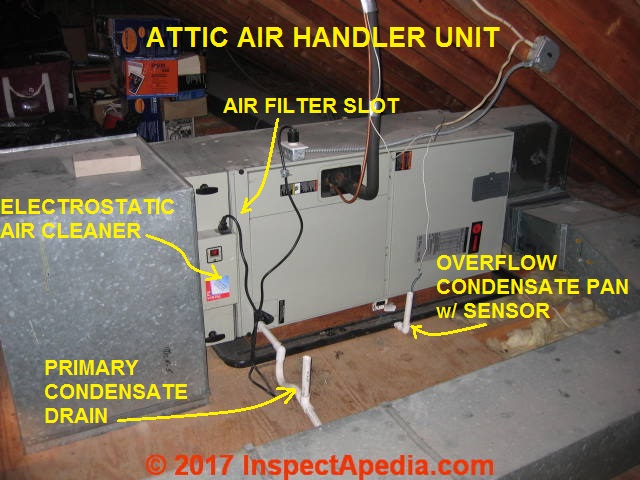
Find the indoor unit of your HVAC system – the air handler. It's usually located in the attic, basement, closet, or utility room. Look for a metal box connected to ductwork.
Step 3: Search for the Filter Access Panel
The filter is usually located behind an access panel on the air handler unit. This panel is typically rectangular or square and secured with screws, clips, or latches. Look for these common locations:
- On the side of the air handler: This is a very common location. The panel might be near the bottom or middle of the unit.
- At the bottom of the air handler: Some units have a bottom access panel.
- Where the return duct connects to the air handler: In some installations, the filter is housed in a separate compartment right where the return air duct enters the unit.
- Within the return air grille itself: Although less common with air handlers directly, sometimes the filter is behind the return air grille (the vent where air is sucked into the system) on the wall or ceiling. This may be connected to your main unit.
Step 4: Inspect the Access Panel
Once you've found a likely access panel, examine it closely:
- Look for labels: Some panels are labeled "Filter Access" or something similar.
- Check for screws or clips: How is the panel secured? Identify the type of fastener before attempting to open it.
Step 5: Opening the Access Panel
Now, carefully open the access panel. The method depends on how it's secured:
- Screws: Use a screwdriver (usually a Phillips head) to remove the screws. Keep the screws in a safe place!
- Clips: Gently pry open the clips. Be careful not to break them.
- Latches: Slide or unlatch the latches to release the panel.
Once the panel is open, you should see the air filter. If not, double-check the other possible locations mentioned above. If you still can't find it, consult your Trane air handler's manual (if you have it) or search online using your model number.
DIY Actions: Inspecting and Replacing the Air Filter
Now that you've found the filter, let's assess its condition and take appropriate action.
Step 1: Filter Inspection (No Tools Required)
Carefully remove the air filter from its housing. Hold it up to the light. Observe the following:
- Dust and debris: How much dust, dirt, and debris is trapped in the filter? If it's heavily coated, it needs replacing.
- Filter material: What kind of filter is it? (Fiberglass, pleated, etc.) Note this for when you buy a replacement.
- Filter size: The filter size is usually printed on the frame of the filter (e.g., 16x25x1). Write this down or take a picture for reference.
- Airflow direction: Some filters have an arrow indicating the correct airflow direction. Note this for when you install the new filter.
Important: A visibly dirty filter significantly restricts airflow and needs to be replaced. Even if it *looks* relatively clean, if it's been in use for the recommended time (usually 1-3 months), it's best to replace it.
Step 2: Filter Replacement (Simple Tools May Be Required)
Replacing the filter is straightforward. Here's what you'll need:
- New air filter: Make sure it's the correct size and type for your air handler.
- Screwdriver (if necessary): If you had to remove screws to access the filter.
- Gloves (optional): To keep your hands clean.
Follow these steps:
- Insert the new filter: Align the filter with the airflow direction arrow (if present). Slide it into the filter housing.
- Replace the access panel: Secure the access panel with the screws, clips, or latches. Make sure it's properly sealed to prevent air leaks.
- Restore power: Turn the power back on to your air handler at the breaker box.
- Test the system: Turn on your thermostat and ensure the heating or cooling system is working properly. Check for improved airflow from the vents.
Step 3: Cleaning the Filter Housing (Optional)
While the filter is out, you can also clean the filter housing using a vacuum cleaner with a brush attachment. This removes any accumulated dust and debris, ensuring optimal airflow.
When to Call a Professional
While replacing an air filter is a simple DIY task, there are situations where you should definitely call a qualified HVAC technician:
- You can't find the filter: If you've followed the steps above and still can't locate the filter, don't force anything. An HVAC professional can quickly identify the location and ensure you're not damaging any components.
- The filter is difficult to remove: If the filter is stuck or requires excessive force to remove, there might be an underlying issue. Don't risk damaging the air handler.
- You notice other problems: If you see signs of mold, water damage, or other unusual conditions while inspecting the filter area, call a professional. These issues require specialized attention.
- The system still isn't working properly: If you've replaced the filter and your system is still exhibiting the same symptoms (weak airflow, uneven temperatures, etc.), the problem likely lies elsewhere. Common issues could be a failing blower motor, a refrigerant leak, or a problem with the compressor.
- You're uncomfortable working with electrical components: If you are unsure on how to turn off the breaker, or uneasy with working close to the electrical components of the air handler, it is best to consult a professional.
Preventative Maintenance: Keeping Your System Running Smoothly
Regular air filter replacement is crucial for maintaining the efficiency and longevity of your Trane air handler. Here are some preventative maintenance tips:
- Check the filter monthly: Depending on your environment (pets, allergies, dust), you might need to replace the filter more frequently than every 1-3 months.
- Use the right filter type: Consult your Trane air handler's manual or an HVAC professional to determine the recommended filter type for your system. Using the wrong filter can restrict airflow and damage the blower motor.
- Schedule regular HVAC maintenance: A professional HVAC technician can perform a thorough inspection of your system, identify potential problems early on, and ensure it's running at peak efficiency.
Conclusion
Replacing your Trane air handler's air filter is a simple and effective way to improve your system's performance and save money on energy bills. By following the steps outlined in this article, you can confidently diagnose the problem, locate the filter, and perform a DIY replacement. Remember to prioritize safety, and don't hesitate to call a professional when needed. With a little preventative maintenance, you can keep your HVAC system running smoothly for years to come.
.jpg)
.jpg)



.jpg)