Trane Air Handler Parts Diagram

Imagine this: It's a sweltering summer day, and your air conditioning suddenly quits. The air vents are blowing warm air, and the house is slowly turning into an oven. Before you panic and call a costly HVAC technician, there are a few things you can check yourself. This guide will focus on troubleshooting common issues with your Trane air handler, helping you identify potential problems and even perform some simple fixes.
Understanding Your Trane Air Handler: A Basic Overview
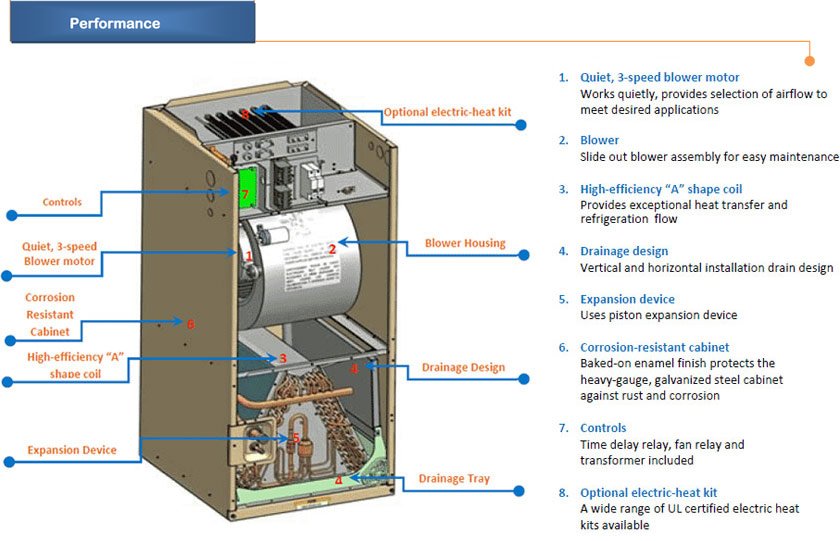
The air handler is the indoor unit of your central air conditioning or heat pump system. It contains the blower fan that circulates air throughout your home, the evaporator coil (where the refrigerant cools the air), and often electric heating elements for supplemental heat. Knowing the basic components is crucial for troubleshooting.
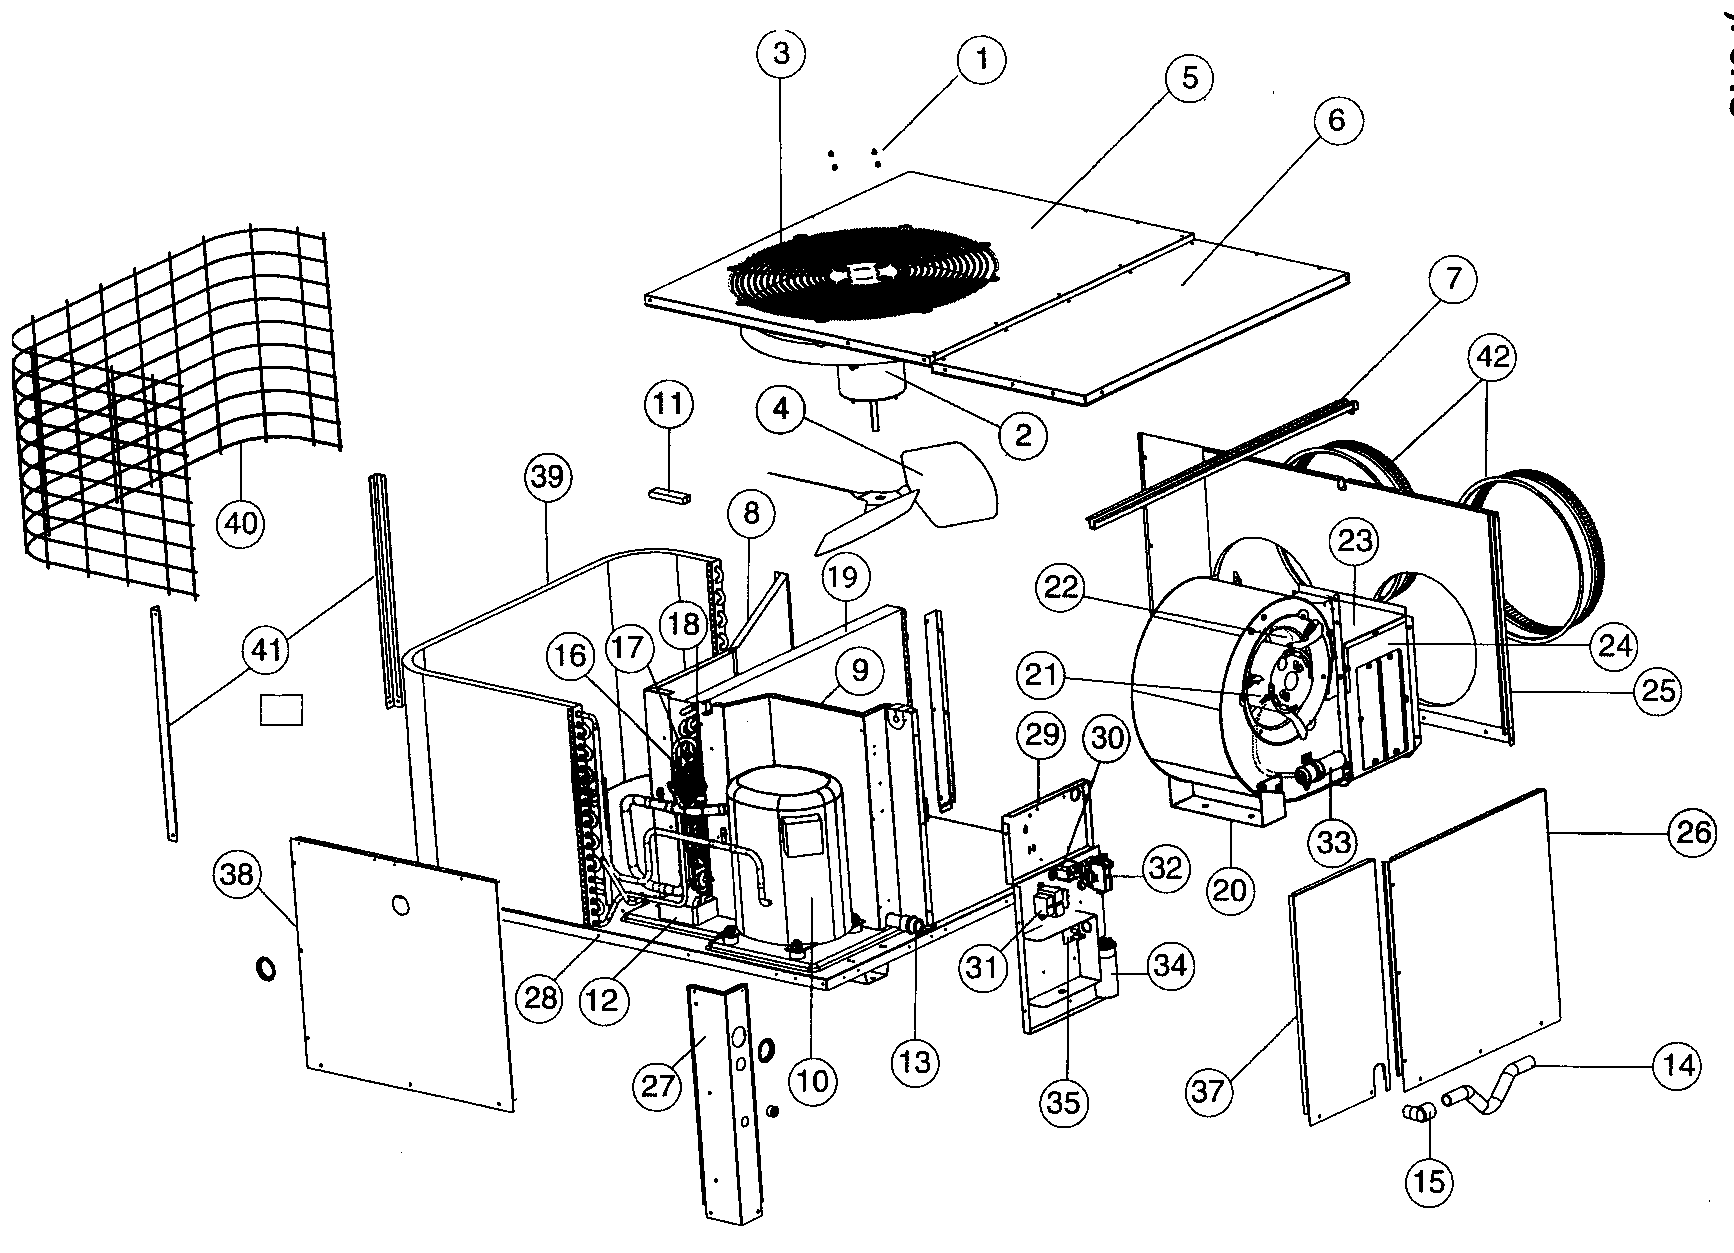
Why a Parts Diagram is Your Friend: A Trane air handler parts diagram is essentially a roadmap of your unit. It shows the location of each component, making it easier to identify and potentially replace faulty parts. You can usually find a diagram inside the unit's access panel or online using your model number.
Step-by-Step Troubleshooting Guide
1. Safety First!
Before you begin any troubleshooting, turn off the power to the air handler at the circuit breaker. This is absolutely essential to prevent electric shock. Double-check that the power is off using a non-contact voltage tester if you have one. If you are uncomfortable working with electricity, stop here and call a qualified HVAC technician.
2. Basic Checks: Thermostat and Power Supply
Sometimes the problem is simpler than you think:
- Thermostat Settings: Ensure your thermostat is set to "Cool" or "Heat" and the temperature is set lower (in cooling mode) or higher (in heating mode) than the current room temperature. Make sure the fan is set to "Auto," not "On" (unless you specifically want the fan running constantly).
- Thermostat Batteries: Replace the thermostat batteries if they're low or dead. A weak thermostat signal can cause the air handler to malfunction.
- Circuit Breaker: Check the circuit breaker for the air handler. If it's tripped (in the "Off" or middle position), reset it by flipping it all the way to the "Off" position and then back to the "On" position. If it trips again immediately, there's likely a short circuit, and you'll need a professional.
- Power Switch: Some air handlers have a separate power switch located on the unit itself. Make sure this switch is in the "On" position.
3. Inspecting the Air Handler Unit
With the power off, carefully remove the access panel(s) of your air handler. Refer to your parts diagram to identify the following components:
- Air Filter: A clogged air filter is a very common cause of reduced airflow and system inefficiency. Replace the air filter with a new one of the correct size and type. This is a preventative measure that should be done regularly (every 1-3 months).
- Blower Motor: Locate the blower motor. Is it visibly damaged? Are there any signs of burning or overheating? Try to spin the blower wheel (fan) by hand. It should spin freely. If it's difficult to turn or makes a grinding noise, the motor bearings may be failing. Replacing a blower motor can be a DIY project for some, but it involves electrical connections and proper wiring. If you're not comfortable, call a professional.
- Blower Capacitor: The blower capacitor is a small cylindrical component connected to the blower motor. It helps start and run the motor. If the capacitor is bulged, leaking, or cracked, it's likely faulty. Capacitors store an electrical charge even when the power is off, so discharge it with an insulated screwdriver before handling it. This is a safety precaution! Replacing a capacitor is generally a straightforward DIY repair for those comfortable working with electricity.
- Evaporator Coil: The evaporator coil is usually an A-shaped or rectangular component. Check for ice buildup on the coil. If there's ice, it could indicate a refrigerant leak, a clogged air filter, or a problem with the airflow. Allow the ice to thaw completely before restarting the system. If the icing recurs, you'll need a professional to diagnose the underlying issue.
- Drain Pan and Drain Line: The drain pan is located underneath the evaporator coil. Check for standing water in the pan. If the drain pan is overflowing, the drain line is likely clogged. You can try clearing the drain line with a wet/dry vacuum or a stiff wire. If the clog is persistent or you suspect mold growth, consult a professional.
- Electric Heating Elements (if equipped): If your air handler has electric heating elements, visually inspect them for signs of damage or burnout. Do not attempt to test the heating elements yourself unless you are a qualified electrician.
4. Common DIY Repairs (with Caution)
- Replacing the Air Filter: As mentioned earlier, this is the most common and easiest DIY fix.
- Clearing the Drain Line: Use a wet/dry vacuum to suck out any debris from the drain line. You can also try using a stiff wire to break up any clogs. Consider using a mixture of bleach and water to flush the drain line periodically to prevent future clogs.
- Replacing the Blower Capacitor: Remember to discharge the capacitor before handling it! Take a picture of the wiring before disconnecting the old capacitor, and connect the new capacitor in the same way. Make sure the new capacitor has the same voltage and capacitance rating as the old one.
5. When to Call a Professional
The following situations require the expertise of a qualified HVAC technician:
- Refrigerant Leaks: Refrigerant is a controlled substance, and handling it requires specialized equipment and training. A refrigerant leak can also indicate a more serious problem with the system.
- Complex Electrical Issues: If you suspect a short circuit, faulty wiring, or problems with the blower motor, it's best to leave it to the professionals.
- Gas Leaks: If you smell gas, evacuate the premises immediately and call your gas company and a qualified HVAC technician.
- Major Component Failures: Replacing the blower motor, evaporator coil, or other major components requires specialized knowledge and equipment.
- Icing Issues: Persistent icing on the evaporator coil indicates a deeper problem that needs to be diagnosed and repaired by a professional.
- You're Uncomfortable: If at any point you feel uncomfortable or unsure about performing a repair, stop and call a professional. It's always better to be safe than sorry.
Using Your Trane Air Handler Parts Diagram Effectively
Your Trane air handler parts diagram is your best reference when attempting a repair or communicating with a technician. Here's how to use it effectively:
- Locate the Diagram: As mentioned, check inside the unit's access panel or search online using your model number.
- Identify the Components: Familiarize yourself with the diagram and identify the location of key components like the blower motor, capacitor, evaporator coil, and drain pan.
- Part Numbers: The diagram will often list part numbers for each component. This is crucial for ordering replacement parts.
- Wiring Diagrams: Some diagrams include wiring diagrams, which are essential for making sure you reconnect wires correctly after replacing a component.
- Communicate with Techs: When calling a technician, having the parts diagram and being able to point out the specific component that seems to be malfunctioning can save time and money.
Preventative Maintenance: The Key to Longevity
The best way to avoid air handler problems is to perform regular preventative maintenance:
- Replace the Air Filter Regularly: As mentioned, this is the most important preventative measure.
- Clean the Evaporator Coil: Periodically clean the evaporator coil with a coil cleaner to remove dust and debris. Follow the manufacturer's instructions carefully.
- Inspect the Drain Line: Check the drain line for clogs and clear it as needed.
- Schedule Professional Maintenance: Have your HVAC system professionally inspected and maintained at least once a year. A technician can identify potential problems before they become major issues.
Conclusion
Troubleshooting your Trane air handler can seem daunting, but by following these steps and using your parts diagram effectively, you can often identify and fix simple problems yourself. Remember to prioritize safety and never hesitate to call a professional when needed. With a little knowledge and preventative maintenance, you can keep your air handler running smoothly for years to come.