Trane Nomenclature Model Breakdown

Decoding a Trane model number can feel like deciphering a secret code. But understanding the Trane nomenclature is a valuable skill for homeowners and DIY enthusiasts alike. This guide will break down the components of a typical Trane model number, helping you identify your unit, find replacement parts, and potentially troubleshoot minor issues. Knowing your unit's specifications can also assist you in obtaining accurate repair cost estimates.
Understanding the Basic Structure
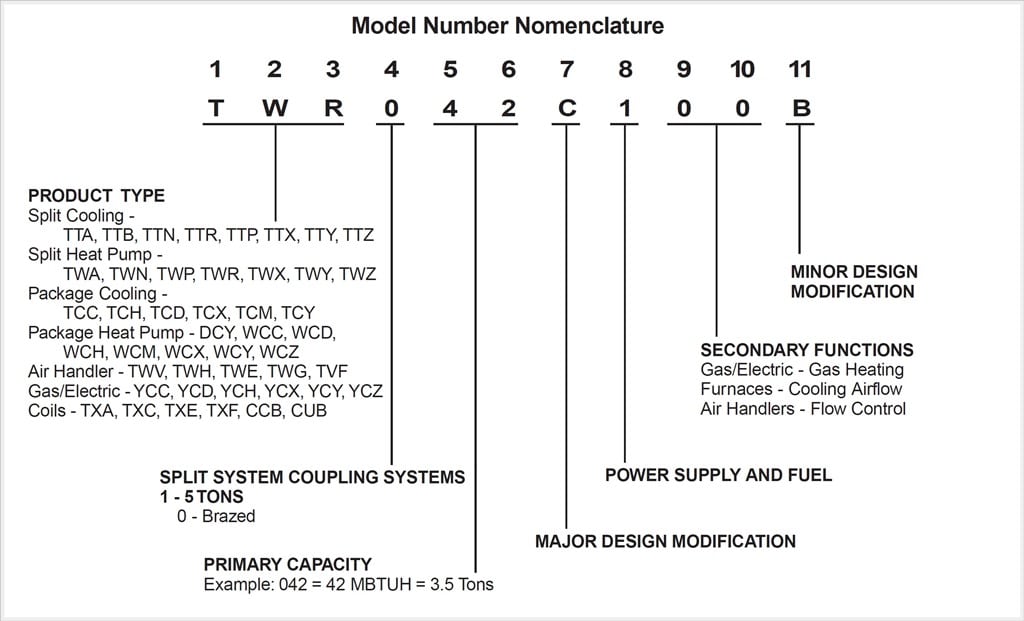
Trane model numbers are generally a string of letters and numbers that represent different features and specifications of the unit. The exact format can vary slightly depending on the type of equipment (e.g., air conditioner, heat pump, furnace), but the core principles remain the same. We will use a generic example to illustrate the concepts, but always refer to your unit's specific model number plate for accurate information.
Let's consider a hypothetical model number: XR16 4TTR3036A1000AA.
Segment-by-Segment Breakdown
We'll break down this example piece by piece:
- XR16: This typically indicates the series or model line. The "XR" usually signifies a specific line within Trane's residential offerings. The "16" often, but not always, represents the SEER (Seasonal Energy Efficiency Ratio) rating, indicating the unit's energy efficiency. Higher numbers generally indicate greater efficiency, but this isn't always a direct correlation.
- 4TTR3: This segment often identifies the type of unit and basic configuration. The leading "4" designates this is a split-system unit, but numbers could vary for packaged systems. "TTR" usually denotes an outdoor unit (condenser) in a residential system. Specific letters and numbers might indicate compressor type or other internal features.
- 036: This section is usually related to the BTU (British Thermal Units) output of the unit. In this case, "036" likely means 36,000 BTU, which translates to a 3-ton unit (36,000 BTU / 12,000 BTU per ton = 3 tons).
- A1: These sections often specify voltage and phase. "A1" is commonly 208/230V single phase, but always verify against your unit's rating plate.
- 000AA: This last portion generally represents engineering revisions, factory options, or other specific manufacturing details. This part is usually less critical for basic troubleshooting and parts identification.
Decoding Specific Components
Let's delve deeper into some of the key components and what they signify:
SEER Rating
As mentioned earlier, the SEER rating reflects the unit's cooling efficiency. Higher SEER ratings translate to lower energy bills. Trane offers a range of SEER ratings to meet different needs and budgets.
BTU and Tonnage
Understanding BTU and tonnage is crucial for ensuring your HVAC system is properly sized for your home. An undersized unit will struggle to cool or heat your space effectively, while an oversized unit can lead to short cycling and humidity problems.
Voltage and Phase
Incorrect voltage can severely damage your HVAC equipment. Always ensure that any replacement parts or electrical connections match the specified voltage and phase of your unit. Most residential Trane units are 208/230V single phase.
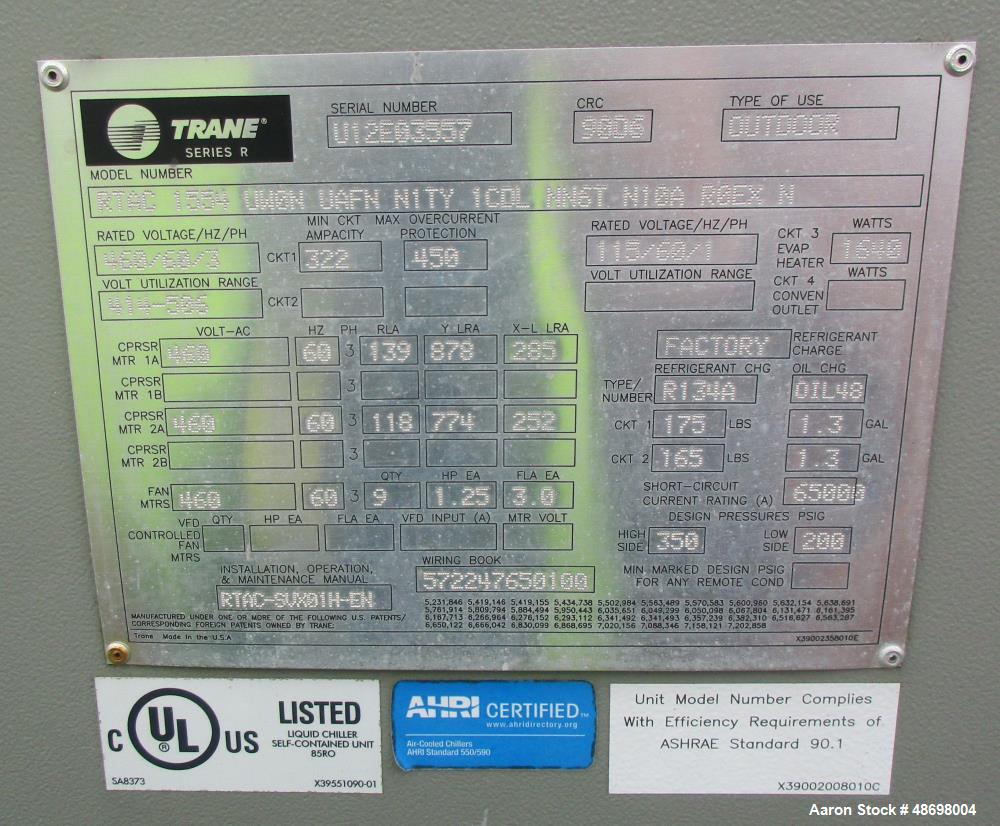
Finding Your Unit's Model Number
The model number is typically found on a metal rating plate attached to the unit. For outdoor condensers, it's usually located on the side or back. For furnaces, it's often inside the unit, accessible after removing the access panel. Be sure to turn off the power before opening any access panels.
The rating plate will contain other valuable information, including:
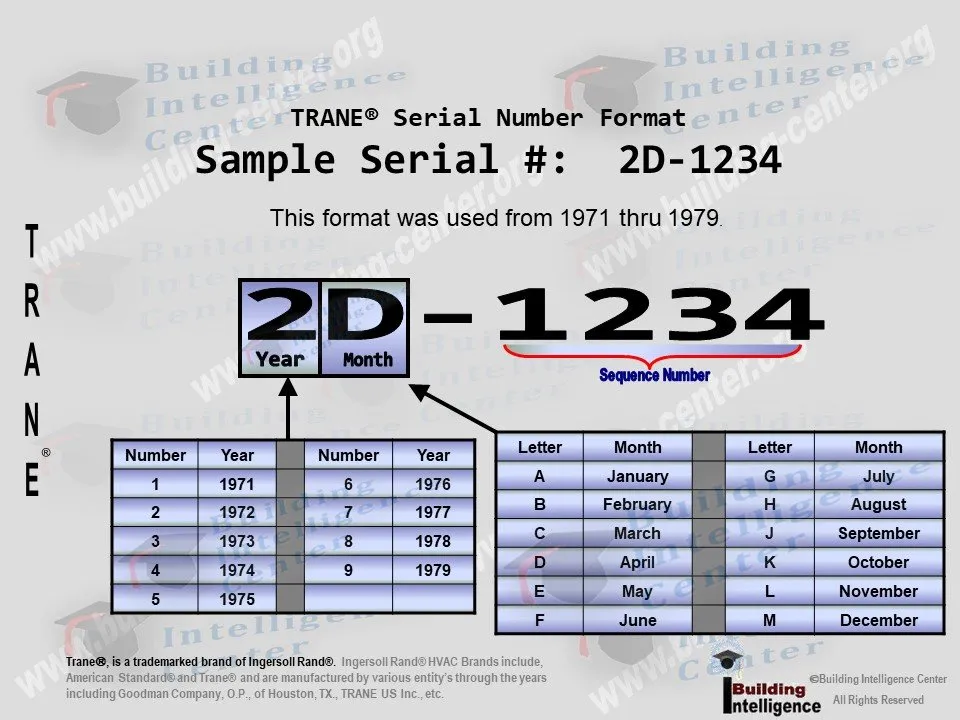
- Serial number
- Refrigerant type
- Electrical specifications (voltage, amperage)
- Manufacturing date
DIY Troubleshooting: When to Proceed and When to Call a Pro
Knowing your Trane model number can empower you to perform some basic troubleshooting steps. However, it's essential to recognize your limits and prioritize safety.
Safe DIY Tasks:
- Changing Air Filters: This is a routine maintenance task that can significantly improve your HVAC system's performance.
- Checking the Thermostat: Ensure the thermostat is set correctly and the batteries are fresh.
- Inspecting the Outdoor Unit: Check for debris obstructing the unit and clear any obstructions.
- Checking Breakers: Verify that the circuit breaker for your HVAC system hasn't tripped.
- Cleaning Condenser Fins (with caution): Carefully clean the condenser fins with a fin comb to improve airflow. Always disconnect power first and avoid bending the fins excessively.
When to Call a Professional:
Working with refrigerant, electrical components, or gas lines requires specialized knowledge and equipment. Attempting these repairs yourself can be dangerous and may void your warranty.
Call a qualified HVAC technician if you encounter any of the following:
- Refrigerant leaks
- Electrical issues (e.g., sparking, burning smells)
- Gas leaks (e.g., rotten egg smell)
- Compressor problems
- Furnace ignition issues
- Unusual noises (e.g., banging, hissing)
- If you are uncomfortable or unsure about any repair.
Finding Replacement Parts
Once you have your Trane model number, you can use it to find the correct replacement parts. Many online retailers and local HVAC supply stores offer parts lookup tools. Be sure to double-check the part number and specifications to ensure compatibility.
Common parts you might need to replace include:
- Air filters
- Capacitors
- Contactors
- Blower motors
- Igniters (for furnaces)
Estimating Repair Costs
While it's impossible to provide an exact repair cost without a professional inspection, knowing your Trane model number can help you get a rough estimate. Many HVAC contractors offer online quote tools or can provide estimates over the phone based on the model number and a description of the problem.
Factors that influence repair costs include:
- Type of repair
- Cost of parts
- Labor rates
- Location
Safety First
Always prioritize safety when working with HVAC equipment.
- Turn off the power to the unit before performing any maintenance or repairs.
- Wear appropriate safety gear, such as gloves and eye protection.
- Never work with refrigerant or gas lines unless you are a qualified technician.
- If you are unsure about any repair, call a professional.
Understanding Trane nomenclature is a valuable asset for homeowners. By deciphering your unit's model number, you can identify its specifications, find replacement parts, and potentially troubleshoot minor issues. Remember to always prioritize safety and call a qualified technician for complex repairs.
Disclaimer: This guide provides general information and should not be considered a substitute for professional advice. Always consult with a qualified HVAC technician for any specific issues or concerns.
Knowing your Trane model number is the first step towards understanding your HVAC system.