Troubleshooting Blower Motor
One of the most frustrating household failures is a malfunctioning blower motor. Whether it's in your furnace, air conditioner, or even your clothes dryer, a faulty blower motor can bring essential appliance operation to a screeching halt. This guide will walk you through a logical, step-by-step troubleshooting process, empowering you to identify and potentially resolve common issues safely. However, safety is paramount. If at any point you feel uncomfortable or the problem seems beyond your skill level, call a qualified technician immediately.
Identifying the Problem: Is it Really the Blower Motor?
Before diving into troubleshooting the blower motor itself, it's crucial to correctly identify the problem. Is the appliance not working at all, or is it making strange noises? Are you getting no airflow, weak airflow, or intermittent airflow? Understanding the symptoms will help narrow down the possible causes.
- No airflow: The appliance might power on, but there's no air coming from the vents (furnace/AC) or drum (dryer).
- Weak airflow: Airflow is significantly reduced compared to normal operation.
- Intermittent airflow: Airflow comes and goes, often accompanied by unusual noises.
- Strange noises: Grinding, squealing, or rattling sounds coming from the appliance, especially during operation.
- Appliance won't turn on: The entire appliance is dead, no lights, no fan, nothing. (Could be a breaker, fuse, or more complex issue).
Remember, a lack of airflow isn't always the blower motor's fault. It could be a tripped circuit breaker, a clogged filter, a faulty thermostat, or other issues. Let's start with the basics.
Step 1: The Obvious - Power and Settings
Never underestimate the power of the obvious. Begin with the simplest checks:
Checking the Power Supply:
- Circuit Breaker: The first thing to check is the circuit breaker for the appliance. Locate the breaker box and ensure the breaker is in the "ON" position. If it's tripped (in the middle or "OFF" position), reset it by switching it to the "OFF" position first, then back to "ON." If it trips again immediately, DO NOT keep resetting it. This indicates a short circuit or overload, and you should call an electrician.
- Fuse (If Applicable): Some older appliances may use fuses instead of circuit breakers. Check the fuse panel and replace any blown fuses with the correct amperage.
- Power Cord: Ensure the power cord is securely plugged into the outlet. Try a different outlet to rule out a faulty outlet.
Verifying the Settings:
- Thermostat (Furnace/AC): Make sure the thermostat is set to "HEAT" or "COOL" and the temperature is set appropriately. Ensure the fan setting is set to "AUTO" or "ON", depending on your preference, and that the thermostat is calling for heat or cooling. A thermostat set to "OFF" or an incorrect temperature setting will prevent the blower motor from running.
- Dryer Settings: Confirm the dryer is set to a drying cycle and not a "cool down" or "off" setting. Some dryers have a "no heat" setting that will only run the blower.
If the power supply and settings are correct, and the blower motor still isn't working, move on to the next steps.
Step 2: Inspecting the Air Filter
A clogged air filter is a very common cause of reduced airflow and can put excessive strain on the blower motor, causing it to overheat and potentially fail.
Locating and Replacing the Air Filter:
- Furnace/AC: The air filter is usually located near the blower motor compartment or in a return air vent. Consult your appliance's manual for the exact location.
- Dryer: The lint trap is NOT the air filter! Some dryers have an additional filter usually located behind a panel, or accessible after removing the lint trap housing.
Once you locate the filter:
- Remove the old filter. Note the direction of airflow (usually indicated by an arrow on the filter frame) for proper installation of the new filter.
- Inspect the new filter. Ensure it's the correct size and type for your appliance.
- Install the new filter, making sure the airflow arrow is pointing in the correct direction.
After replacing the filter, test the appliance to see if the airflow has improved. If the blower motor still isn't working correctly, proceed to the next step.
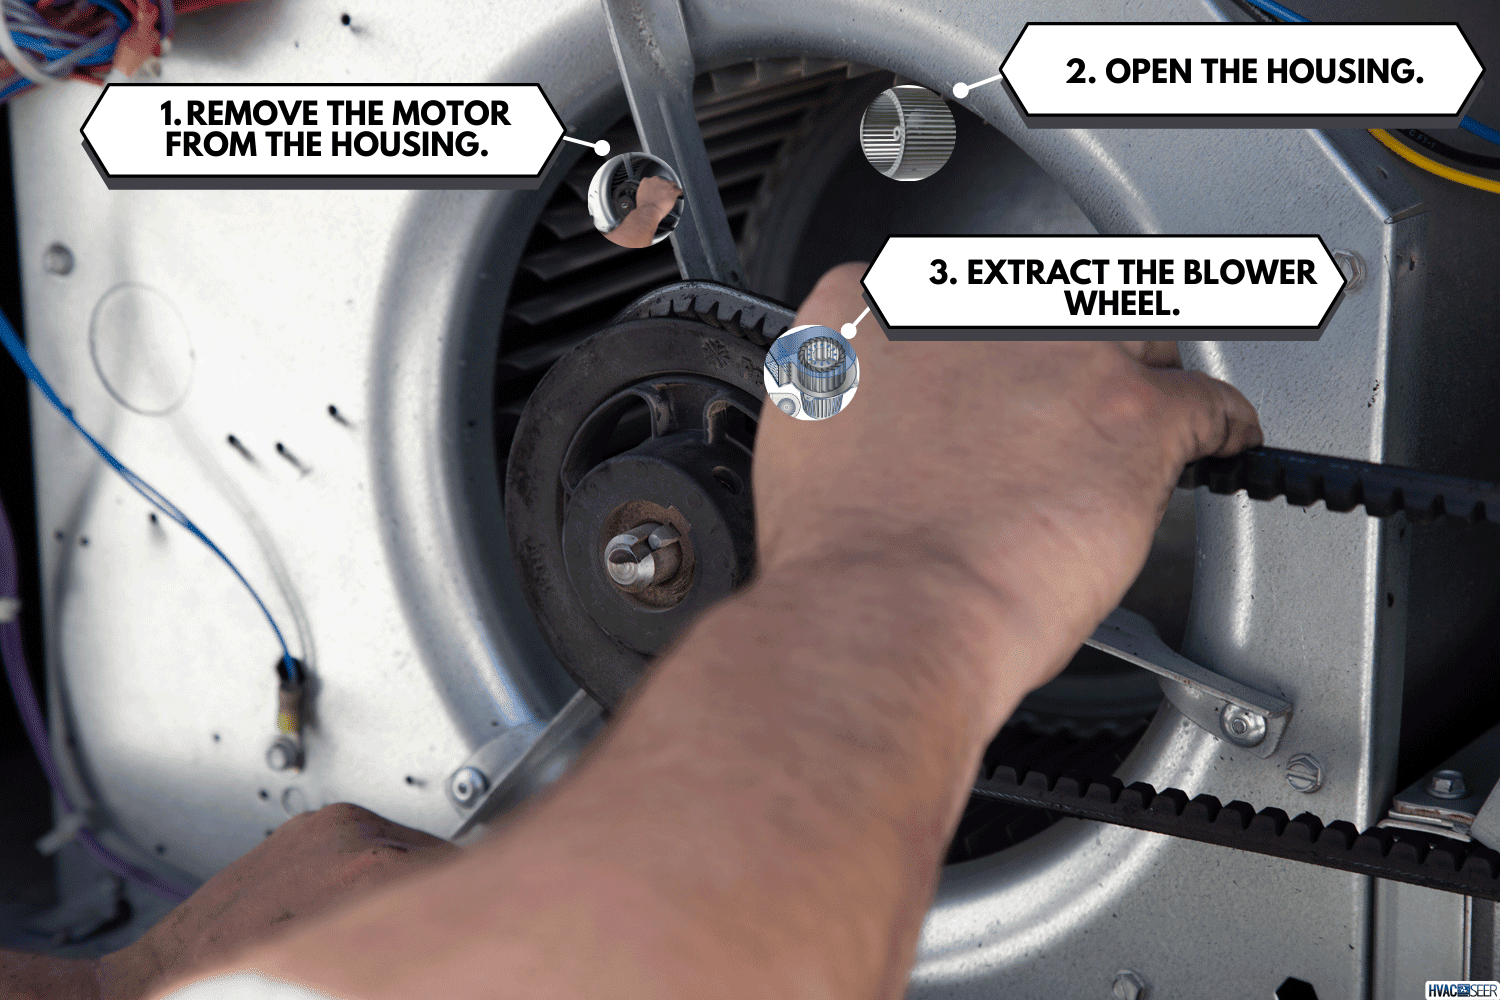
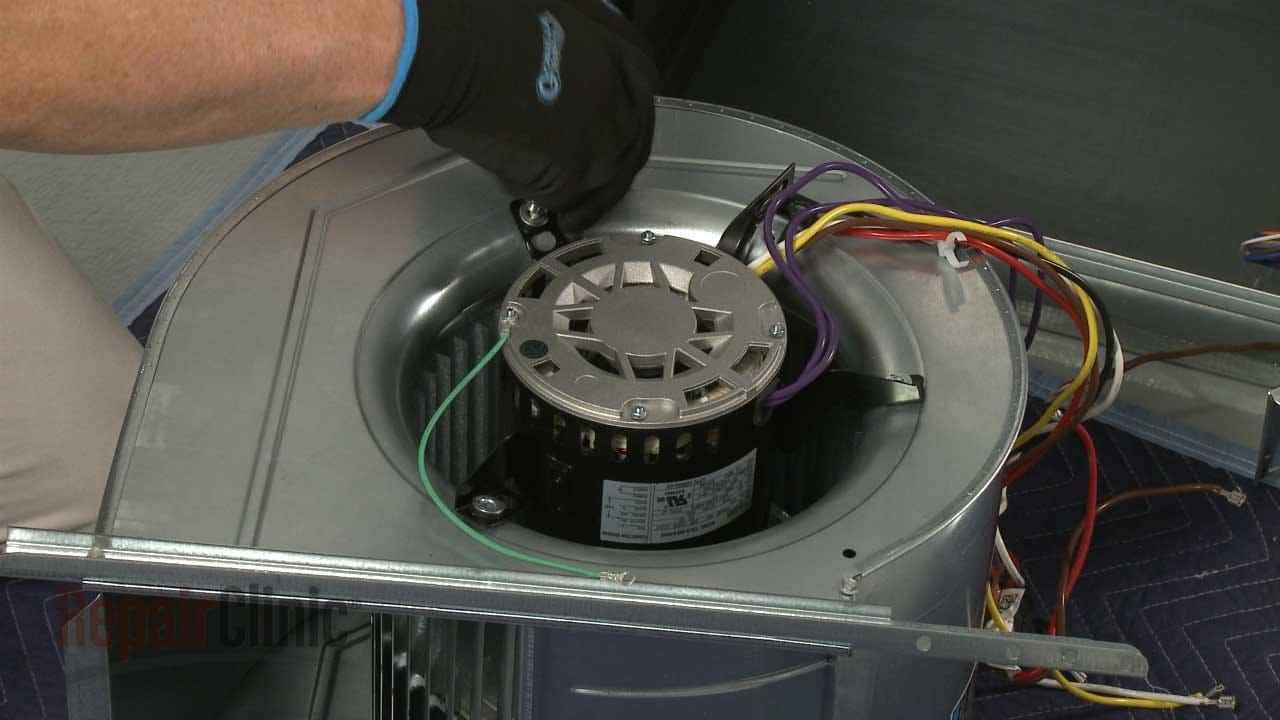
Step 3: Accessing and Inspecting the Blower Motor (Safety First!)
This step involves accessing the blower motor itself. Before proceeding, DISCONNECT THE POWER to the appliance at the circuit breaker. This is crucial to prevent electric shock!
Locating the Blower Motor:
- Furnace/AC: The blower motor is typically located in a compartment within the furnace or air handler. Refer to your appliance's manual for the exact location and access instructions. You will likely need a screwdriver to remove access panels.
- Dryer: The blower motor is usually located near the bottom of the dryer, often behind a panel. Again, consult your dryer's manual for specific instructions.
Visual Inspection:
Once you have access to the blower motor:
- Check for obstructions: Look for any debris (dust, lint, leaves, etc.) that may be blocking the blower wheel (the fan attached to the motor). Remove any obstructions carefully.
- Inspect the blower wheel: Check for cracks, breaks, or damage to the blower wheel. A damaged blower wheel can cause imbalance and noise. If the blower wheel is damaged, it will likely need to be replaced, which may require professional assistance.
- Check the wiring: Carefully inspect the wiring connected to the blower motor. Look for loose connections, frayed wires, or signs of burning. If you see any signs of electrical damage, DO NOT attempt to repair it yourself. Call a qualified technician.
Step 4: Testing the Blower Motor (Advanced - Requires Caution and Proper Tools)
This step involves electrical testing and should only be attempted by individuals with experience working with electrical circuits and using a multimeter. If you are not comfortable with these procedures, DO NOT proceed and contact a qualified technician.
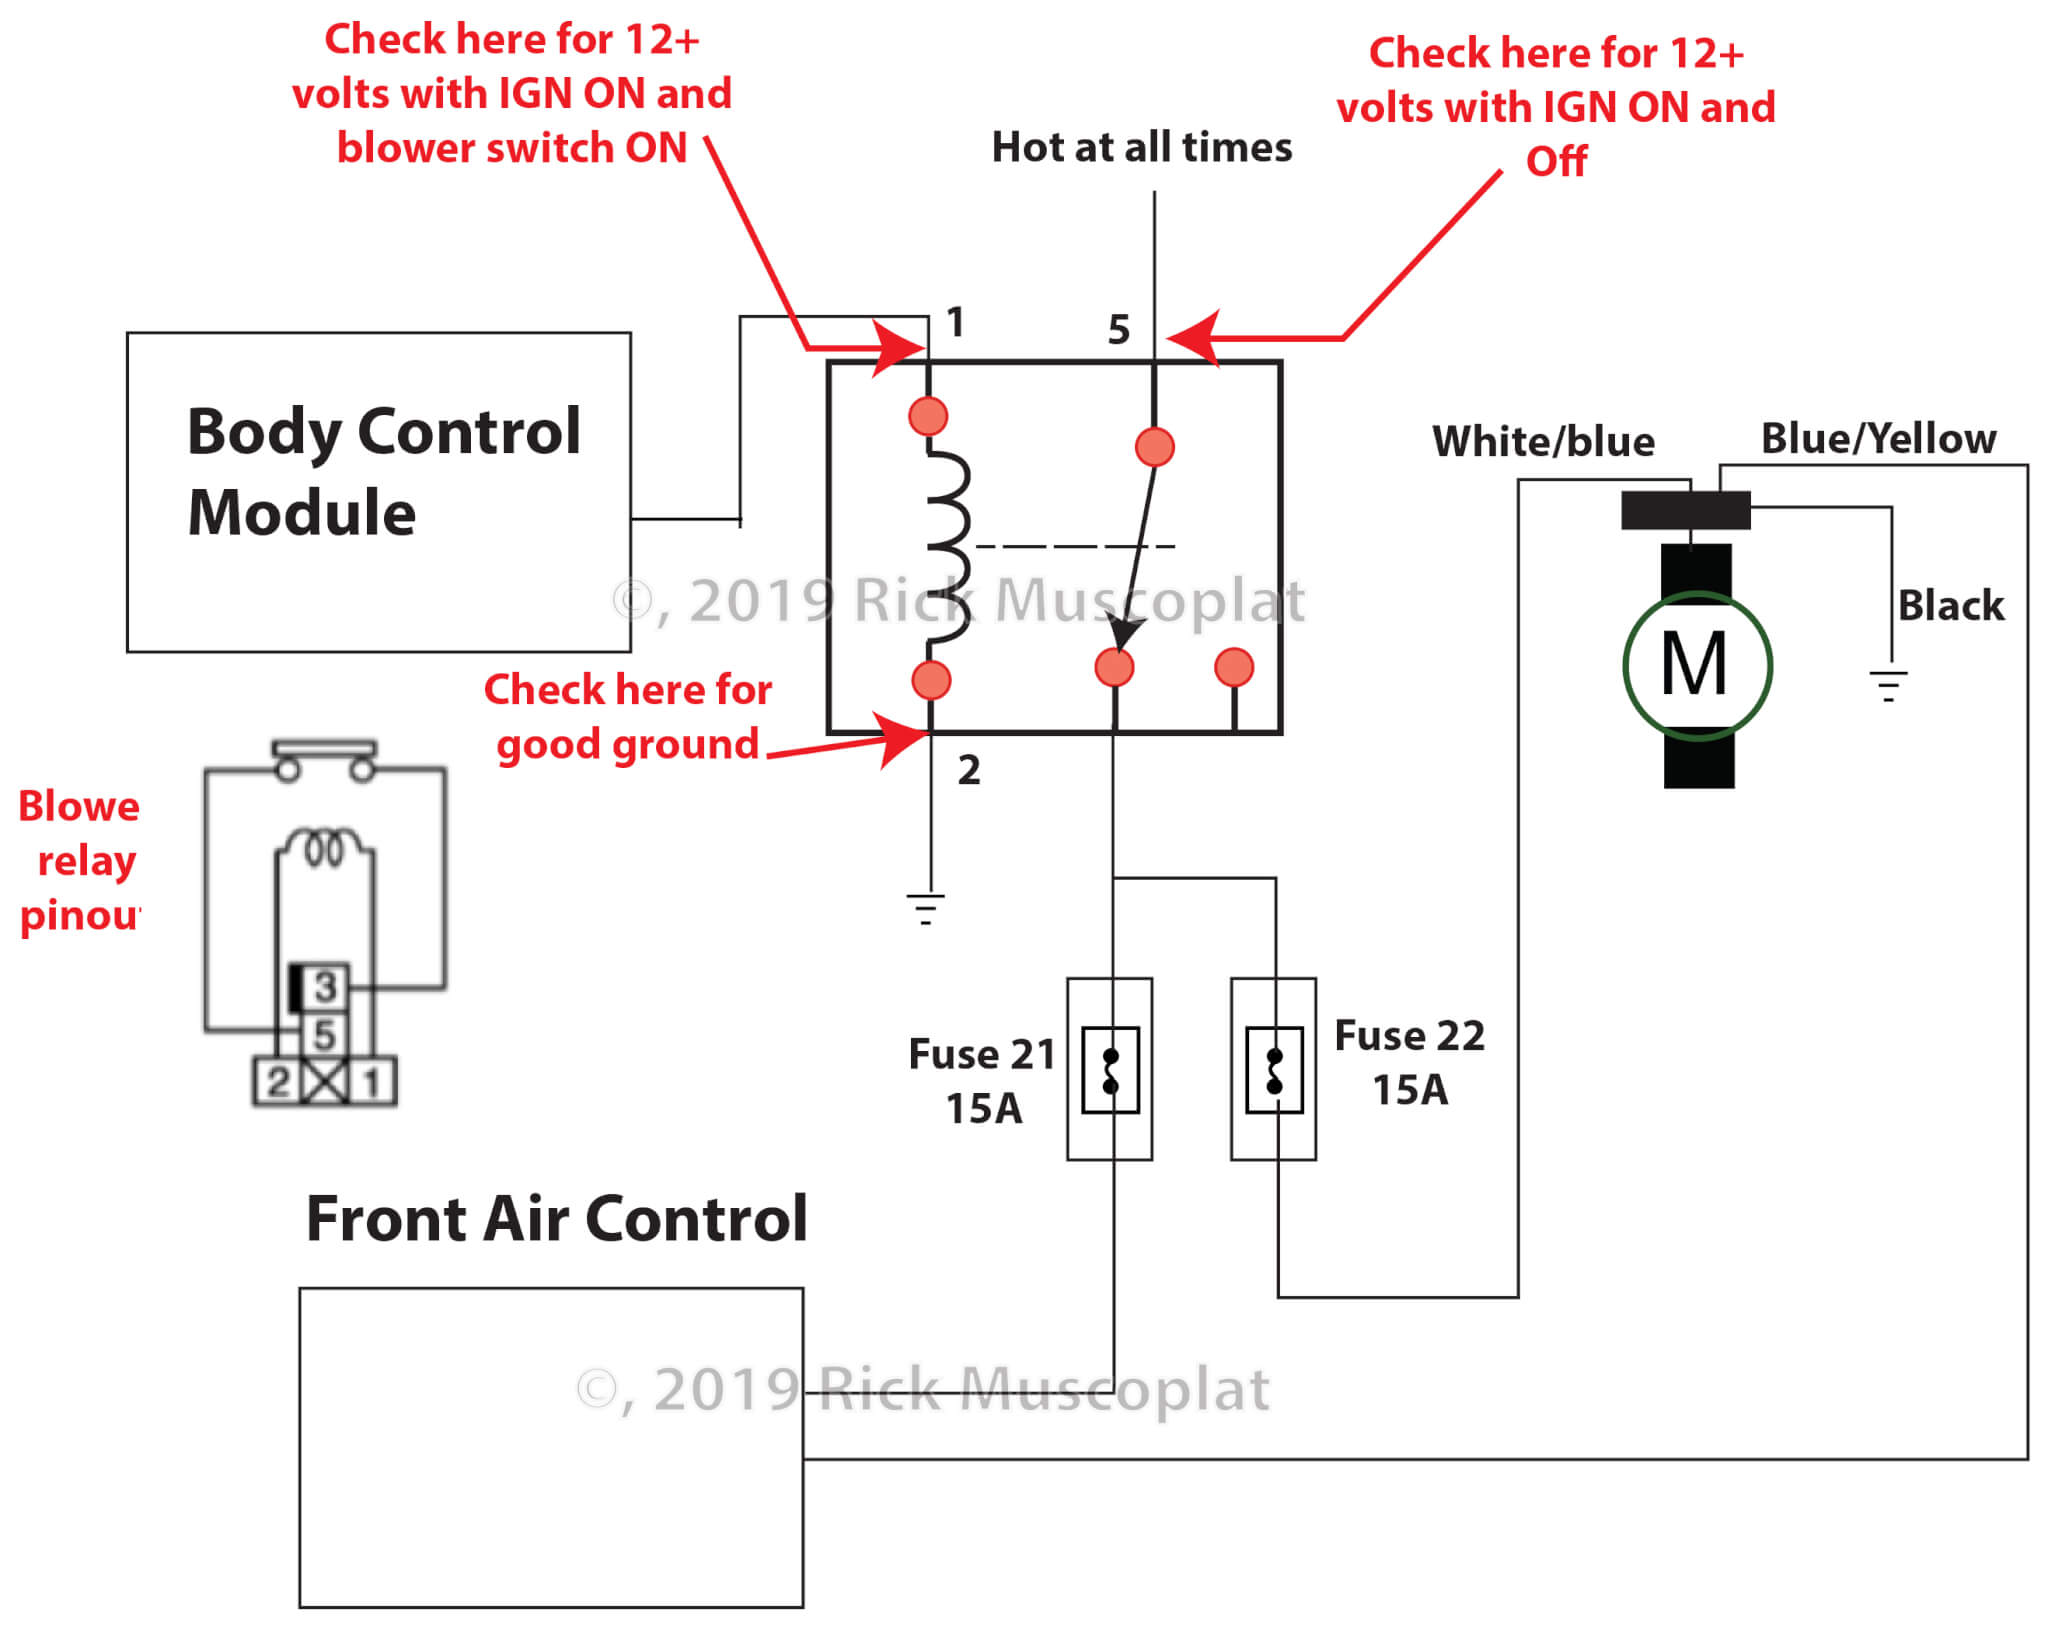
Testing for Voltage:
- Reconnect the power to the appliance (after ensuring all safety precautions are in place).
- Set your multimeter to measure AC voltage.
- Locate the wires leading to the blower motor. Using your multimeter, carefully test for voltage at the motor terminals. Be extremely cautious to avoid touching any bare wires or metal parts.
- Compare the voltage reading to the voltage specified on the blower motor label. If you are not getting the correct voltage, there may be a problem with the wiring or a component upstream of the motor. Call a qualified technician.
Testing the Motor Capacitor (If Applicable):
Some blower motors use a capacitor to help start and run the motor. A faulty capacitor can cause the motor to fail or run weakly.
- DISCONNECT THE POWER to the appliance at the circuit breaker.
- Discharge the capacitor: Using an insulated screwdriver, carefully short across the capacitor terminals to discharge any stored energy. This is important to prevent electric shock.
- Disconnect the capacitor from the blower motor.
- Test the capacitor using a multimeter that has a capacitance setting. Refer to your multimeter's manual for instructions on how to test capacitance.
- Compare the capacitance reading to the value printed on the capacitor. If the reading is significantly different, the capacitor is likely faulty and needs to be replaced.
Replacing a capacitor can be a relatively simple DIY project, but it's crucial to use the correct replacement capacitor with the same voltage and capacitance rating. Ensure the power is disconnected during the replacement and always discharge the old capacitor before handling it.
Step 5: Oiling the Blower Motor (If Applicable)
Some older blower motors have oil ports. Lubricating the motor bearings can sometimes resolve issues with noise or sluggish operation. However, many newer motors are permanently lubricated and do not require oiling. Consult your appliance's manual or the motor label to determine if your motor requires oiling.
Locating and Oiling the Ports:
- Locate the oil ports: These are typically small holes near the motor bearings, often covered with caps or plugs.
- Use the correct oil: Use a lightweight machine oil, such as SAE 20. Do not use WD-40 or other penetrating oils.
- Apply a few drops of oil to each oil port. Do not over-oil.
- Run the motor for a few minutes to distribute the oil.
When to Call a Professional
While this guide provides a comprehensive troubleshooting process, there are situations where it's best to call a qualified technician:
- You are uncomfortable working with electricity or gas.
- You suspect a gas leak (furnace).
- You find signs of electrical damage (burnt wires, arcing).
- The blower motor requires complex repairs or replacement.
- You are unable to diagnose the problem using the steps outlined above.
- You are not comfortable working inside the appliance.
- The appliance is still under warranty. Attempting repairs yourself may void the warranty.
Working with appliances involves inherent risks. Prioritize your safety and the safety of others. When in doubt, seek professional help. Remember, a skilled technician has the expertise and tools to diagnose and repair complex problems safely and efficiently.
Preventative Maintenance
The best way to avoid blower motor problems is to perform regular preventative maintenance:
- Replace air filters regularly. This is the most important step.
- Keep the appliance clean and free of debris. Vacuum around the appliance and remove any dust or lint buildup.
- Schedule regular professional maintenance for your furnace, air conditioner, and dryer.
By following these steps, you can keep your blower motor running smoothly and efficiently for years to come. Good luck!