What Are Normal Humidity Levels In A House
Imagine this: You wake up, ready to start your day, only to find your air conditioner isn't blowing cold air. Instead, it's just humming, and the house feels incredibly muggy. Before you call an expensive repair technician, let's explore some basic troubleshooting steps you can take to identify and potentially fix the problem yourself.
Understanding Normal Humidity Levels
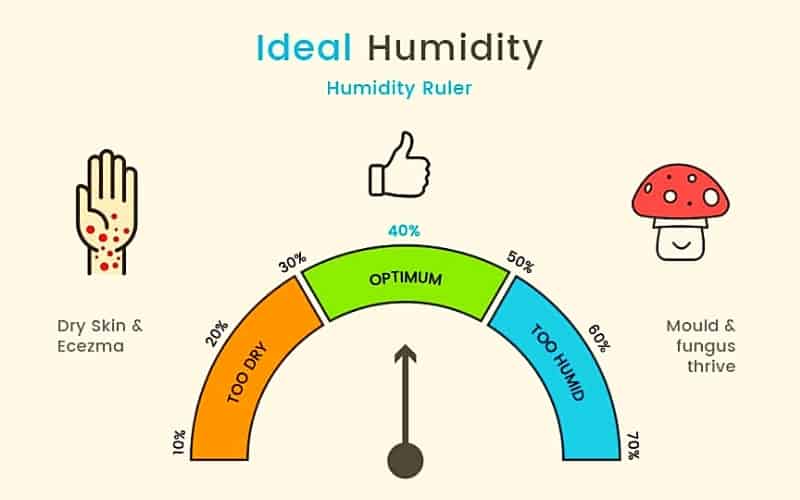
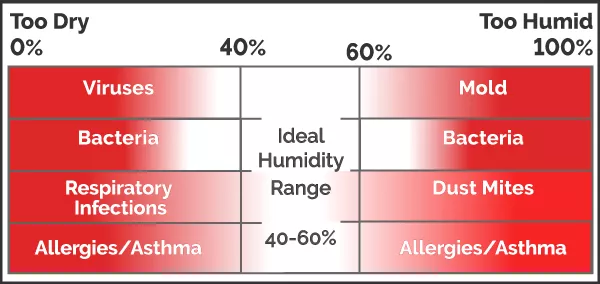
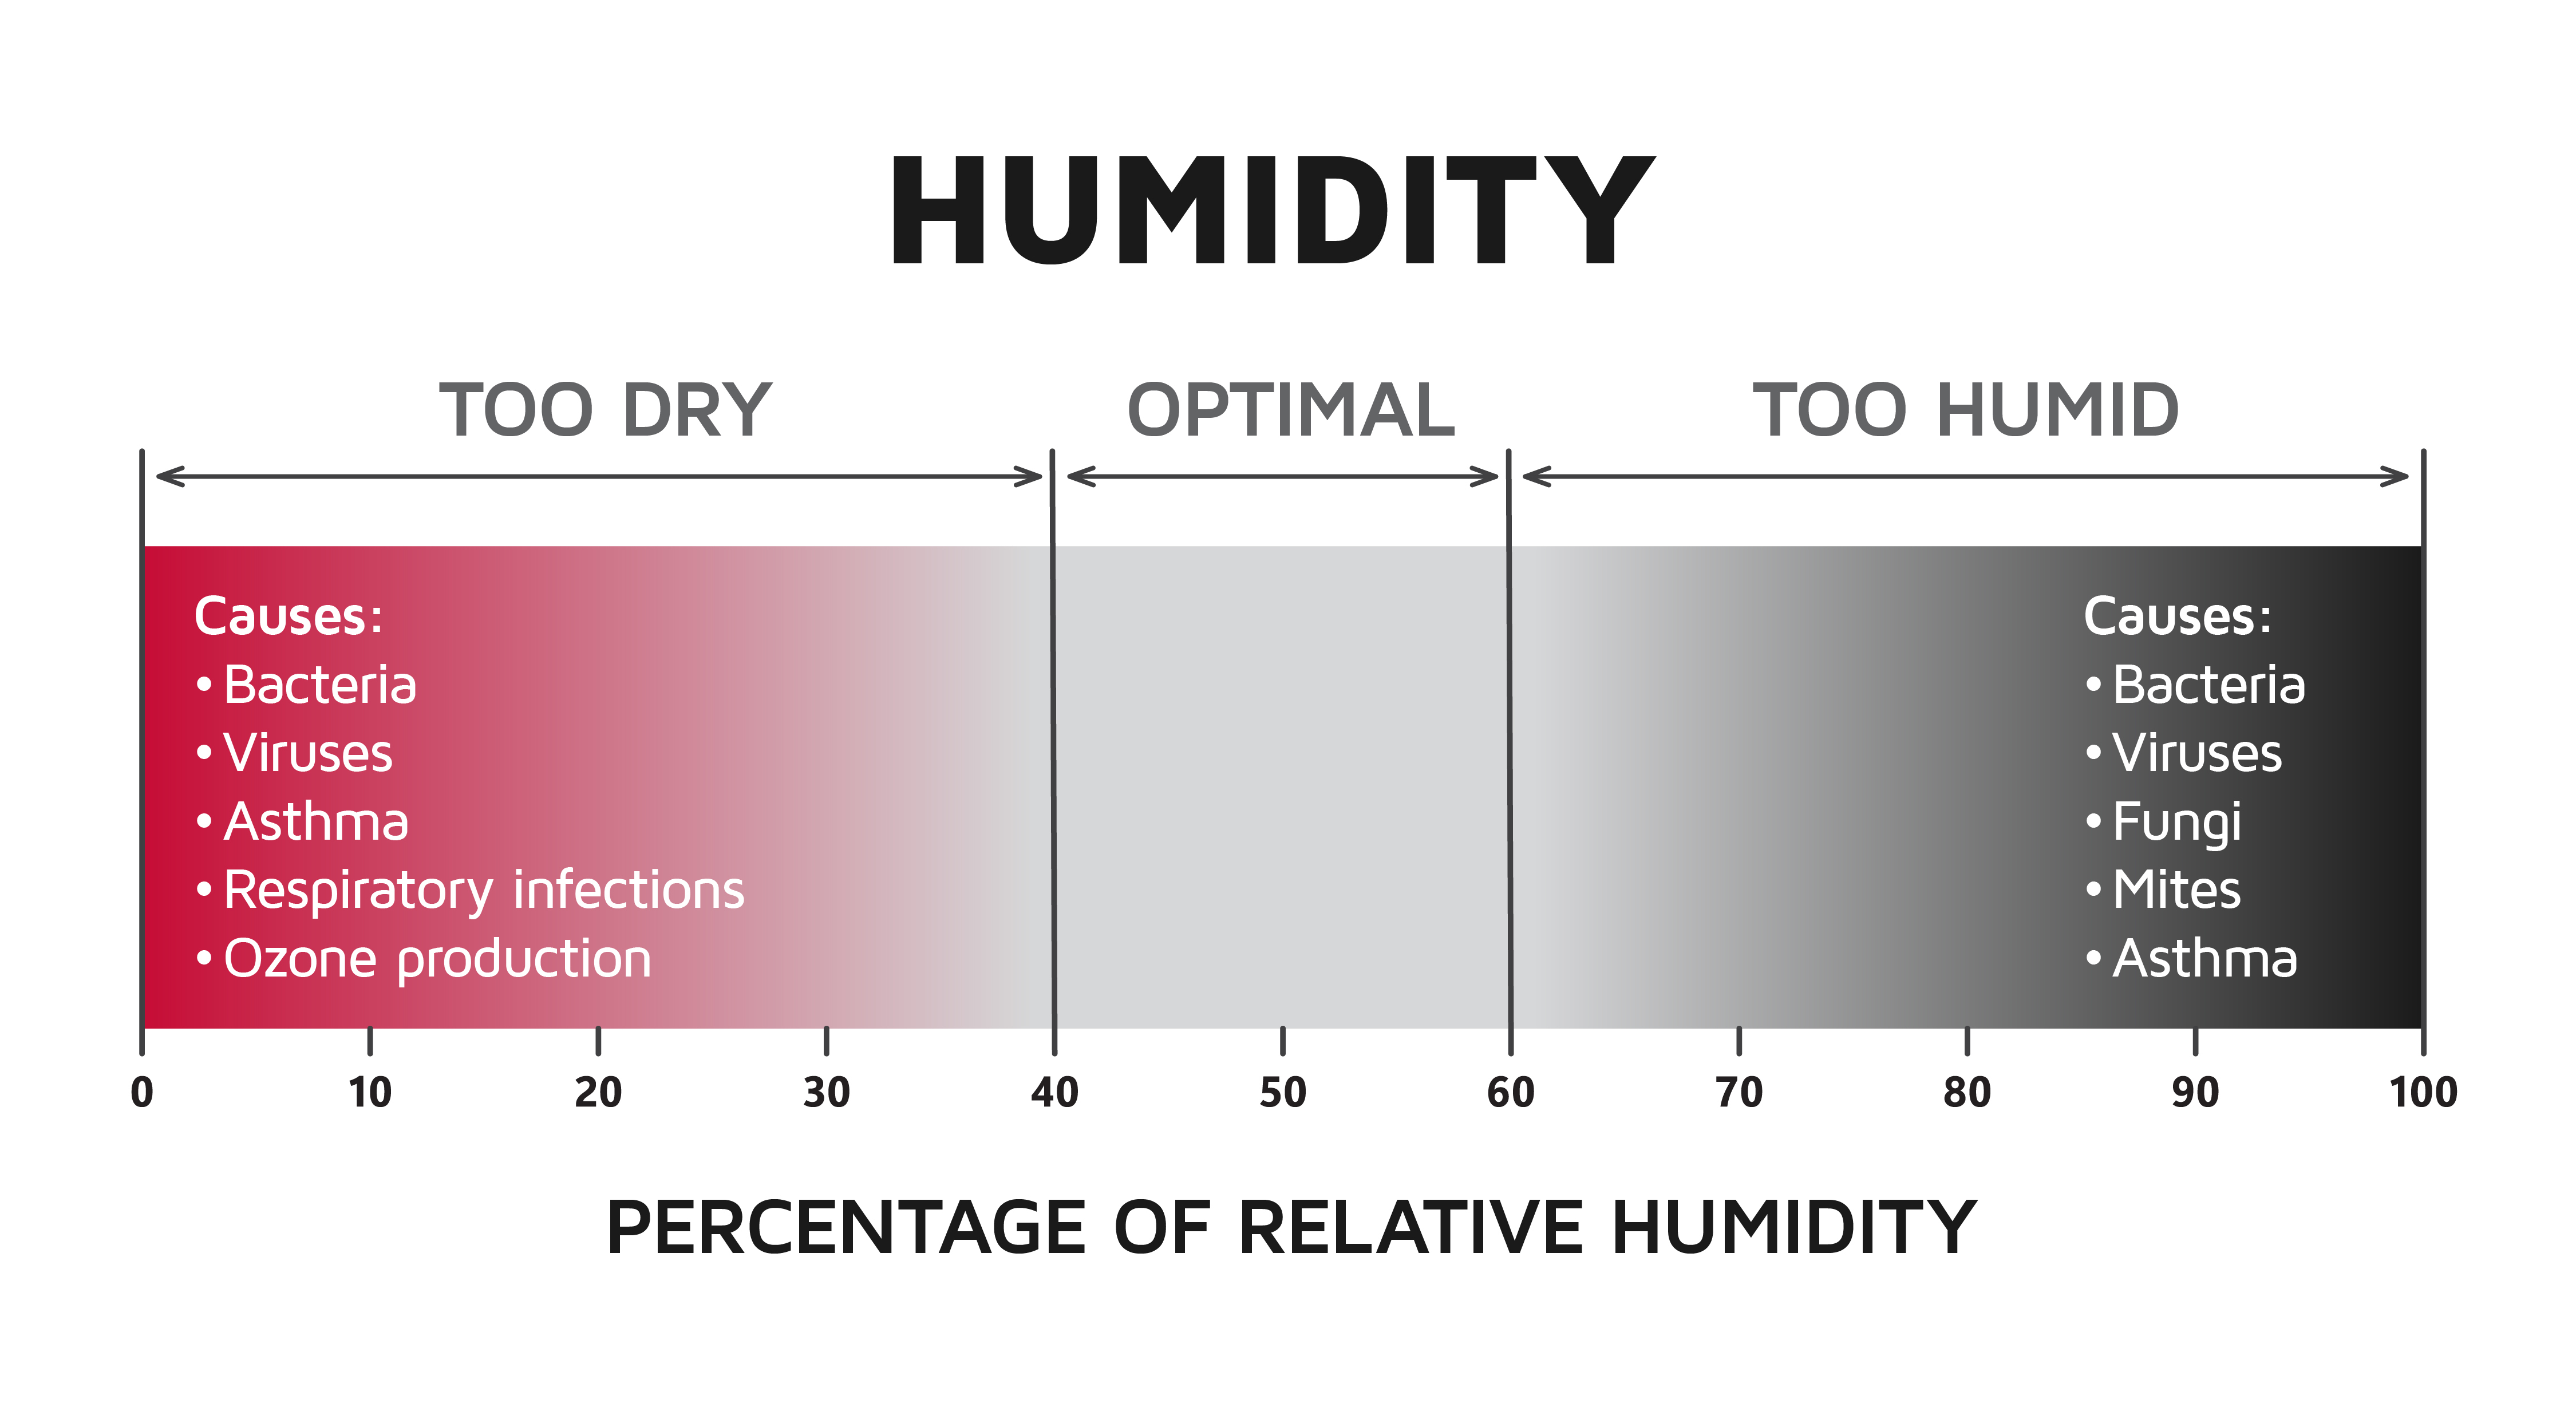
Before diving into the A/C issues, it's crucial to understand what constitutes *normal* humidity within a home. Ideal indoor humidity levels generally fall between 30% and 50%. Keeping humidity within this range helps prevent mold growth, reduces dust mites, and contributes to overall comfort.
Why Humidity Matters
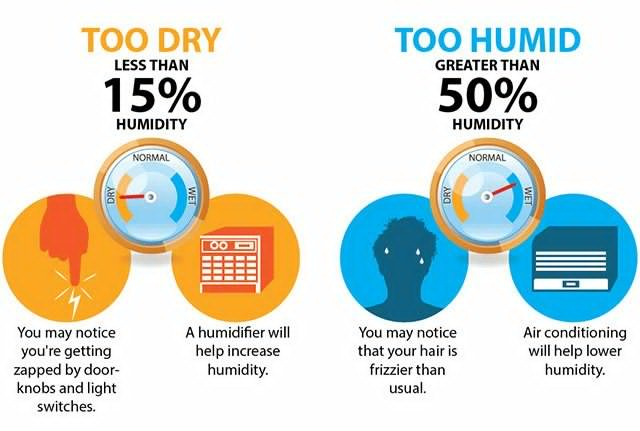
- Too High Humidity (above 50%): Can lead to mold and mildew growth, attracting pests, and causing a general feeling of being sticky and uncomfortable.
- Too Low Humidity (below 30%): Can dry out your skin, irritate your sinuses, and even damage wooden furniture.
Monitoring your home's humidity levels is essential. You can easily do this with a simple hygrometer, available at most hardware stores. Place it in a central location within your home to get an accurate reading.
Factors Affecting Humidity
Several factors can influence the humidity levels in your home:
- Weather Conditions: Humid climates naturally lead to higher indoor humidity.
- Ventilation: Poor ventilation traps moisture inside.
- Activities: Cooking, showering, and even breathing contribute to indoor humidity.
- Leaks: Leaky pipes or roofs can introduce excess moisture.
Troubleshooting Your A/C: A Step-by-Step Guide
Now, let's get back to that malfunctioning air conditioner. Here's a logical troubleshooting process you can follow:
Step 1: The Power Check
This might seem obvious, but it's often overlooked. Always start with the simplest solutions.
- Check the Breaker: Locate the circuit breaker panel and look for the breaker labeled "A/C" or "Air Conditioner." Is it tripped (in the "off" position)? If so, flip it fully to the "off" position and then back to "on."
- Check the Power Cord: Ensure the A/C unit is properly plugged into a working outlet. Try plugging another appliance into the same outlet to verify it's receiving power.
- Inspect the Disconnect Switch (Outdoor Unit): Many outdoor A/C units have a disconnect switch (often a large pull-out switch). Ensure it's properly inserted and in the "on" position. Use caution when handling electrical components, and if you are not comfortable, call an electrician.
Safety First: Before working with any electrical components, ALWAYS turn off the power at the breaker.
Step 2: Thermostat Settings
Believe it or not, incorrect thermostat settings are a common cause of A/C problems.
- Mode: Ensure the thermostat is set to "Cool" or "A/C" mode.
- Temperature: Make sure the set temperature is lower than the current room temperature.
- Fan Setting: Try setting the fan to "Auto" instead of "On." In "On" mode, the fan runs constantly, even when the A/C isn't actively cooling.
- Check the Batteries: If your thermostat has batteries, replace them. Low batteries can cause erratic behavior.
Step 3: Air Filter Inspection
A dirty air filter is one of the most common causes of A/C issues. It restricts airflow, causing the unit to work harder and potentially freeze up.
- Locate the Filter: The air filter is usually located in the indoor unit (furnace or air handler). It's often behind a removable panel or in a slot.
- Inspect the Filter: If the filter is visibly dirty (covered in dust and debris), it needs to be replaced.
- Replace the Filter: Use a filter of the correct size and type (check the existing filter for the specifications).
Tip: Replace your air filter every 1-3 months, depending on usage and air quality.
Step 4: Check the Outdoor Unit (Condenser)
The outdoor unit is responsible for releasing heat. If it's blocked or dirty, it can't function properly.
- Clear Debris: Remove any leaves, branches, grass clippings, or other debris that may be blocking the unit. Ensure there is at least 2-3 feet of clear space around the unit.
- Clean the Fins: Use a garden hose (with a gentle spray nozzle) to clean the condenser fins. Spray from the inside out to avoid bending the fins. Avoid using a pressure washer, as it can damage the fins.
Safety First: Turn off the power to the outdoor unit at the disconnect switch before cleaning it.
Step 5: Check for Ice Buildup
Ice buildup on the evaporator coils (usually located inside the indoor unit) is a sign of a serious problem.
- Inspect the Coils: Carefully inspect the evaporator coils. If they are covered in ice, the unit is likely frozen.
- Turn off the A/C: Turn off the A/C and switch the fan to "On." This will help melt the ice.
- Investigate the Cause: Common causes of ice buildup include a dirty air filter (see Step 3), low refrigerant, or a malfunctioning blower motor.
Important: If the ice buildup persists even after cleaning the filter, it's likely a sign of a more serious problem that requires professional attention.
Step 6: Drain Line Check
A clogged drain line can prevent the A/C from removing moisture effectively, leading to higher humidity and potential water damage.
- Locate the Drain Line: The drain line is usually a PVC pipe that exits the indoor unit.
- Check for Clogs: Look for any obvious clogs or obstructions in the drain line.
- Clear the Clog: You can try clearing the clog with a wet/dry vacuum or a stiff wire. Be careful not to damage the drain line. You can also pour a cup of white vinegar down the drain line to help dissolve any buildup.
When to Call a Professional
While many A/C issues can be resolved with basic troubleshooting, some problems require the expertise of a qualified HVAC technician.
- Refrigerant Leaks: Refrigerant handling requires specialized equipment and training. Never attempt to handle refrigerant yourself.
- Electrical Problems: If you suspect an electrical problem beyond a simple breaker trip, call an electrician. Working with high voltage electricity is dangerous.
- Compressor Issues: The compressor is the heart of the A/C system. If it's malfunctioning, it's best left to a professional.
- Major Component Failures: If you suspect that a major component (like the blower motor or condenser fan motor) has failed, it's usually more cost-effective to have it diagnosed and repaired by a professional.
- Persistent Problems: If you've tried the troubleshooting steps above and the A/C is still not working properly, it's time to call a professional.
Addressing Humidity Issues Directly
Even if your A/C is working correctly, you might still experience high humidity levels in your home. Here are some ways to address those issues directly:
- Improve Ventilation: Open windows and doors (when weather permits) to allow fresh air to circulate. Use exhaust fans in bathrooms and kitchens to remove moisture. Consider installing a whole-house ventilation system if you have persistent humidity problems.
- Use a Dehumidifier: A dehumidifier removes excess moisture from the air. Choose a unit that is appropriately sized for your space.
- Fix Leaks: Repair any leaky pipes, roofs, or windows to prevent moisture from entering your home.
- Properly Insulate: Ensure your home is properly insulated to prevent condensation.
- Avoid Overwatering Plants: Overwatering houseplants can contribute to indoor humidity.
- Air Conditioner Maintenance: Regular A/C maintenance, including cleaning the coils and checking the refrigerant levels, can help improve its dehumidifying capabilities.
DIY Fixes: Tips and Tricks
Here are a few extra DIY tips to keep in mind:
- Cleaning Coils: You can purchase coil cleaner at most hardware stores. Follow the instructions carefully. Always disconnect the power before cleaning the coils.
- Checking Capacitors: Capacitors are small electrical components that help start the motors in your A/C unit. A faulty capacitor can prevent the motor from running. However, capacitors store a charge, even when the power is off. Touching a charged capacitor can result in a serious electric shock. If you are not comfortable working with electrical components, leave this to a professional.
Important: If you are unsure about any of these steps, DO NOT attempt the repair. It's always better to be safe than sorry. Call a qualified HVAC technician or electrician.
Maintaining Comfortable Humidity Levels
Maintaining a comfortable and healthy humidity level in your home is an ongoing process. By understanding the factors that influence humidity and taking proactive steps to control it, you can create a more comfortable and healthy living environment. Regularly monitor your home's humidity levels with a hygrometer and adjust your strategies as needed.
By following these troubleshooting steps, you can potentially save money on costly repairs and keep your A/C running efficiently. Remember, safety is paramount, and when in doubt, always consult a professional.
.jpg?width=3508&name=Humidity level chart (1).jpg)