What Could Cause Carbon Monoxide In Home
One of the most unsettling and potentially dangerous problems a homeowner can face is the presence of carbon monoxide (CO) in their home. CO is an odorless, colorless gas that can be deadly. Many times, homeowners aren't even aware of its presence until symptoms like headaches, dizziness, nausea, or confusion begin to surface. Pinpointing the source is critical, but it must be done with caution and a clear understanding of the systems involved.
This article provides a methodical approach to troubleshooting potential sources of CO in your home. We'll walk through steps you can take to identify the issue, simple DIY checks, and when to immediately call a qualified HVAC professional. Your safety is paramount. If you suspect high levels of CO, evacuate your home immediately and call 911.
Step 1: Immediate Actions and Initial Assessment
Before diving into diagnostics, ensure your safety. These initial steps are crucial.
- If anyone is experiencing symptoms of CO poisoning (headache, dizziness, nausea, vomiting, confusion, weakness, loss of consciousness), evacuate the home immediately and call 911.
- Open windows and doors to ventilate the home.
- Do not re-enter the home until the source of the CO is identified and resolved, and the home has been properly ventilated.
- If you have a CO detector, take note of the reading. If it's alarming, don't ignore it.
Once you're in a safe location, consider these initial questions:
- When did you first notice the symptoms or the CO alarm?
- Did the alarm go off intermittently or consistently?
- Were any appliances recently serviced or installed?
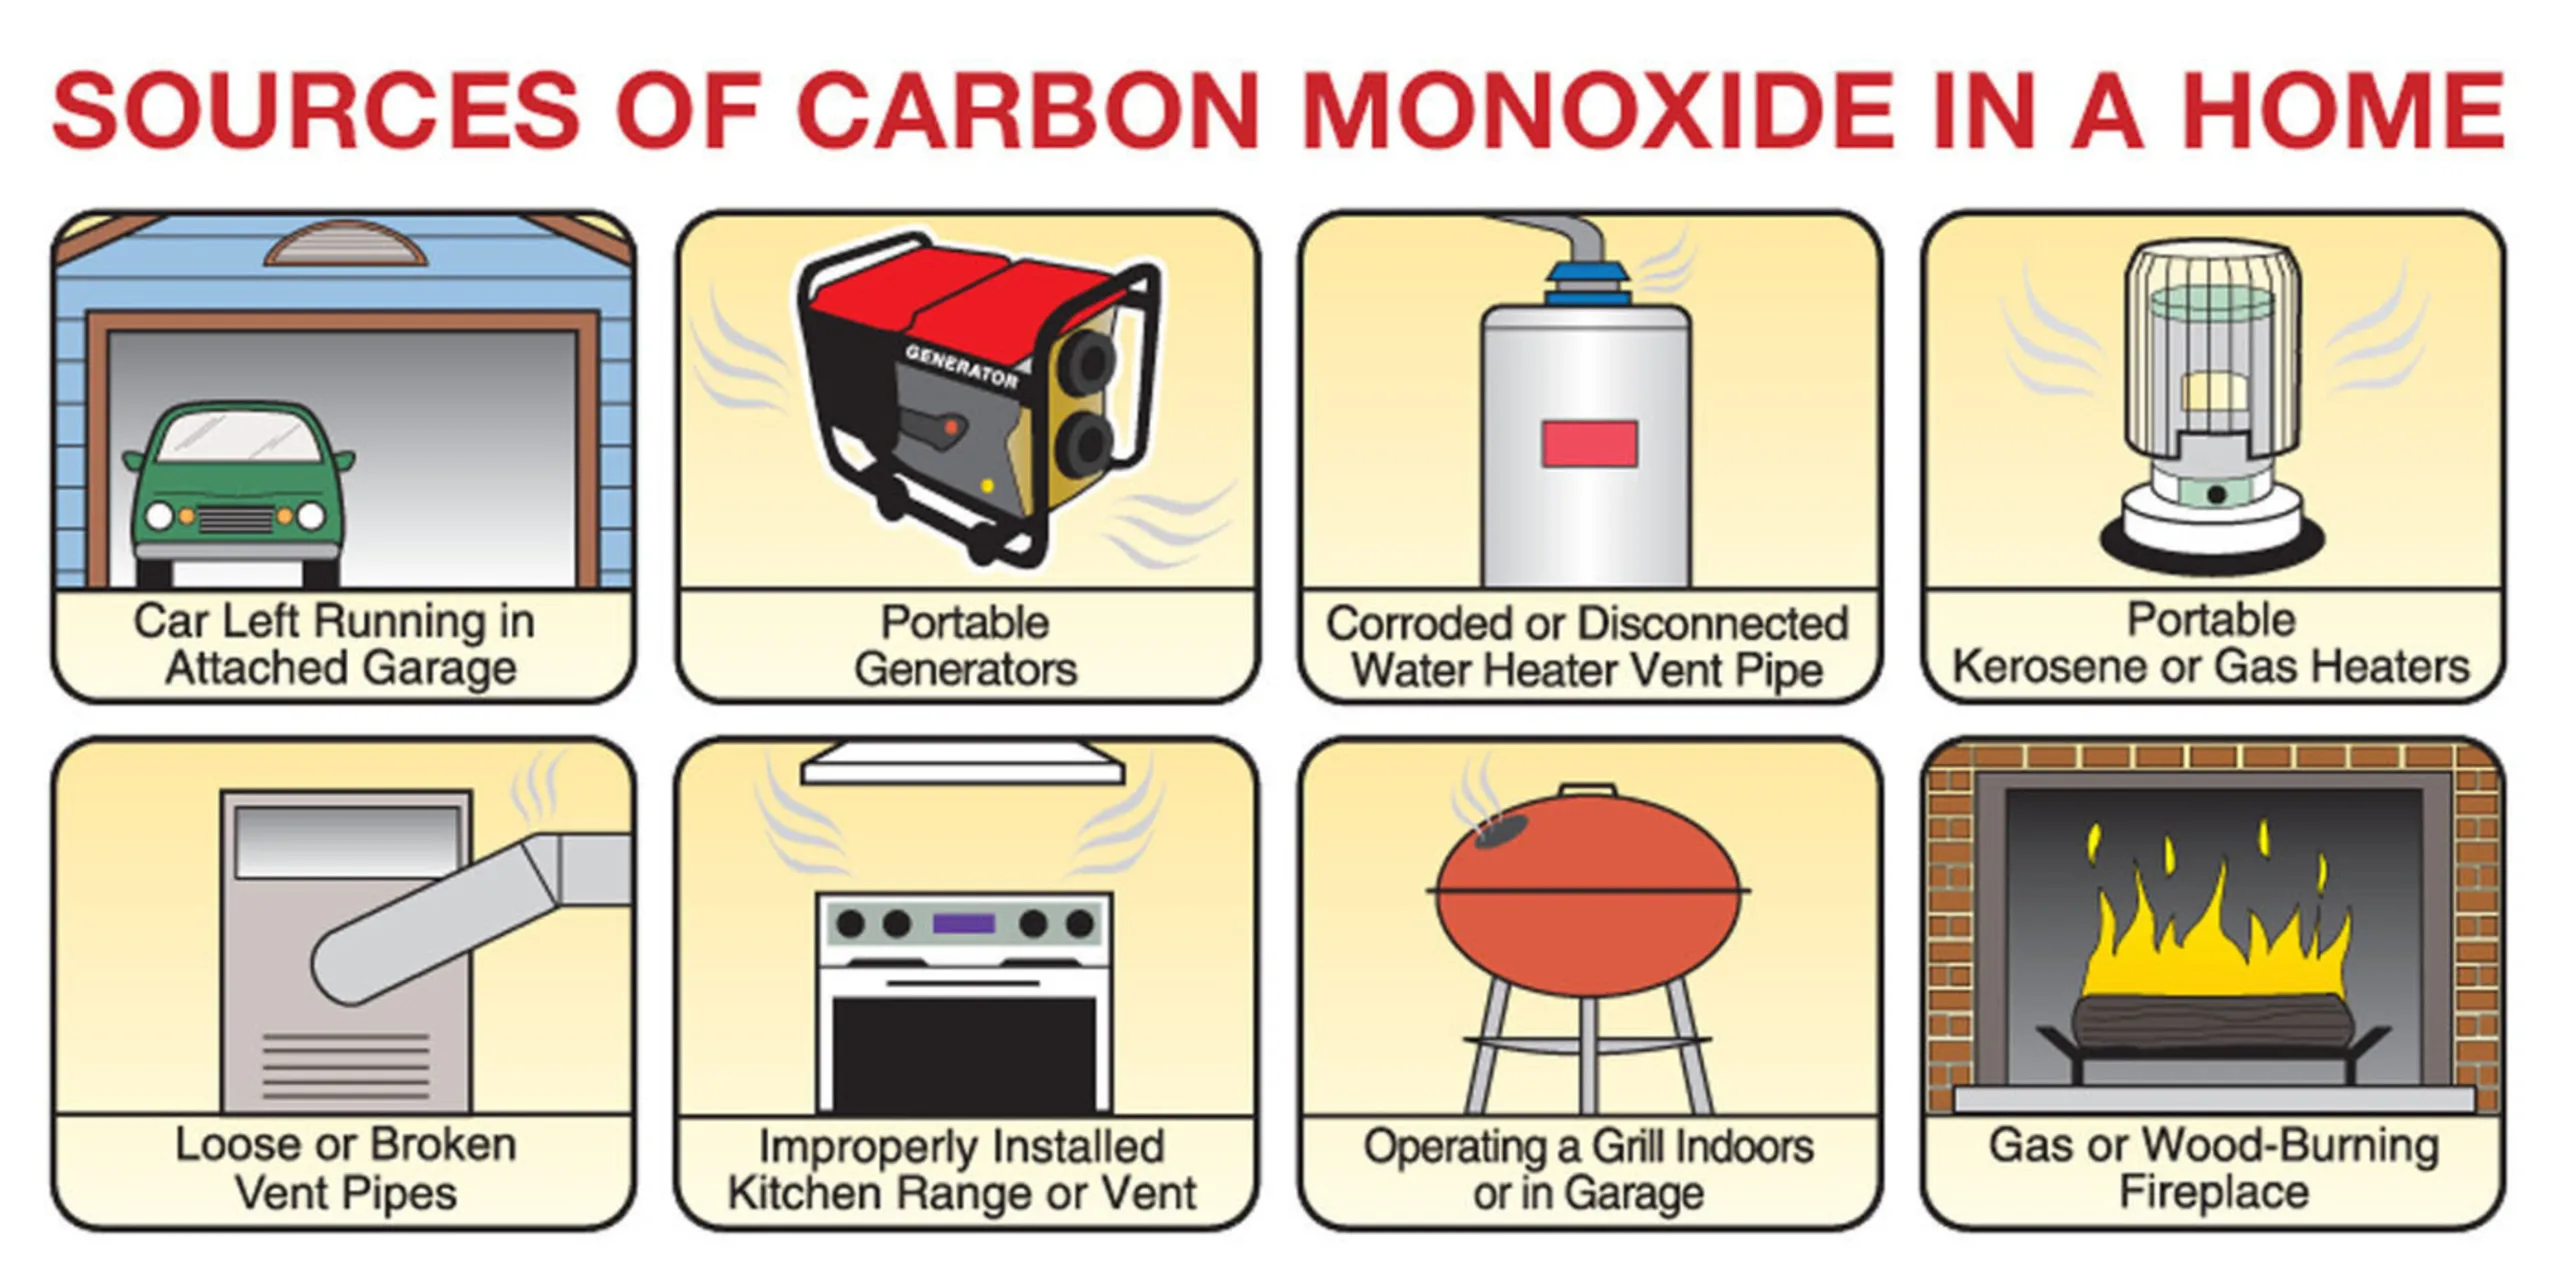
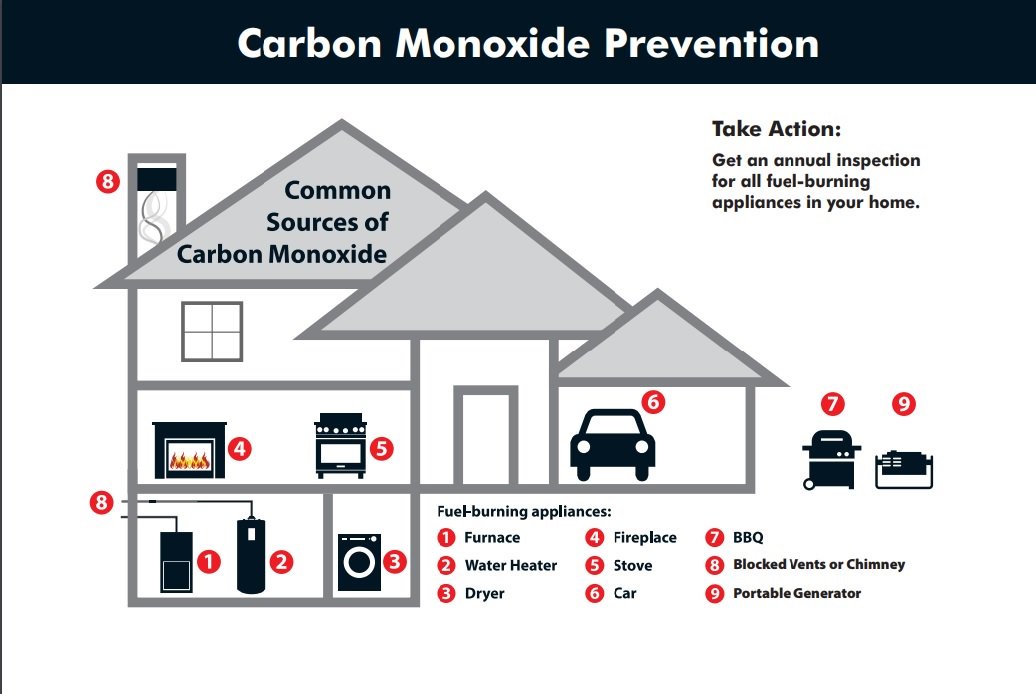
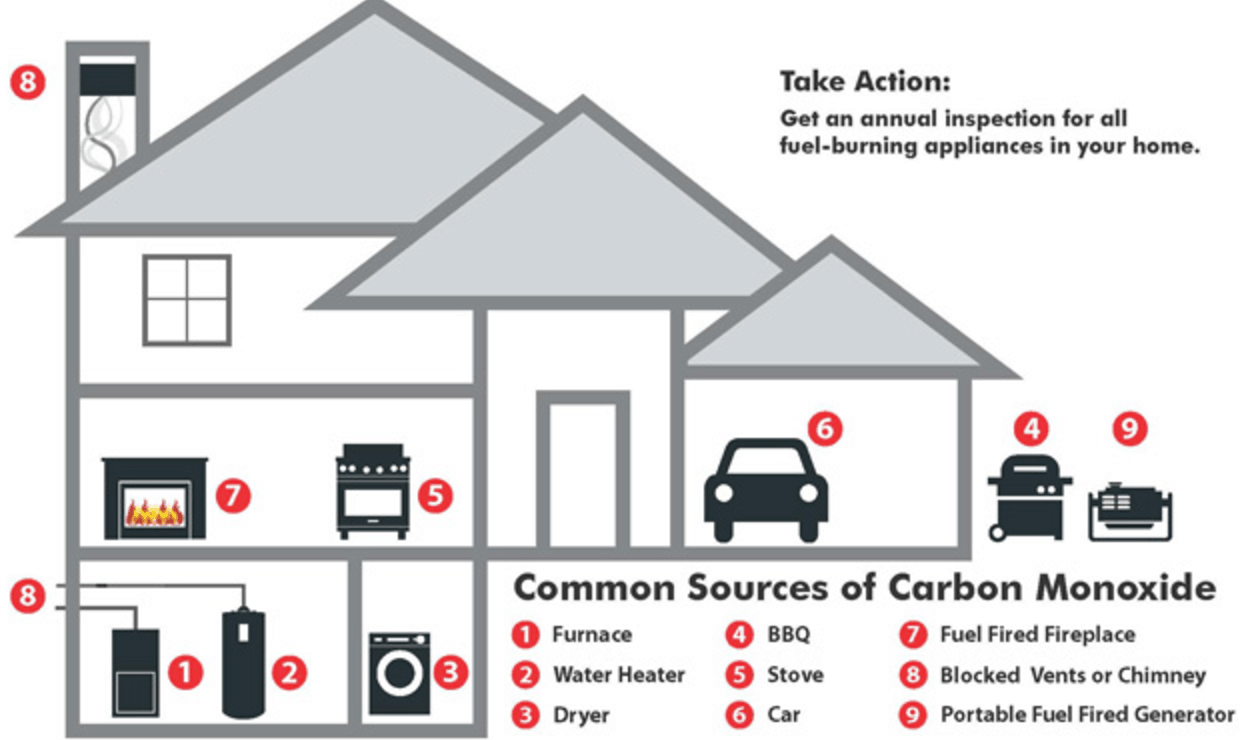
- Are you using any fuel-burning appliances (furnace, stove, water heater, fireplace, generator) more frequently than usual?
Step 2: Checking Potential CO Sources – No Tools Required
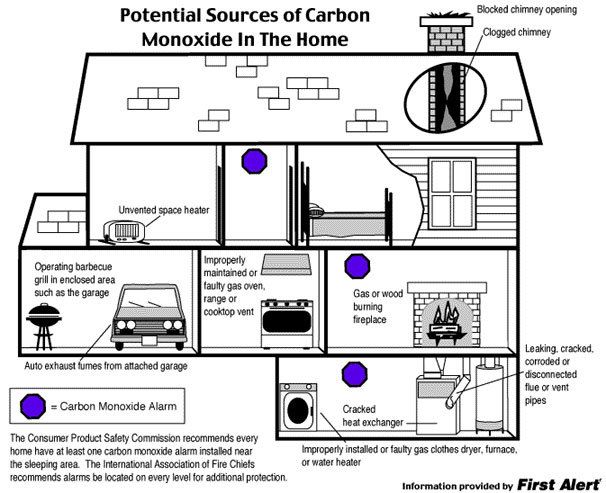
Begin by examining appliances and systems that are known potential CO sources. These checks require no tools but keen observation.
1. Furnace Inspection
The furnace is a prime suspect, especially during the heating season.
- Visual Inspection: Look around the furnace for any signs of rust, soot, or damage. Pay close attention to the vent pipe connecting the furnace to the chimney. Is it securely connected and free of any visible holes or disconnections?
- Smell Test: (Do this briefly and only if you are feeling well.) Does the area around the furnace smell like fuel (gas or oil)? A strong fuel odor could indicate a leak.
- Pilot Light (If Applicable): If you have an older furnace with a pilot light, check that the flame is blue and steady. A yellow or flickering flame can indicate incomplete combustion, potentially producing CO.
- Blower Compartment: If possible and safe, visually inspect the blower compartment for excessive dust or debris. A dirty blower can reduce airflow, affecting combustion efficiency.
2. Water Heater Examination
Like the furnace, a gas water heater can also produce CO.
- Vent Pipe Check: Ensure the vent pipe is properly connected and not blocked. Look for rust or damage.
- Flame Observation: If your water heater has a visible flame, check that it's blue and steady. A yellow or orange flame is a red flag.
- Area Inspection: Look for any signs of soot or water leaks around the water heater.
3. Stove and Oven Review
Gas stoves and ovens can produce CO if not functioning correctly.
- Burner Flame Color: The flames on your gas stove burners should be blue. Yellow or orange flames indicate incomplete combustion.
- Oven Vent: Ensure the oven vent is not blocked by cookware or foil.
- Range Hood Function: Test the range hood to ensure it's working properly. A functioning range hood helps vent fumes outside.
4. Fireplace Assessment
Fireplaces, especially wood-burning ones, can be a source of CO if not properly maintained.
- Chimney Damper: Ensure the damper is fully open before lighting a fire. A closed or partially closed damper can trap smoke and CO inside the house.
- Draft Test: Light a match and hold it near the fireplace opening. The flame should be drawn up into the chimney. If it flickers or is pushed back into the room, there may be a draft problem.
- Visual Inspection: Look for creosote buildup in the chimney. Excessive creosote is a fire hazard and can also affect the draft.
5. Portable Generators: A Critical Warning
Never, under any circumstances, operate a portable generator inside your home, garage, or any enclosed space. Generators produce significant amounts of CO, and even operating them near an open window or door can be deadly. Always operate generators outdoors, far away from any windows, doors, or vents.
Step 3: Using Basic Equipment – Proceed with Caution
Some checks require basic tools like a screwdriver and a flashlight. However, be extremely careful and only proceed if you're comfortable working with these tools and have a basic understanding of the appliance you're inspecting. If you have any doubts, stop and call a professional.
1. Thermocouple Inspection (Furnace or Water Heater)
The thermocouple is a safety device that shuts off the gas supply if the pilot light goes out. A faulty thermocouple can sometimes lead to incomplete combustion.
- Location: The thermocouple is a small, thin metal rod located near the pilot light.
- Visual Check: With the appliance turned off and cooled down, carefully examine the thermocouple for any signs of damage, such as corrosion or cracks.
- Cleaning: Sometimes, the thermocouple can become dirty, preventing it from functioning properly. Use a fine-grit sandpaper or steel wool to gently clean the tip of the thermocouple. Do not use excessive force.
- Testing (Requires a Multimeter – Proceed with Caution): If you have a multimeter and know how to use it, you can test the thermocouple's output voltage. Consult the appliance's service manual for the correct voltage reading. If you are unfamiliar with using a multimeter, do not attempt this step.
2. Vent Pipe Inspection (with Flashlight)
A more detailed inspection of the vent pipes can reveal hidden problems.
- Check for Blockages: Use a flashlight to look inside the vent pipes for any obstructions, such as bird nests, leaves, or debris.
- Inspect Joints: Carefully check the joints between the vent pipe sections for any gaps or leaks. Use aluminum foil tape to temporarily seal any small leaks you find, but remember this is a temporary fix.
- Vertical Clearance: Ensure that the vent pipe has adequate vertical clearance and is properly supported. Sagging or improperly supported vent pipes can create backdrafts and CO buildup.
3. Air Filter Check (Furnace)
A clogged air filter restricts airflow, which can affect combustion efficiency and potentially lead to CO production.
- Location: The air filter is typically located near the blower compartment of the furnace.
- Visual Inspection: Remove the air filter and hold it up to the light. If you can't see through it easily, it's time to replace it.
- Replacement: Replace the dirty air filter with a new one of the correct size and type. Refer to your furnace's manual for the recommended filter specifications.
Step 4: When to Call a Professional – Don't Hesitate
There are several situations where DIY troubleshooting is not recommended, and you should immediately contact a qualified HVAC professional. These situations involve more complex repairs, potential safety risks, or specialized equipment.
- You suspect a gas leak: If you smell gas or suspect a gas leak, evacuate the home immediately and call your gas company or 911.
- You are uncomfortable working with gas or electrical appliances.
- You lack the necessary tools or expertise to perform a repair safely.
- The problem is beyond your understanding.
- The CO alarm continues to sound after you've taken initial steps.
- You find significant rust, corrosion, or damage to any fuel-burning appliance.
- You need to work on the gas lines. Only qualified professionals should work on gas lines.
- You suspect a problem with the chimney liner.
- You want a professional CO inspection of your home and appliances.
A qualified HVAC technician can perform a comprehensive inspection of your heating and cooling systems, diagnose the source of the CO, and make the necessary repairs or replacements. They have the specialized equipment and expertise to ensure your home is safe and free of CO.
Prevention is Key: Maintaining a CO-Safe Home
While troubleshooting can help identify the source of CO, the best approach is prevention. Regular maintenance and adherence to safety practices can significantly reduce the risk of CO poisoning.
- Install CO detectors: Install CO detectors on every level of your home, especially near bedrooms. Test them regularly (usually monthly) and replace them according to the manufacturer's instructions (typically every 5-7 years).
- Regular HVAC Maintenance: Schedule annual maintenance for your furnace, water heater, and other fuel-burning appliances. A qualified technician can identify potential problems before they become dangerous.
- Chimney Inspections: Have your chimney inspected and cleaned regularly, especially if you use a wood-burning fireplace.
- Proper Ventilation: Ensure that your home is properly ventilated, especially when using fuel-burning appliances.
- Never Use Outdoor Equipment Indoors: Never use grills, generators, or other outdoor equipment inside your home, garage, or any enclosed space.
- Be Aware of Symptoms: Know the symptoms of CO poisoning and seek medical attention immediately if you suspect exposure.
By taking these proactive steps, you can create a safer and healthier home environment for yourself and your family.
Disclaimer: This article provides general guidance on troubleshooting potential sources of carbon monoxide. It is not a substitute for professional advice. Always prioritize your safety and consult with a qualified HVAC technician if you have any concerns.