What Does A Flame Sensor Do
One of the most frustrating home heating and cooling issues is a furnace that starts, runs for a short period, and then shuts down. You hear the igniter click, the burners roar to life, and then… silence. This short cycling can leave you shivering in the winter or sweating in the summer, and it often points to a problem with the flame sensor.
Understanding the Flame Sensor
The flame sensor is a crucial safety component in your furnace. Its primary job is to detect the presence of a flame when the burners are lit. If the flame sensor doesn't detect a flame, it signals the furnace control board to shut off the gas supply, preventing a dangerous buildup of unburned fuel. Think of it as a watchful guardian, protecting your home from potential hazards.
How it Works
The flame sensor is typically a thin, metallic rod (often made of silicon carbide) located near the burners. When a flame touches the sensor, it creates a tiny electrical current – measured in microamps (µA). This current signals to the furnace control board that combustion is occurring safely. If the control board doesn't receive this signal within a few seconds of ignition, it assumes there's a problem and shuts down the furnace.
Troubleshooting a Faulty Flame Sensor: A Step-by-Step Guide
Diagnosing a flame sensor issue can seem daunting, but with a methodical approach, you can often pinpoint the problem and even resolve it yourself. Here's a breakdown of the steps you can take:
Step 1: Preliminary Checks (No Tools Required)
Before diving into anything complex, perform these basic checks. These cost you nothing but time, and can often reveal simpler issues.
- Check Your Thermostat: Ensure your thermostat is set to "Heat" (or "Cool" if the issue occurs with your AC) and that the temperature is set higher (or lower) than the current room temperature. A simple setting error is more common than you might think!
- Check the Furnace Power Switch: Locate the power switch for your furnace (usually a standard light switch located on or near the unit). Make sure it's turned ON. It's surprising how often this gets accidentally switched off.
- Check the Air Filter: A dirty air filter can restrict airflow, causing the furnace to overheat and shut down. Remove the filter and hold it up to the light. If you can't see light through it easily, it's time for a replacement. Replace it with a new filter of the correct size and type. This is an easy and inexpensive fix that can resolve many furnace problems.
- Look for Error Codes: Many modern furnaces have an LED display or a series of flashing lights that indicate error codes. Consult your furnace's manual to understand the meaning of any displayed codes. Some codes specifically point to flame sensor issues.
Step 2: Visual Inspection (No Tools Required Initially)
Now, let's visually inspect the flame sensor itself. Always turn off the power to the furnace at the breaker before proceeding with any visual inspection!
- Locate the Flame Sensor: The flame sensor is typically a thin, metallic rod located near the burners, often held in place by a single screw. Refer to your furnace's manual if you're unsure of its location.
- Inspect for Dirt and Debris: The most common cause of flame sensor failure is a buildup of carbon deposits or other contaminants. Carefully examine the sensor rod. Does it appear dirty, corroded, or covered in soot? Even a thin layer of grime can prevent the sensor from detecting the flame properly.
- Check the Wiring: Inspect the wire connecting the flame sensor to the furnace control board. Look for any signs of damage, such as frayed insulation, loose connections, or corrosion. Gently tug on the wire to ensure it's securely connected to both the sensor and the control board.
Step 3: Cleaning the Flame Sensor (Simple DIY)
If the visual inspection reveals a dirty flame sensor, cleaning it is often the solution. Again, ensure the power is OFF before you start. You will need a specific tool for this task:
- Materials: You'll need a piece of emery cloth or fine steel wool.
The Cleaning Process:
- Disconnect the Wire: Carefully disconnect the wire from the flame sensor. Use pliers if needed, but be gentle to avoid damaging the connector.
- Clean the Sensor Rod: Gently rub the flame sensor rod with the emery cloth or fine steel wool to remove any carbon buildup or corrosion. Focus on cleaning the entire surface of the rod that is exposed to the flame. Be careful not to bend or damage the sensor.
- Reassemble: Once the sensor is clean, reconnect the wire securely. Ensure the connection is tight and free of corrosion.
- Test: Turn the power back on to the furnace and test its operation. Observe whether the furnace now stays lit or continues to short cycle.
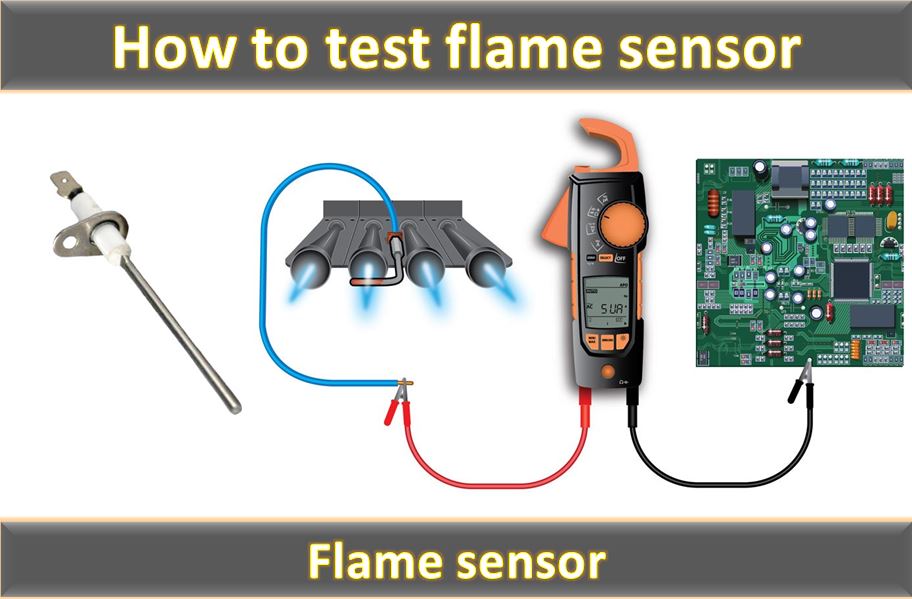
Step 4: Testing with a Multimeter (Requires Basic Equipment)
If cleaning the flame sensor doesn't solve the problem, you can use a multimeter to test its functionality. This requires a basic understanding of electrical testing and the use of a multimeter. If you're not comfortable with this, it's best to call a professional.
What You'll Need:
- Multimeter: A digital multimeter capable of measuring microamps (µA) DC.
- Furnace Manual: To understand the expected microamp reading for your specific furnace model.
The Testing Process:
- Set the Multimeter: Set your multimeter to measure microamps (µA) DC.
- Connect the Multimeter: Disconnect the wire from the flame sensor and connect the multimeter in series with the sensor and the control board. This means one lead of the multimeter connects to the wire you disconnected, and the other lead connects to the terminal on the flame sensor.
- Start the Furnace: Turn on the furnace and observe the microamp reading on the multimeter while the burners are lit.
- Compare to Specification: Compare the reading to the specification in your furnace's manual. Typically, a good flame sensor will produce a reading between 2-10 µA DC. A reading significantly below this range indicates a faulty sensor, even if the sensor looks clean.
Step 5: Checking the Ground Connection (Requires Basic Equipment)
Sometimes, a poor ground connection can prevent the flame sensor from functioning correctly. A good, reliable ground is essential for the sensor to operate effectively.
What You'll Need:
- Multimeter: To check continuity.
- Screwdriver: To tighten grounding screws.
The Testing Process:
- Locate the Ground Wire: Find the ground wire for the furnace. It's typically a green or bare copper wire connected to the furnace chassis.
- Check Continuity: Use your multimeter to check the continuity between the ground wire and a known good ground, such as a metal water pipe. If there's no continuity, or very high resistance, the ground connection is faulty.
- Tighten Connections: Ensure that all ground connections are tight and free of corrosion. Clean any corroded connections with a wire brush.
When to Call a Professional
While some flame sensor issues can be resolved with simple DIY steps, there are situations where it's best to call a qualified HVAC technician:
- You're Uncomfortable Working with Electricity or Gas: Working with electricity and gas can be dangerous. If you're not comfortable with these tasks, it's always best to err on the side of caution and call a professional.
- You Suspect a Gas Leak: If you smell gas, immediately turn off the gas supply to the furnace and call your gas company or a qualified HVAC technician. Do not attempt to troubleshoot the problem yourself!
- The Furnace Control Board is Damaged: If you suspect the furnace control board is faulty, it's best to call a professional. Replacing a control board can be complex and requires specialized knowledge.
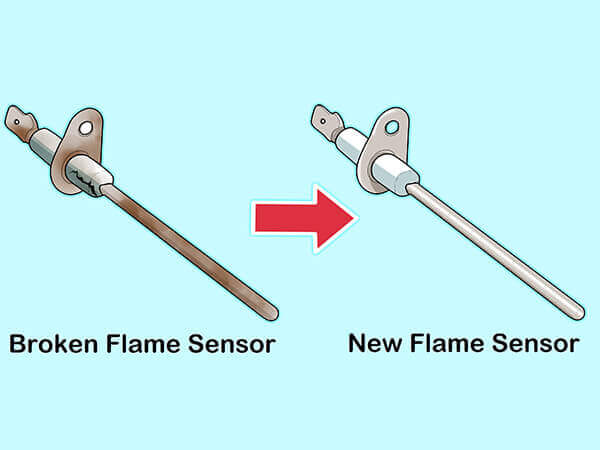
- The Flame Sensor is Damaged: If the flame sensor is physically damaged, bent, or cracked, it needs to be replaced. While you can replace the sensor yourself, if you're not confident in your abilities, a professional can ensure it's done correctly.
- The Problem Persists After Cleaning and Testing: If you've cleaned the flame sensor, tested it with a multimeter, and checked the ground connection, and the furnace still isn't working correctly, there may be a more complex issue that requires professional diagnosis and repair.
Safety First!
Always prioritize safety when working on your furnace!
- Turn off the power to the furnace at the breaker before performing any maintenance or repairs.
- Never work on the furnace while it's running.
- If you smell gas, immediately turn off the gas supply and call your gas company.
- Wear safety glasses to protect your eyes from debris.
- If you're unsure about anything, call a qualified HVAC technician.
Prevention is Key
Preventing flame sensor issues is easier than fixing them. Here are a few tips to keep your furnace running smoothly:
- Change your air filter regularly (every 1-3 months).
- Schedule annual furnace maintenance with a qualified HVAC technician. This will ensure that your furnace is operating safely and efficiently.
- Keep the area around your furnace clean and free of debris.
By following these steps, you can often diagnose and resolve flame sensor issues yourself, saving time and money. However, remember that safety is paramount, and when in doubt, it's always best to call a professional.