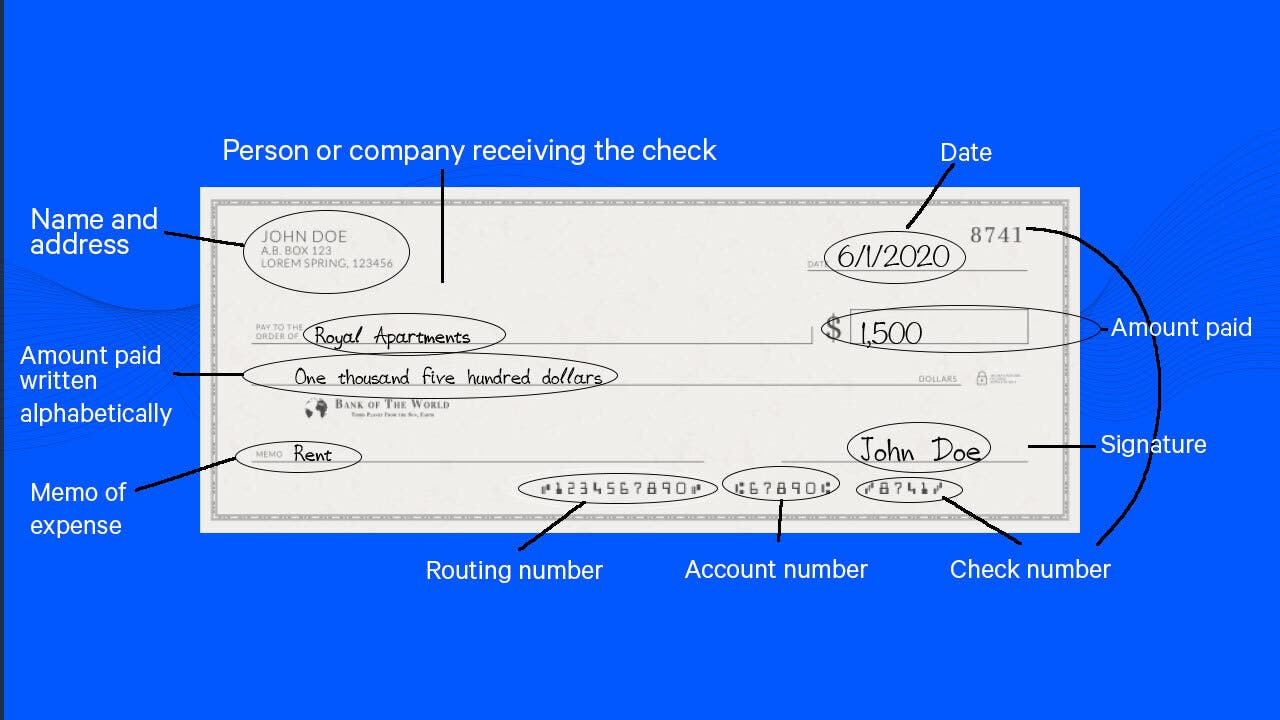
What Does Refer To Maker Mean On A Check

That sinking feeling when your refrigerator stops cooling is something most homeowners dread. Before you resign yourself to calling a repair technician, let's walk through some basic troubleshooting steps. This guide will help you identify common issues and attempt safe, DIY fixes. Remember, if at any point you feel uncomfortable or unsure, especially when dealing with electricity, gas, or complex components, stop and call a qualified professional.
My Refrigerator Isn't Cooling! What Now?
Start by staying calm. Refrigerators can sometimes seem dead when it's a simple issue. We'll work through a systematic approach to diagnose the problem.
Step 1: Check the Power Supply
This may seem obvious, but it's the most common culprit. Don't skip it!
- Verify the Outlet: Is the refrigerator plugged in securely? Try unplugging it and plugging it back in. Make sure the plug fits snugly.
- Test the Outlet: Plug another small appliance (like a lamp or phone charger) into the same outlet. Does it work? If not, the problem is likely the outlet itself.
- Check the Circuit Breaker: Locate your home's circuit breaker panel. Look for the breaker labeled "Refrigerator" or a similar designation. Is it tripped (in the "off" position)? If so, flip it to the "off" position first, then back to the "on" position. Important: If the breaker trips immediately again, there's likely a short circuit. Call an electrician immediately.
- Extension Cords: Avoid using extension cords for refrigerators. They can be a fire hazard and often don't provide enough power. If you are using one, try plugging the refrigerator directly into the wall outlet to rule it out.
Step 2: Examine the Refrigerator Settings
Sometimes the issue isn't a malfunction, but simply an incorrect setting.
- Temperature Controls: Check both the refrigerator and freezer temperature controls. Are they set too high? Someone may have accidentally adjusted them. Refer to your refrigerator's manual for the optimal temperature settings (usually around 37-40°F for the refrigerator and 0°F for the freezer).
- Control Panel Lock: Some refrigerators have a control panel lock function. Ensure it's not engaged, preventing you from making adjustments.
- Demo Mode/Showroom Mode: Some refrigerators, especially new ones, may be in a "demo" or "showroom" mode, which disables the cooling function. Consult your user manual to disable this mode.
Step 3: Inspect the Condenser Coils
The condenser coils release heat from the refrigerant. If they're dirty, the refrigerator can't cool efficiently.
- Location: Condenser coils are typically located on the back of the refrigerator or underneath it.
- Safety First: Unplug the refrigerator before cleaning the coils.
- Cleaning: Use a vacuum cleaner with a brush attachment to gently remove dust and debris from the coils. You can also use a coil cleaning brush (available at most hardware stores) for more thorough cleaning.
- Frequency: Clean the condenser coils every 6-12 months for optimal performance.
Step 4: Check the Door Seals (Gaskets)
Leaky door seals allow warm air to enter the refrigerator, making it work harder and potentially causing it to fail.
- Visual Inspection: Carefully examine the door seals (gaskets) around both the refrigerator and freezer doors. Look for cracks, tears, or signs of deterioration.
- The Dollar Bill Test: Place a dollar bill between the door and the refrigerator frame, then close the door. Try to pull the bill out. If it slides out easily, the seal is weak and needs to be addressed. Repeat this test around the entire perimeter of both doors.
- Cleaning: Clean the door seals with a damp cloth and mild detergent. Remove any food debris or sticky residue.
- Replacement: If the door seals are damaged or weak, they may need to be replaced. You can usually order replacement seals online or from an appliance parts store. Follow the manufacturer's instructions for installation.
Step 5: Examine the Evaporator Fan
The evaporator fan circulates cold air from the freezer into the refrigerator compartment. If it's not working, the refrigerator won't cool properly.
- Location: The evaporator fan is typically located inside the freezer compartment, behind a panel.
- Safety First: Unplug the refrigerator before accessing the evaporator fan.
- Accessing the Fan: Remove the panel covering the evaporator fan. You may need a screwdriver. Consult your refrigerator's manual for specific instructions.
- Visual Inspection: Check the fan blades for obstructions (ice buildup is a common problem). Manually spin the fan blades to ensure they rotate freely.
- Testing the Fan Motor: This step involves electrical testing and should only be attempted if you are comfortable and experienced with electrical work. Otherwise, call a professional. Use a multimeter to test the fan motor for continuity. If there is no continuity, the motor is likely faulty and needs to be replaced.
- Defrosting: If the fan is blocked by ice, try manually defrosting the freezer. Unplug the refrigerator and leave the freezer door open for several hours to allow the ice to melt. You can also use a hair dryer (on a low setting) to speed up the process, but be careful not to damage any plastic parts.
Step 6: Check the Condenser Fan (If Applicable)
Some refrigerators have a condenser fan that helps cool the condenser coils. If this fan isn't working, the refrigerator can overheat and fail to cool properly.
- Location: The condenser fan is typically located near the compressor at the back of the refrigerator.
- Safety First: Unplug the refrigerator before inspecting the condenser fan.
- Visual Inspection: Check the fan blades for obstructions. Manually spin the fan blades to ensure they rotate freely.
- Testing the Fan Motor: This step involves electrical testing and should only be attempted if you are comfortable and experienced with electrical work. Otherwise, call a professional. Use a multimeter to test the fan motor for continuity. If there is no continuity, the motor is likely faulty and needs to be replaced.
Step 7: The Defrost System
Refrigerators use a defrost system to prevent ice buildup on the evaporator coils. If the defrost system malfunctions, the coils can become blocked with ice, preventing the refrigerator from cooling.
This is a complex system involving electrical components. Troubleshooting and repairing the defrost system should generally be left to a qualified appliance repair technician. However, here are some things to be aware of:
- Symptoms: Excessive ice buildup in the freezer, refrigerator not cooling, water leaking inside the refrigerator.
- Possible Causes: Faulty defrost timer, defrost heater, defrost thermostat, or defrost sensor.
- Professional Repair: A technician will use specialized tools to diagnose the problem and replace the faulty component.
Step 8: The Compressor
The compressor is the heart of the refrigerator. It circulates the refrigerant, which cools the air inside the refrigerator.
Compressor issues are almost always best left to a professional. Repairing or replacing a compressor requires specialized tools, knowledge of refrigerants, and EPA certification.
- Symptoms: Refrigerator not cooling at all, unusual noises (clicking, buzzing) coming from the compressor area.
- Possible Causes: Faulty compressor, refrigerant leak.
- Professional Repair: A technician will diagnose the problem and determine if the compressor needs to be repaired or replaced. They will also check for refrigerant leaks and recharge the system if necessary.
When to Call a Professional
While many refrigerator problems can be resolved with simple DIY fixes, there are certain situations where it's best to call a qualified appliance repair technician. Here are some examples:
- You're uncomfortable working with electricity or gas.
- You suspect a refrigerant leak. Refrigerants can be harmful to the environment and your health.
- The problem is complex and involves major components like the compressor, defrost system, or electronic control board.
- You've tried the basic troubleshooting steps and the refrigerator is still not working.
- The refrigerator is under warranty. Attempting repairs yourself may void the warranty.
Important Safety Tips
Always prioritize safety when troubleshooting and repairing appliances.
- Unplug the appliance before performing any repairs.
- Wear safety glasses to protect your eyes.
- Use the correct tools for the job.
- Follow the manufacturer's instructions carefully.
- If you're unsure about anything, call a professional.
- Never attempt to repair a refrigerator that is leaking water or has exposed wires.
- Be aware of the risks associated with refrigerants.
By following these troubleshooting steps, you can often diagnose and fix common refrigerator problems yourself. Remember to prioritize safety and don't hesitate to call a professional when needed. With a little patience and effort, you can keep your refrigerator running smoothly for years to come.
:max_bytes(150000):strip_icc()/parts-of-a-check-315356-JS-0717613d6e7e4eda84a4b72f133eb6b0.png)
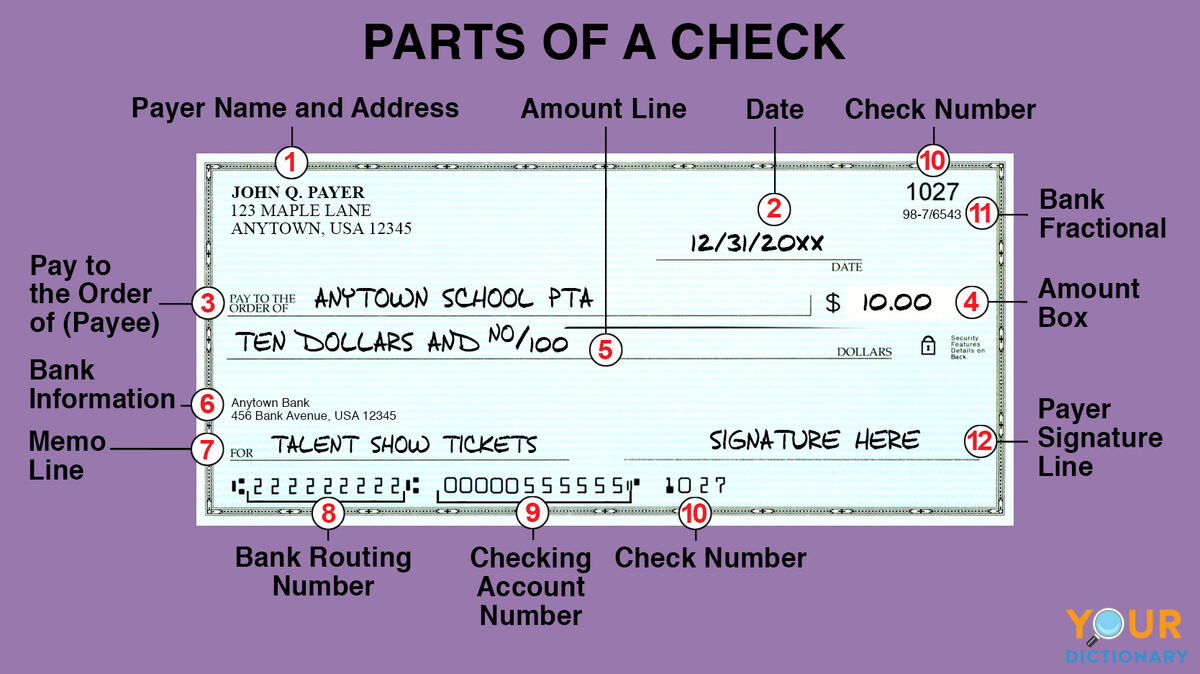
:max_bytes(150000):strip_icc()/MemoLine-56a065e63df78cafdaa168c2.jpg)