What Does Vav Mean In Hvac
The world of HVAC (Heating, Ventilation, and Air Conditioning) is filled with acronyms that can sound like a foreign language. One such acronym you might encounter, especially in commercial settings, is VAV. But what does VAV mean in HVAC, and how does it affect your comfort and energy bills? This guide will break down the complexities of VAV systems, explaining how they work, their benefits, potential problems, and when you might need to call a professional.
Understanding VAV: Variable Air Volume
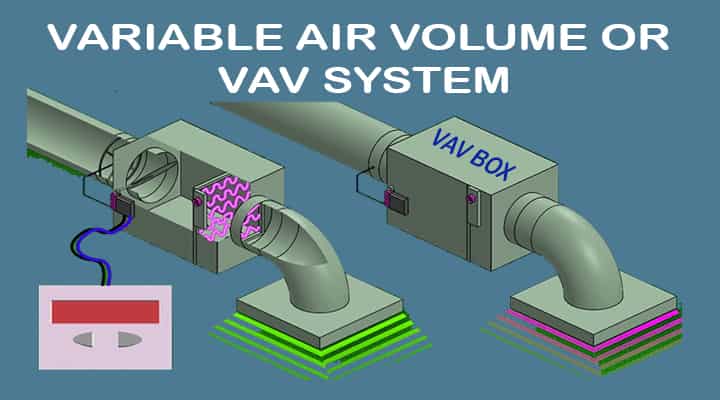
VAV stands for Variable Air Volume. It refers to an HVAC system that controls the temperature in different zones of a building by varying the volume of air supplied to each zone. Unlike constant air volume (CAV) systems, which deliver a fixed amount of air at a varying temperature, VAV systems adjust the airflow while maintaining a relatively constant air temperature.
How VAV Systems Work
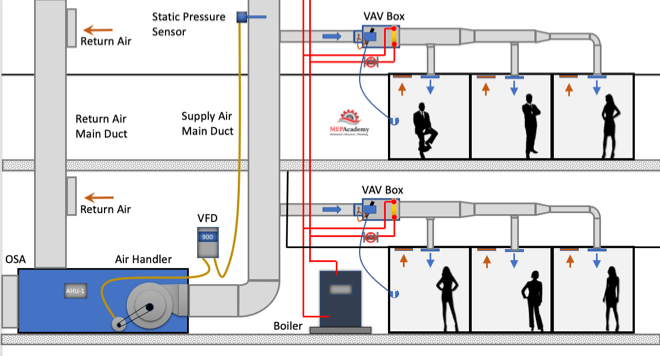
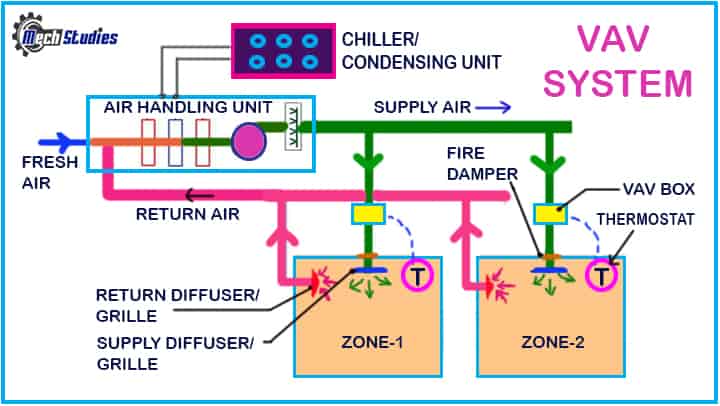
At the heart of a VAV system is the central air handling unit (AHU). The AHU conditions the air – heating, cooling, filtering, and dehumidifying it as needed. This conditioned air is then distributed through ductwork to individual VAV boxes located in each zone or area of the building.
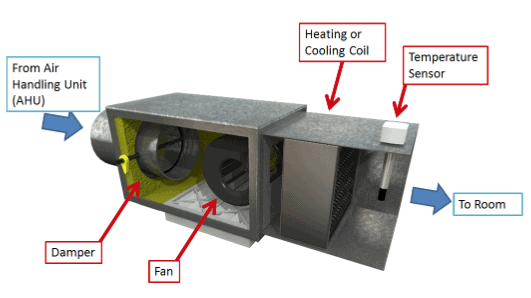
Each VAV box contains a damper that regulates the airflow into the zone. A thermostat in the zone monitors the temperature and sends signals to the VAV box's controller. If the zone is too warm, the damper opens, allowing more cool air to enter. If the zone is too cold, the damper closes, reducing the airflow. Some VAV boxes also have reheat coils to provide additional heating when needed.
Think of it like this: Imagine a water faucet. A CAV system is like turning the faucet on at a fixed rate and adjusting the water temperature. A VAV system is like keeping the water temperature constant but adjusting how much water comes out of the faucet depending on your needs.
Components of a VAV System
Here's a breakdown of the key components of a typical VAV system:
- Air Handling Unit (AHU): The central unit responsible for conditioning the air.
- Ductwork: A network of pipes that distributes the conditioned air throughout the building.
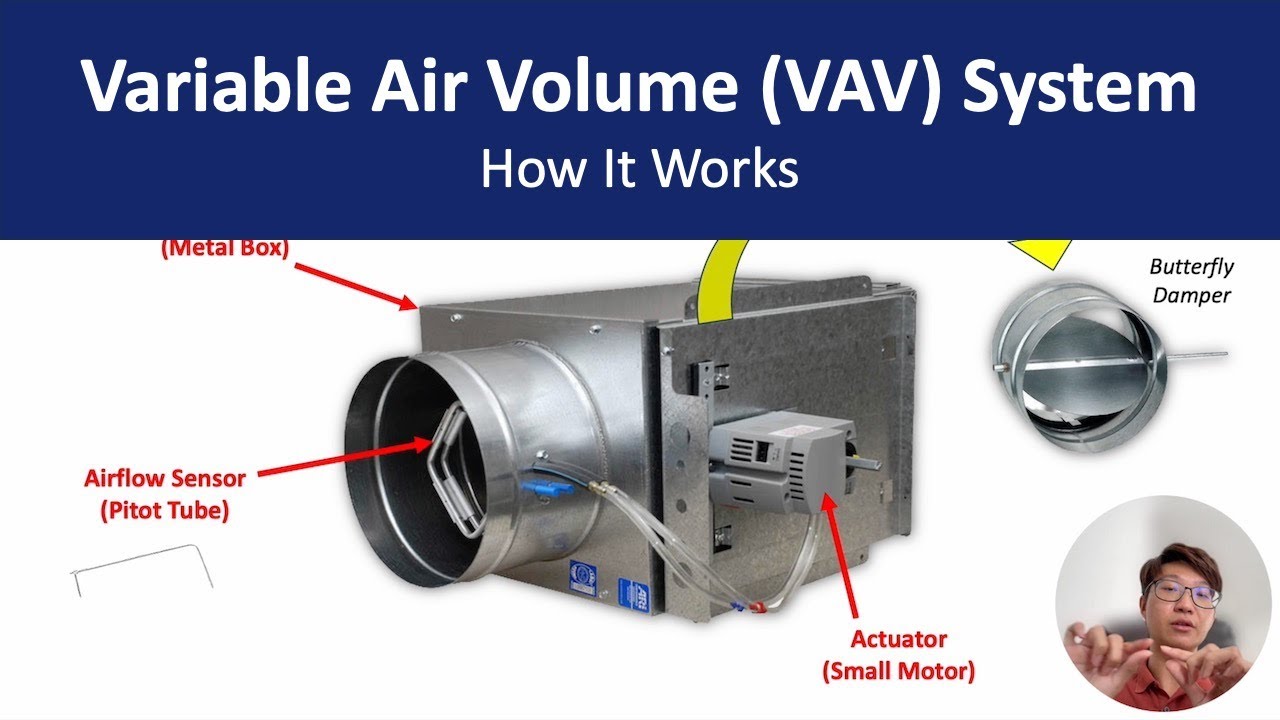
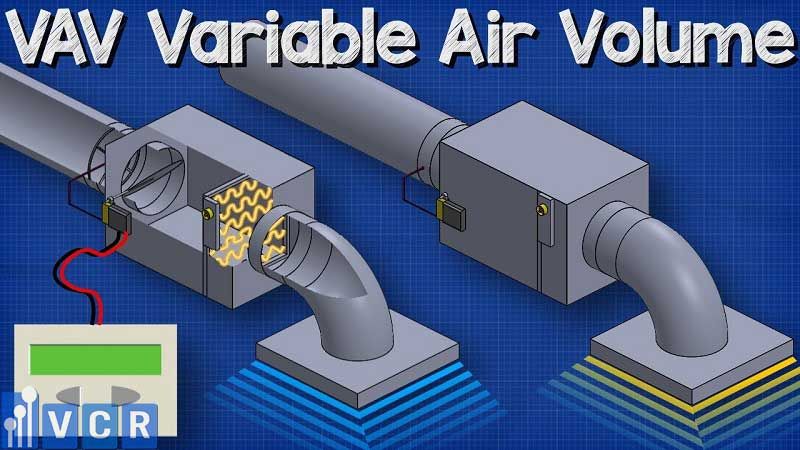
- VAV Boxes: Located in each zone, these boxes control the airflow based on the zone's temperature.
- Dampers: Adjustable plates inside the VAV boxes that regulate airflow.
- Thermostats: Monitor the temperature in each zone and send signals to the VAV boxes.
- Controllers: Receive signals from the thermostats and control the damper position in the VAV boxes.
- Reheat Coils (Optional): Provide supplemental heating in zones that require it.
- Building Management System (BMS): A centralized control system that monitors and manages the entire HVAC system, including the VAV system.
Benefits of VAV Systems
VAV systems offer several advantages over other types of HVAC systems, particularly in larger buildings with diverse heating and cooling needs:
- Energy Efficiency: By only delivering the necessary amount of air to each zone, VAV systems can significantly reduce energy consumption. This is especially true in buildings with varying occupancy levels and diverse internal heat loads.
- Improved Comfort: VAV systems allow for precise temperature control in each zone, ensuring occupants are comfortable regardless of their location in the building.
- Cost Savings: Reduced energy consumption translates to lower utility bills. VAV systems can also reduce wear and tear on equipment, extending its lifespan and reducing maintenance costs.
- Flexibility: VAV systems can easily adapt to changes in building occupancy and usage. Zones can be added or removed without requiring major modifications to the entire system.
Potential Problems with VAV Systems
While VAV systems offer numerous benefits, they can also experience problems. Here are some common issues:
- Sticking Dampers: Dampers can become stuck due to dirt, corrosion, or mechanical failure. This can lead to inconsistent temperatures in the affected zone.
- Faulty Thermostats: A malfunctioning thermostat can send incorrect signals to the VAV box, resulting in overheating or overcooling.
- Controller Issues: The VAV box controller can fail, preventing the damper from adjusting properly.
- Airflow Imbalances: If the airflow is not properly balanced, some zones may receive too much or too little air.
- Leaky Ductwork: Leaks in the ductwork can reduce the efficiency of the system and lead to temperature fluctuations.
- Poor Maintenance: Neglecting routine maintenance, such as filter changes and coil cleaning, can lead to a variety of problems.
- Short Cycling: This happens when the VAV system cycles on and off too frequently, leading to inefficient operation and increased wear and tear.
Troubleshooting VAV Systems: A DIY Approach
While VAV systems are complex, some basic troubleshooting steps can be performed by homeowners or DIY enthusiasts. Safety First! Always turn off the power to the HVAC system before performing any maintenance or repairs.
Tools and Materials You Might Need:
- Screwdrivers (various sizes)
- Wrench set
- Multimeter
- HVAC tape
- Foam sealant
- Compressed air
- Replacement air filters
- Cleaning supplies (coil cleaner, mild detergent)
- Safety glasses
- Gloves
Simple Troubleshooting Steps:
- Check the Thermostat: Ensure the thermostat is set to the correct temperature and mode (heating or cooling). Replace the batteries if necessary.
- Inspect Air Filters: Dirty air filters can restrict airflow and reduce the efficiency of the system. Replace filters regularly (every 1-3 months).
- Look for Obstructions: Make sure supply and return air vents are not blocked by furniture or other objects.
- Inspect Ductwork: Check for visible leaks in the ductwork. Seal any leaks with HVAC tape or foam sealant.
- Listen for Unusual Noises: Pay attention to any unusual noises coming from the AHU or VAV boxes. This could indicate a mechanical problem.
- Visually Inspect VAV Box Dampers (If Accessible): If you can safely access the VAV boxes, visually inspect the dampers to ensure they are moving freely.
Addressing Common Issues:
- Dirty Air Filters: Replace the filter with a new one of the correct size and MERV rating.
- Minor Duct Leaks: Seal small leaks with HVAC foil tape. Ensure the area is clean before applying the tape.
- Blocked Vents: Clear any obstructions from supply and return air vents.
When to Call a Professional HVAC Technician
While some basic troubleshooting can be done yourself, more complex repairs and maintenance should be handled by a qualified HVAC technician. Here are some situations where you should definitely call a professional:
- Major Ductwork Repairs: Repairing or replacing large sections of ductwork requires specialized tools and expertise.
- VAV Box Problems: Diagnosing and repairing problems with VAV box dampers, controllers, or reheat coils often requires specialized knowledge and equipment.
- AHU Issues: Any problems with the AHU, such as compressor failures or refrigerant leaks, should be handled by a professional.
- Electrical Problems: Working with electrical components of the HVAC system can be dangerous. Always call a professional for electrical repairs.
- Refrigerant Handling: Refrigerant is a hazardous substance. Only certified technicians are authorized to handle refrigerant.
- If You're Not Comfortable: If you're not comfortable working on the HVAC system, don't hesitate to call a professional. It's better to be safe than sorry.
Estimating Repair Costs
The cost of repairing a VAV system can vary widely depending on the nature of the problem and the complexity of the repair. Here are some general cost estimates:
- Thermostat Replacement: $100 - $300
- VAV Box Repair: $300 - $1000 (depending on the complexity)
- Ductwork Repair (small leak): $100 - $300
- Ductwork Replacement (section): $500 - $2000
- AHU Repair: $500 - $5000+ (depending on the component and complexity)
These are just estimates. The best way to get an accurate estimate is to contact a qualified HVAC technician and request a quote. Be sure to get multiple quotes to compare prices.
Preventative Maintenance for VAV Systems
Regular preventative maintenance can help prevent problems and extend the life of your VAV system. Here are some important maintenance tasks:
- Change Air Filters Regularly: As mentioned earlier, replacing air filters every 1-3 months is crucial.
- Clean Coils: Clean the evaporator and condenser coils at least once a year. Dirty coils can reduce the efficiency of the system.
- Inspect Ductwork: Regularly inspect the ductwork for leaks and damage.
- Lubricate Moving Parts: Lubricate any moving parts in the AHU and VAV boxes as needed.
- Calibrate Thermostats: Periodically calibrate the thermostats to ensure accurate temperature readings.
- Professional Inspection: Schedule a professional inspection and tune-up at least once a year.
Conclusion
Understanding VAV systems can empower you to better manage your building's HVAC and potentially save money on energy costs. While DIY troubleshooting can address some minor issues, remember that complex repairs should always be left to qualified professionals. By following a regular preventative maintenance schedule, you can keep your VAV system running smoothly and efficiently for years to come.