What Is A Condenser In Hvac

Is your home feeling more like a sauna than a sanctuary in the summer? Or perhaps your furnace is working overtime in the winter, but you’re still shivering? One common culprit behind these comfort catastrophes is a malfunctioning condenser. But what is a condenser in HVAC, and how can you tell if it's the source of your woes? Let's break it down and give you some troubleshooting tips.
Understanding Your HVAC System's Condenser
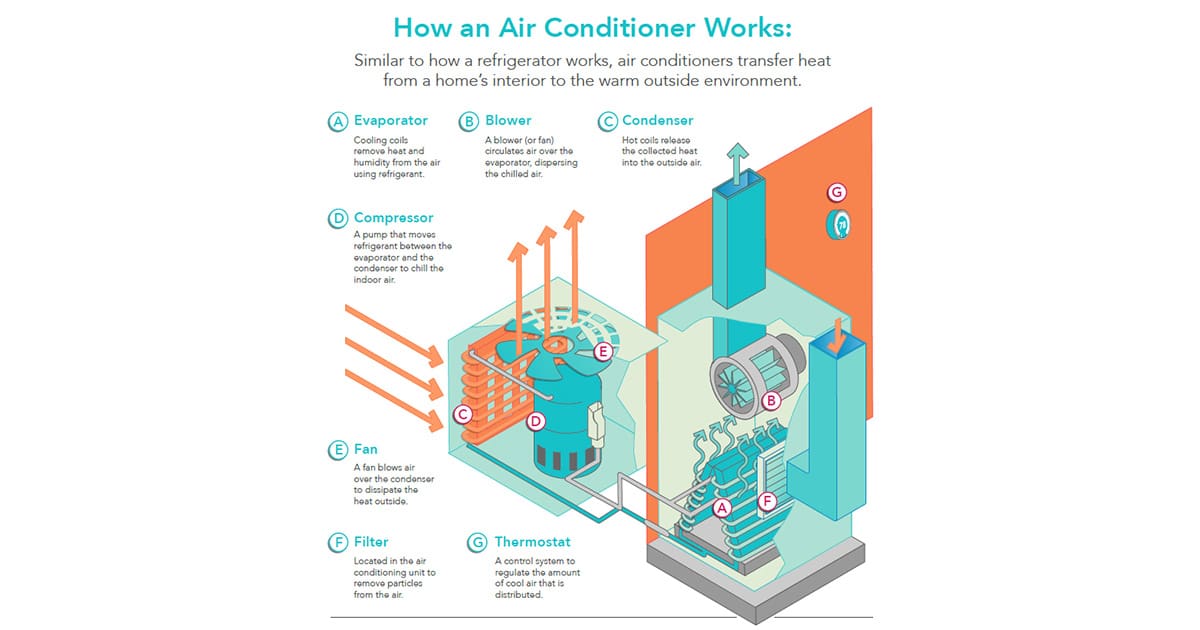
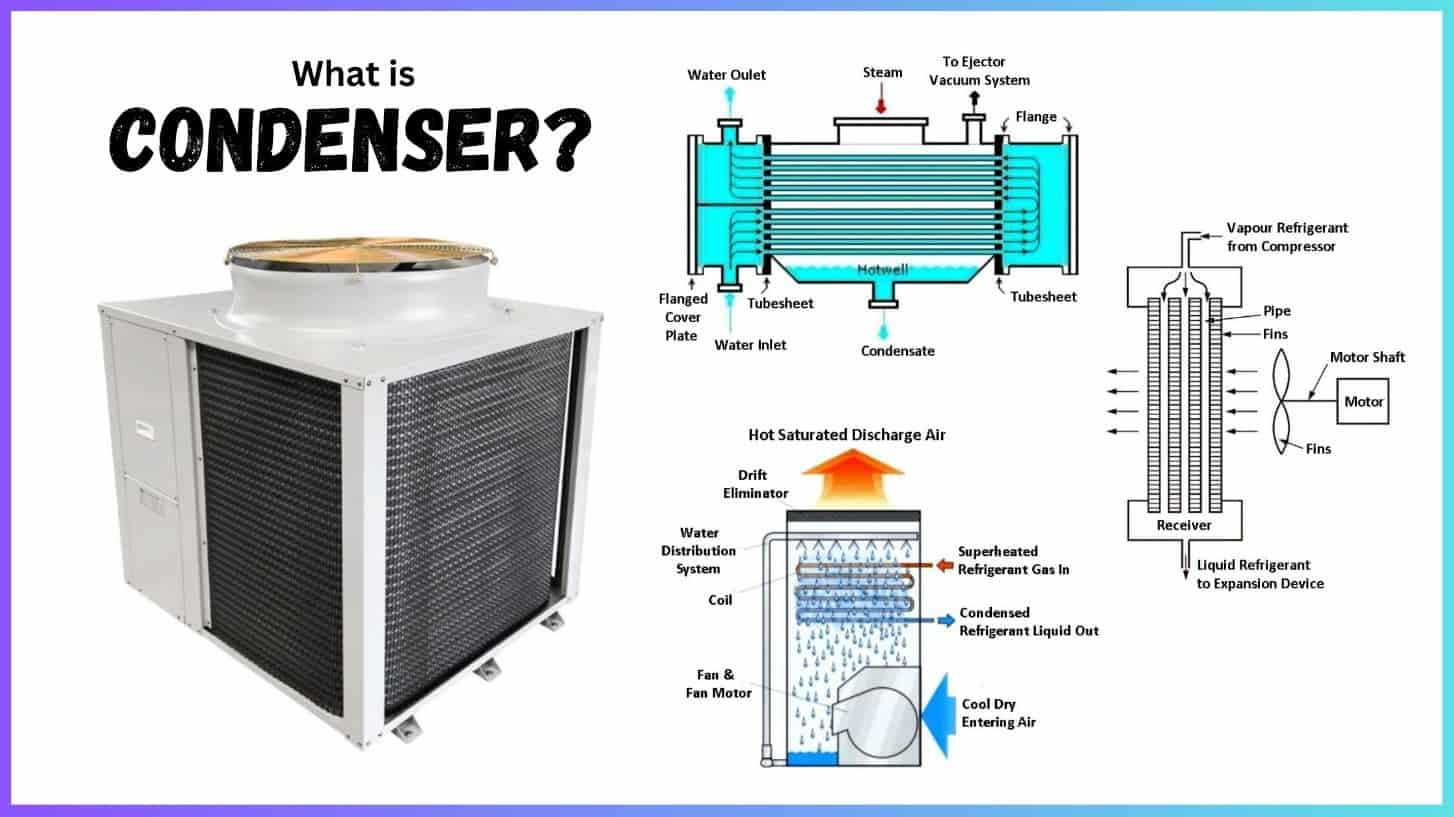
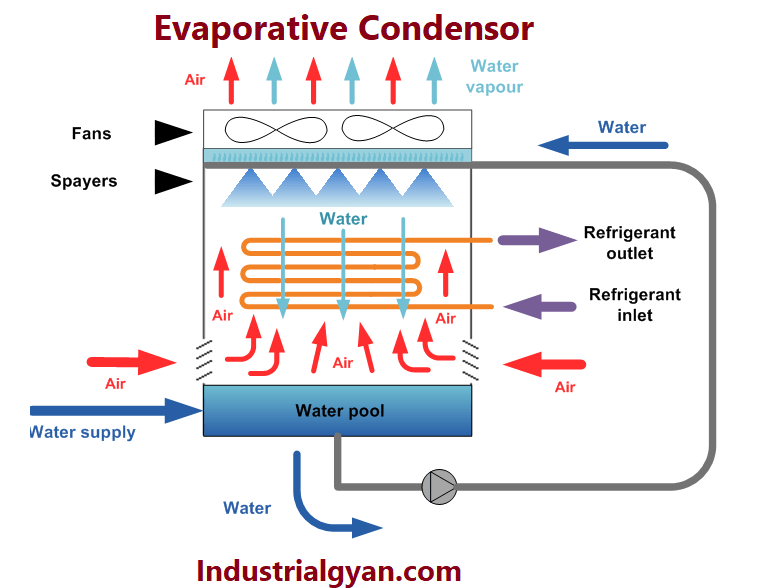
The condenser is a crucial component of your air conditioner or heat pump. Think of it as the system's outdoor workhorse. Its primary function is to release heat from the refrigerant circulating within your HVAC system. In cooling mode, the condenser takes hot, high-pressure refrigerant from the compressor and cools it down, turning it into a liquid. This cooled refrigerant then heads indoors to absorb heat from your home. In heating mode (for heat pumps), the process is reversed; the condenser absorbs heat from the outside air to warm the refrigerant.
The condenser unit typically sits outside your house and includes several key parts:
- Condenser Coil: A network of tubing where the heat exchange happens.
- Fan: Blows air across the condenser coil to facilitate heat transfer.
- Compressor: Pumps the refrigerant through the system (often located within the condenser unit).
- Electrical Components: Including capacitors, contactors, and wiring.
Troubleshooting: Is Your Condenser the Problem?
Let's dive into a methodical approach to diagnosing condenser issues. We'll start with simple checks and gradually move to more involved steps. Safety first! Always turn off the power to your HVAC system at the breaker box before performing any inspections or maintenance.
Step 1: Basic Visual Inspection (No Tools Required)
Start with a thorough visual check of the condenser unit. This simple step can often reveal obvious problems.
- Debris Buildup: Is the condenser coil covered in leaves, grass clippings, dirt, or other debris? Obstructions can significantly reduce airflow and hinder heat transfer. Clear any visible debris by hand.
- Bent Fins: Are the thin metal fins on the condenser coil bent or damaged? These fins help dissipate heat. A few bent fins aren't usually a major issue, but widespread damage can impair performance.
- Vegetation Overgrowth: Are bushes, shrubs, or vines growing too close to the unit? Ensure there's adequate clearance (at least 2-3 feet) around the condenser for proper airflow.
- Ice Buildup: In cold weather, check for ice accumulation on the condenser coil. This could indicate a problem with the defrost cycle (for heat pumps) or airflow restriction.
- Visible Damage: Look for any signs of physical damage to the unit, such as dents, cracks, or loose parts.
Action: Remove any visible debris and vegetation obstructing airflow. Gently straighten any severely bent fins using a fin comb (available at most hardware stores). Be careful not to damage the fins further.
Step 2: Checking Power and Basic Operation (No Tools Required - Use Caution!)
Next, verify that the unit is receiving power and attempt to observe its basic operation.
- Breaker Check: Make sure the circuit breaker for your HVAC system hasn't tripped. Reset it if necessary.
- Thermostat Setting: Ensure your thermostat is set to "cool" (or "heat" for heat pumps) and that the temperature setting is lower (or higher) than the current room temperature.
- Fan Operation: With the thermostat calling for cooling (or heating), listen to see if the condenser fan is running. If the fan isn't running, there may be an electrical problem.
- Compressor Sound: Listen for the hum of the compressor. A healthy compressor will usually make a noticeable humming sound when running. If you hear a clicking sound or no sound at all, the compressor might be faulty. Do not touch the unit while it's running.
Action: If the breaker was tripped, reset it. If the fan isn't running and the breaker is fine, or you suspect a compressor issue, it's time to call a professional.
Step 3: Cleaning the Condenser Coil (Basic Tools Required)
A dirty condenser coil is a common cause of reduced efficiency and poor performance. Cleaning the coil can often improve airflow and heat transfer.
Tools needed: Garden hose with a spray nozzle, fin comb (optional), screwdriver (to remove access panels, if necessary).
Procedure:
- Turn off the power to the HVAC system at the breaker box.
- Remove any access panels to expose the condenser coil.
- Gently spray the coil with a garden hose, using a low-pressure setting. Spray from the inside out to push dirt and debris outward. Avoid using a high-pressure nozzle, as it can damage the fins.
- If necessary, use a fin comb to gently straighten any bent fins after cleaning.
- Reinstall the access panels and turn the power back on.
Important: Avoid getting water on any electrical components. If the coil is heavily soiled, you may need to use a specialized coil cleaner (available at HVAC supply stores). Follow the manufacturer's instructions carefully.
Step 4: Checking the Capacitor (Basic Tools & Knowledge Required - Proceed with Caution!)
The capacitor is an electrical component that helps start and run the condenser fan motor and compressor. A failing capacitor is a common cause of condenser problems.
Warning: Capacitors store electrical charge, even when the power is off. Touching a charged capacitor can result in a severe electrical shock. This step should only be attempted by individuals with basic electrical knowledge and experience. If you are not comfortable working with electrical components, call a professional.
Tools needed: Screwdriver, multimeter with capacitance testing function (optional, but highly recommended for accurate testing).
Procedure:
- Turn off the power to the HVAC system at the breaker box.
- Locate the capacitor inside the condenser unit. It's usually a cylindrical component with wires connected to it.
- Discharge the capacitor: This is the most important step to prevent electric shock. Use a screwdriver with an insulated handle to carefully short across the capacitor terminals. Touch the screwdriver blade to both terminals simultaneously. Some people recommend using a resistor for safer discharge, but this requires more advanced knowledge.
- Visually inspect the capacitor: Look for signs of bulging, leaking, or corrosion. A physically damaged capacitor is likely faulty.
- Test the capacitor with a multimeter: If you have a multimeter with a capacitance testing function, you can measure the capacitance of the capacitor. Compare the measured value to the rated capacitance printed on the capacitor label. A significant deviation (e.g., more than 10%) indicates that the capacitor is likely failing.
Action: If the capacitor is visually damaged or fails the capacitance test, it needs to be replaced. Important: Always replace the capacitor with one of the same voltage and capacitance rating. Capacitors can be purchased at HVAC supply stores. If you are not comfortable replacing the capacitor yourself, call a professional.
Step 5: Checking Refrigerant Levels (Professional Only!)
Low refrigerant levels can also cause condenser problems. However, checking and adding refrigerant requires specialized equipment and knowledge. This task should only be performed by a licensed HVAC technician. Attempting to handle refrigerant without proper training and equipment can be dangerous and illegal.
When to Call a Professional HVAC Technician
While some condenser issues can be addressed with simple DIY troubleshooting, certain problems require the expertise of a qualified HVAC technician. Call a professional if you encounter any of the following:
- Compressor Problems: If you suspect a faulty compressor, don't attempt to repair it yourself. Compressor repairs are complex and require specialized tools and knowledge.
- Refrigerant Leaks: Refrigerant leaks are harmful to the environment and can indicate a serious problem. A professional can locate and repair the leak and recharge the system with refrigerant.
- Electrical Problems: If you are not comfortable working with electrical components, leave electrical repairs to a professional.
- Lack of Airflow Despite Cleaning: If you've cleaned the coil and ensured proper airflow, but the system still isn't cooling (or heating) effectively, there may be a more serious underlying issue.
- Unit is Old: If your condenser unit is old (10-15 years or older) and requires frequent repairs, it may be more cost-effective to replace it with a new, more energy-efficient model.
- Suspect Heat Pump Defrost Issues: For heat pumps, if you suspect the defrost cycle is not working correctly, a professional can diagnose the issue, check sensors and related electrical controls.
Preventative Maintenance: Keeping Your Condenser Healthy
Regular preventative maintenance can help keep your condenser running efficiently and prevent costly repairs. Consider the following:
- Regular Cleaning: Clean the condenser coil at least once a year, preferably in the spring before cooling season.
- Clear Debris: Keep the area around the condenser unit free of debris and vegetation.
- Professional Tune-Ups: Schedule annual tune-ups with a qualified HVAC technician. A technician can inspect the system, clean the coils, check refrigerant levels, and identify potential problems before they become major issues.
By understanding what a condenser is and performing basic troubleshooting and maintenance, you can help keep your HVAC system running smoothly and efficiently, ensuring a comfortable home environment year-round. Remember, when in doubt, call a professional!