What Is A Normal Humidity Level Outside
.jpg?width=3508&name=Humidity level chart (1).jpg)
Has your air conditioner suddenly stopped cooling as efficiently as it used to? Or perhaps you're noticing condensation on your windows, even when it's not raining? One potential culprit could be the humidity level outside. Understanding what a normal humidity level is and how it affects your home can be the first step in diagnosing and addressing these problems.
Understanding Humidity and Its Impact
Humidity refers to the amount of moisture in the air. It's usually expressed as relative humidity, which is the percentage of moisture the air holds compared to the maximum it can hold at a given temperature. Warmer air can hold more moisture than colder air.
Why does humidity matter? High humidity can make you feel hotter because sweat doesn't evaporate as effectively, hindering your body's cooling process. It can also contribute to:
- Mold and mildew growth: Excess moisture creates an ideal environment for these to thrive.
- Wood rot: High humidity can damage wooden structures in your home.
- Uncomfortable indoor environment: Feeling clammy and sticky.
- Increased energy bills: Your AC has to work harder to cool and dehumidify the air.
What Is Considered a Normal Humidity Level Outside?
There isn't one single "normal" humidity level for outdoors. It varies significantly depending on:
- Geographic location: Coastal areas tend to have higher humidity than deserts.
- Time of year: Summer months are typically more humid than winter months.
- Time of day: Humidity levels often fluctuate throughout the day.
- Weather conditions: Rainfall or proximity to bodies of water can increase humidity.
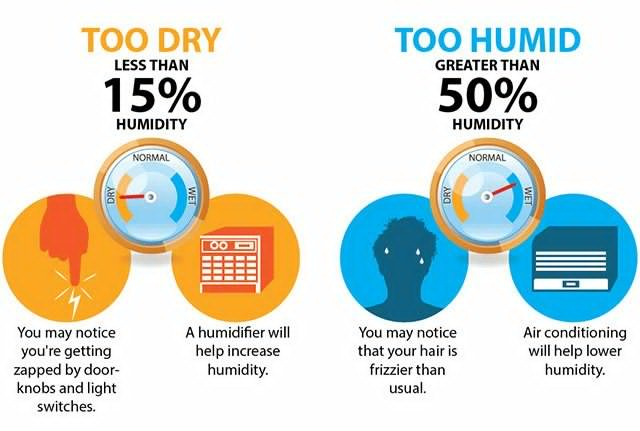
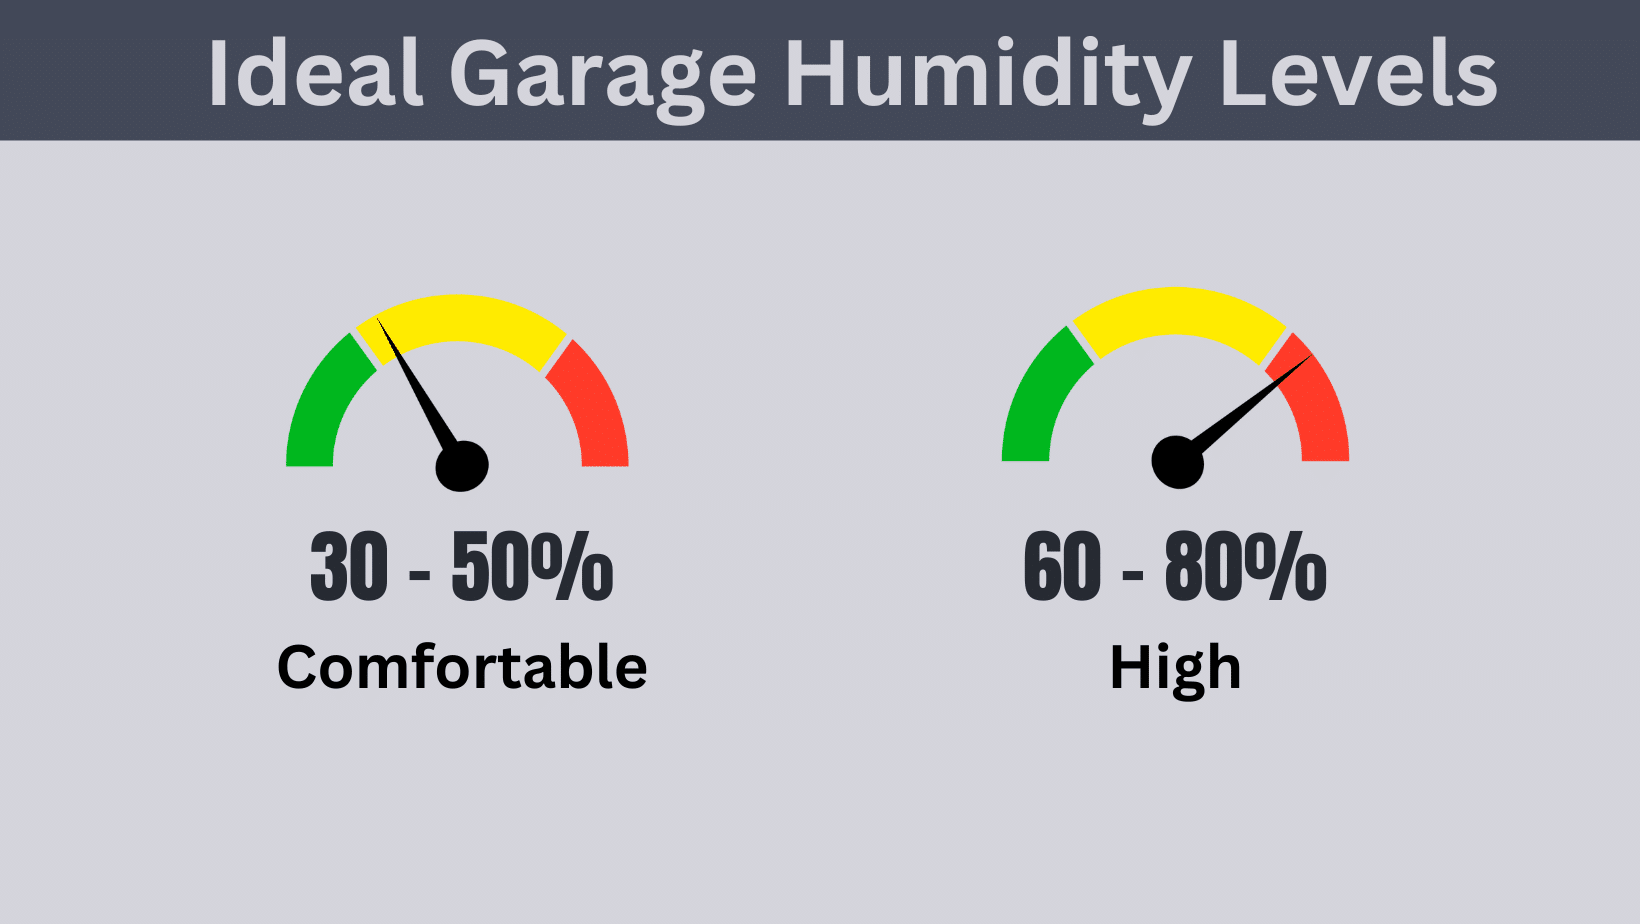
Generally speaking, a relative humidity level of 30-60% is considered comfortable for most people. However, even within this range, personal preferences can vary. Some people find 40% ideal, while others prefer closer to 60%.
You can find the current humidity level for your area by:
- Checking your local weather forecast: Most weather apps and websites provide humidity information.
- Using a weather station: If you have a weather station at home, it will typically measure humidity.
Troubleshooting a Common Household Appliance Failure: The Air Conditioner
Let's assume your air conditioner is running but not cooling properly. A major cause can be that your AC is struggling to reduce high humidity levels.
Step 1: Initial Assessment – Is It Really the AC?
Before diving into AC troubleshooting, make sure the problem isn't something simpler. Ask yourself:
- Is the thermostat set correctly? Ensure it's in "Cool" mode and set to a temperature lower than the current room temperature.
- Are all the vents open and unobstructed? Closed or blocked vents restrict airflow.
- Are windows and doors properly sealed? Gaps allow hot, humid air to enter, overloading the AC.
- Is the problem widespread or isolated to a specific room? If it's only one room, the issue might be with the vent or ductwork serving that area.
Step 2: Checking the Power Supply
A surprisingly common issue is a lack of power. Here’s how to check:
- Inspect the breaker: Locate the breaker in your electrical panel that controls the AC. Is it tripped (in the "off" or middle position)? If so, flip it fully to the "off" position, then back to "on". If it trips again immediately, stop here and call an electrician. There’s likely a serious electrical problem.
- Check the disconnect switch: Most outdoor AC units have a disconnect switch located nearby. Ensure it is in the "on" position. Some are pull-out switches; make sure it is fully inserted.
Step 3: Air Filter Inspection and Replacement
A dirty air filter is a major cause of AC inefficiency. It restricts airflow, forcing the unit to work harder and reducing its cooling capacity. A clogged filter prevents adequate air circulation which may also cause ice buildup on the cooling coils.
- Locate the air filter: It's usually located in the return air duct, either near the furnace or air handler.
- Inspect the filter: Hold it up to the light. If you can't see much light through it, it's dirty.
- Replace the filter: Use the correct size and type of filter recommended by your AC manufacturer. Most filters have the size printed on the side. Aim to replace your filter every 1-3 months, especially during peak cooling season.
Step 4: Cleaning the Outdoor Unit (Condenser)
The outdoor condenser unit needs good airflow to release heat. Debris can block this airflow, making the AC less efficient.
- Turn off the power: Crucially important! Turn off the power to the AC unit at the disconnect switch before cleaning.
- Remove debris: Clear away any leaves, grass clippings, branches, or other debris from around the unit.
- Clean the fins: Use a garden hose with a gentle spray nozzle to clean the fins of the condenser. Spray from the inside out to avoid bending them. A fin comb can be used to straighten any bent fins carefully.
Step 5: Checking for Ice Buildup
If the evaporator coil (inside the air handler) freezes over, it can severely restrict airflow and reduce cooling. Low refrigerant or a dirty air filter are common causes.
- Locate the evaporator coil: This is inside the indoor air handler unit. You may need to remove an access panel.
- Inspect for ice: If you see ice buildup, turn off the AC and run only the fan. This will help melt the ice.
- Address the underlying cause: Once the ice has melted, address the reason for the buildup. Replace the air filter (if dirty) and consider calling a professional to check the refrigerant levels. Low refrigerant is a job for a qualified HVAC technician.
Step 6: Inspecting the Condensate Drain Line
Your air conditioner removes humidity from the air, and that water needs to drain away. A clogged drain line can cause water to back up, potentially damaging your system or causing leaks.
- Locate the drain line: It's usually a PVC pipe that exits the indoor air handler.
- Check for clogs: Look for any visible blockages at the end of the pipe.
- Flush the drain line: You can try using a wet/dry vacuum to suck out any debris or use a vinegar solution. Pour a cup of distilled vinegar into the drain line and let it sit for about 30 minutes, then flush it with water.
When to Call a Professional
While these DIY steps can address many common AC problems, some issues require professional expertise. Never attempt repairs involving refrigerant, electrical wiring beyond the breaker and disconnect switch, or gas lines if you are not properly trained.
Call a qualified HVAC technician if:
- The breaker trips repeatedly: This indicates a serious electrical problem.
- You suspect a refrigerant leak: Handling refrigerant requires specialized equipment and certification.
- The compressor is making strange noises: This could indicate a failing compressor, which is a costly repair.
- You are uncomfortable working with electrical components: Your safety is paramount.
- After trying these steps, the AC still isn't cooling properly: There may be a more complex underlying issue.
Tips for Maintaining Comfortable Humidity Levels Indoors
Even with a properly functioning AC, you can take steps to manage indoor humidity levels:
- Use exhaust fans in bathrooms and kitchens: These vent moisture-laden air outside.
- Run a dehumidifier: Especially in basements or other damp areas.
- Ensure proper ventilation: Opening windows (when outdoor humidity is lower) can help circulate fresh air.
- Fix any leaks promptly: Leaky pipes or roofs contribute to indoor humidity.
- Consider a whole-house dehumidifier: For persistent humidity problems, a whole-house dehumidifier integrated with your HVAC system may be the best solution.
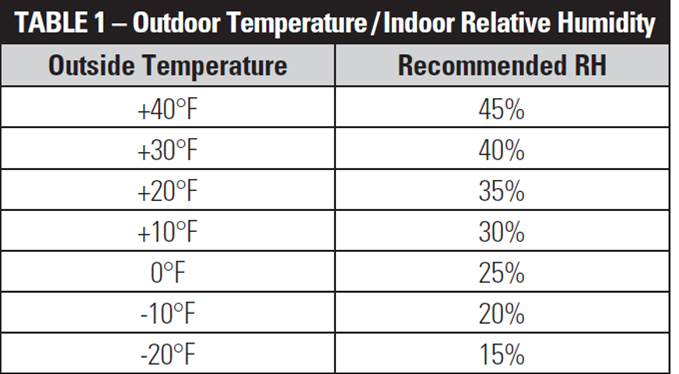
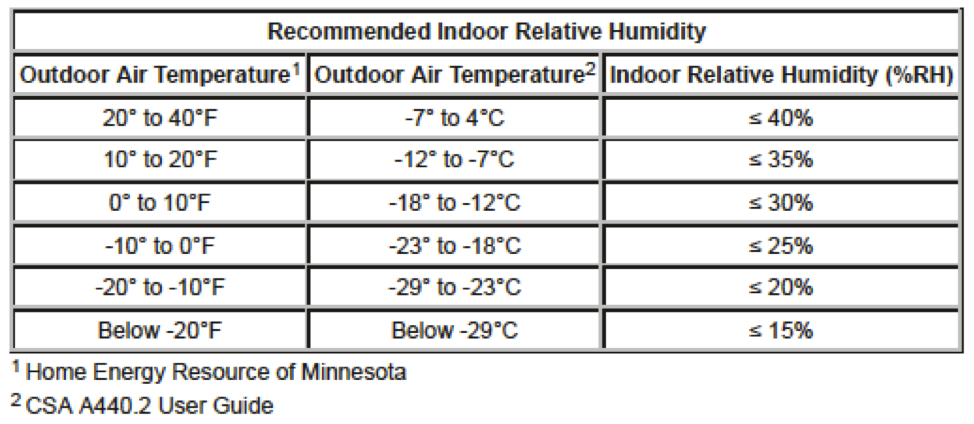
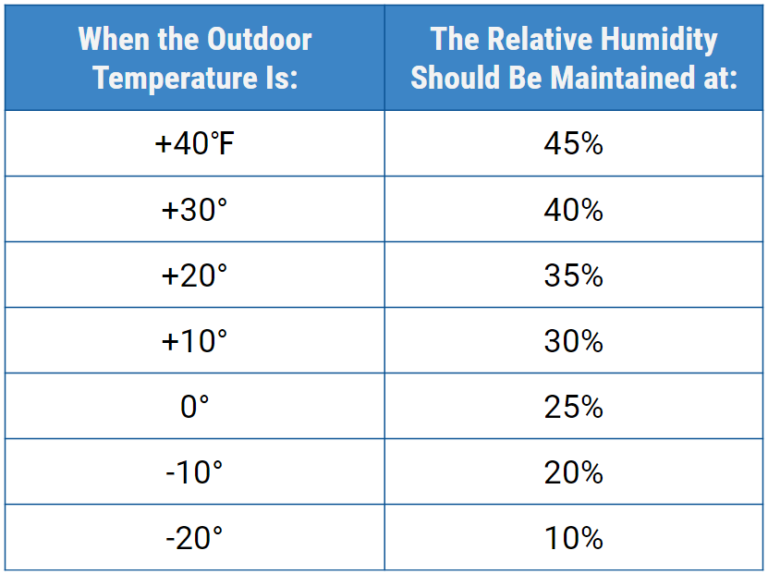
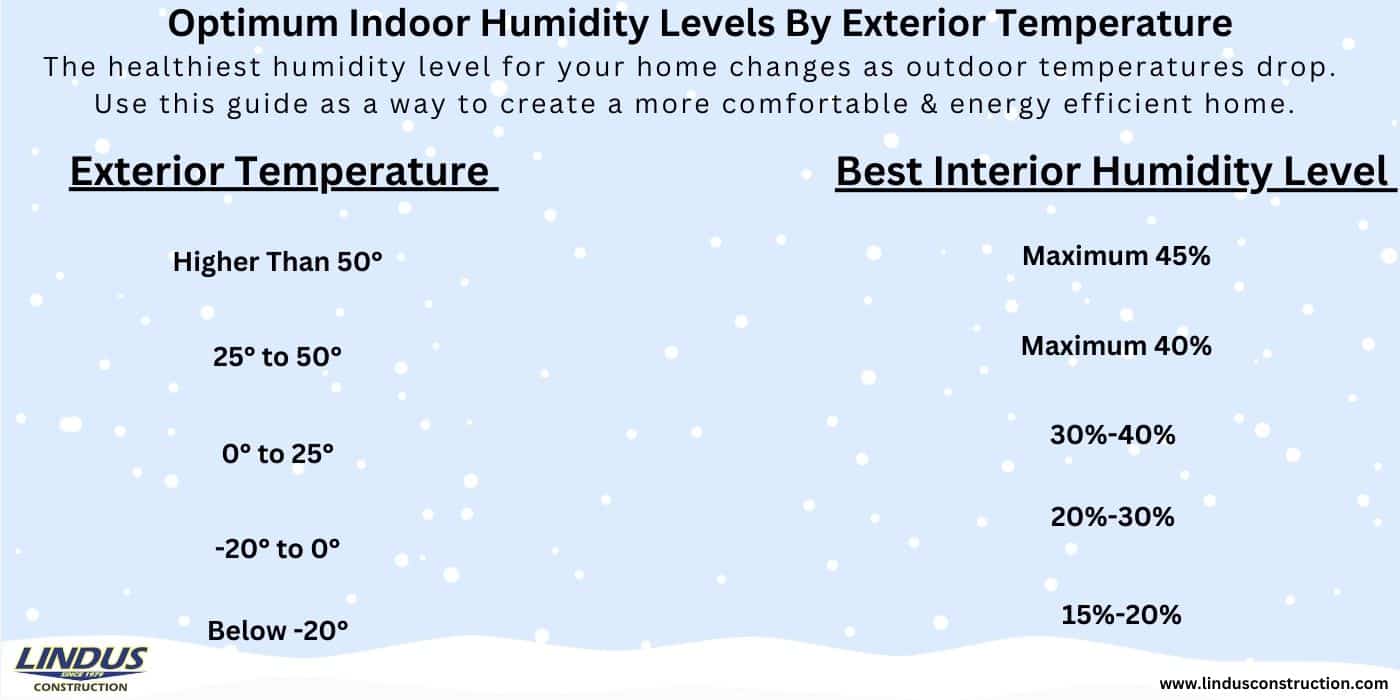
- Monitor your indoor humidity: Use a hygrometer to keep track of the humidity levels in your home. Aim for a range of 30-50%.
By understanding what a normal humidity level is outside and how it affects your home, you can take proactive steps to maintain a comfortable and healthy indoor environment. And by following these troubleshooting steps, you can often resolve minor AC issues yourself, saving time and money. However, always prioritize safety and don't hesitate to call a professional when needed.