What Is An Oil Burner Used For

Imagine waking up on a chilly morning, expecting your home to be warm and cozy, only to find it's as cold inside as it is outside. Or perhaps you're facing the opposite: your home is consistently too hot, despite the thermostat settings. These are frustrating and common heating and cooling problems homeowners face, and often, a malfunctioning oil burner is the culprit when oil heat is in use.
This article aims to equip you with the knowledge to understand what an oil burner is used for and to troubleshoot common issues, saving you time and money. We'll walk through a step-by-step diagnostic process and highlight DIY solutions while stressing the importance of calling a professional when things get too complex or potentially dangerous.
Understanding Your Oil Burner's Role
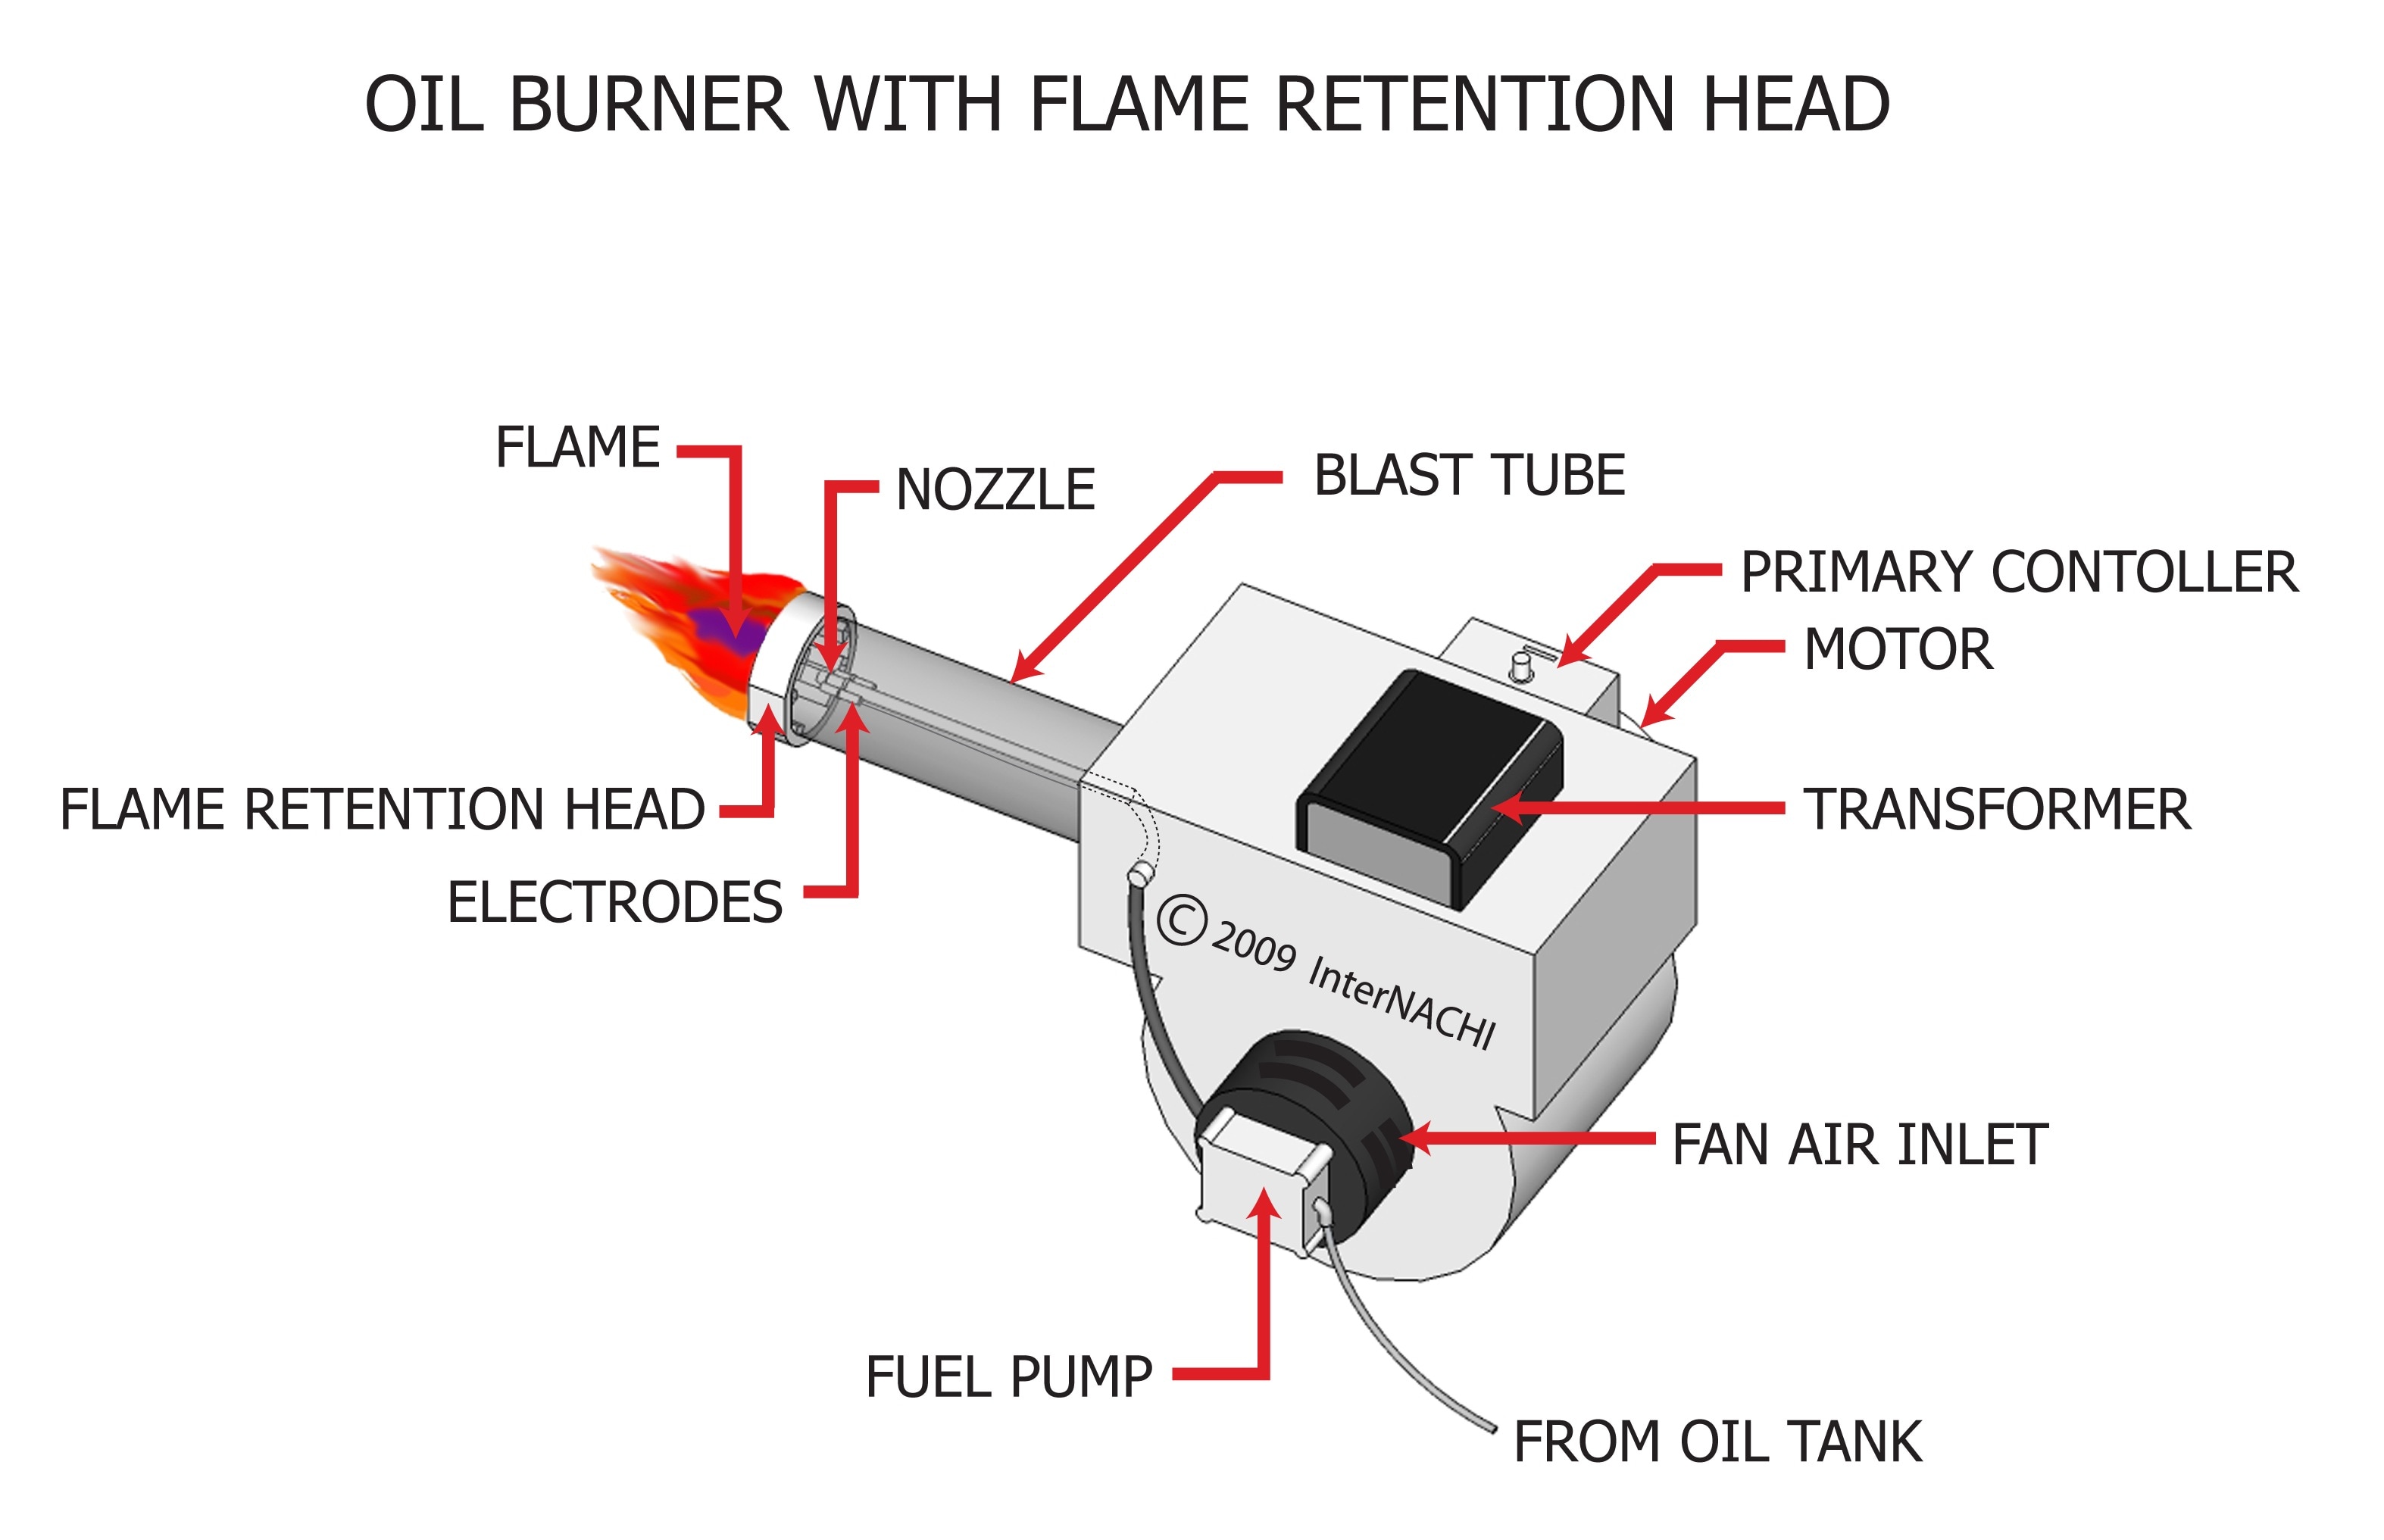
Before diving into troubleshooting, let's clarify the purpose of an oil burner. The oil burner is the heart of your oil-fired heating system. Its primary function is to convert heating oil into heat that warms your home. It does this through a combustion process:
- Pumping Oil: The oil burner draws heating oil from your storage tank.
- Atomizing the Oil: The oil is then atomized, meaning it's broken down into a fine mist.
- Mixing with Air: This mist is mixed with air.
- Ignition: The mixture is ignited, creating a flame within the combustion chamber of your furnace or boiler.
- Heat Transfer: The heat produced is transferred to water (in a boiler) or air (in a furnace), which is then circulated throughout your home.
Therefore, if your oil burner isn't functioning correctly, your heating system won't be able to effectively warm your home.
Troubleshooting: A Step-by-Step Guide
Now, let's move on to diagnosing the issue. Follow these steps methodically. Remember to always prioritize your safety.
Step 1: Initial Checks (No Tools Required)
Start with the basics – things you can check without any tools:
- Thermostat Setting: Is your thermostat set correctly to "heat" and at a temperature higher than the current room temperature? This might seem obvious, but it's a common oversight. Make sure the batteries in the thermostat are functioning.
- Emergency Switch: Locate the emergency switch for your heating system (usually a red switch near the burner). Ensure it's in the "on" position. Someone might have accidentally switched it off.
- Oil Tank Level: Check the gauge on your oil tank. Is there enough oil? A low or empty tank is a frequent cause of heating problems. Running out of oil can also introduce sediment into the system, leading to burner problems.
- Circuit Breaker: Go to your electrical panel and check the circuit breaker for your furnace or boiler. Has it tripped? If so, reset it. If it trips again immediately, do not keep resetting it. This indicates a more serious electrical problem.
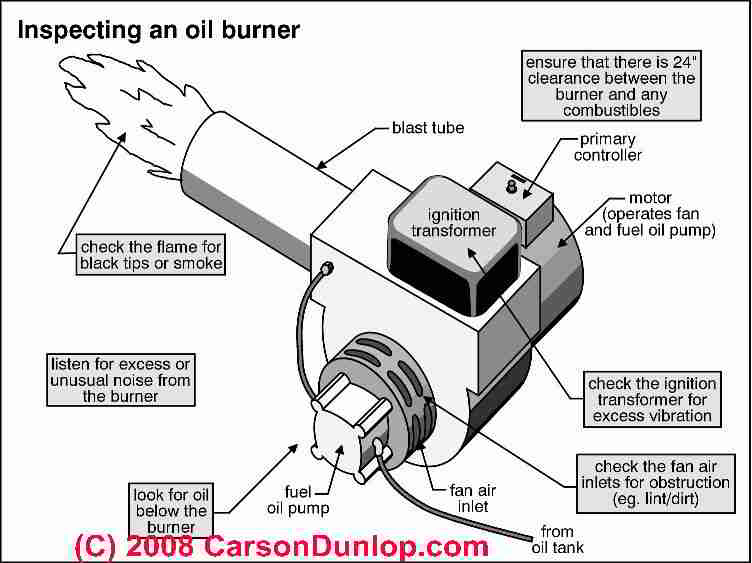
- Visual Inspection: Look around the burner for any obvious signs of problems, such as oil leaks, smoke, or unusual noises. Sniff for a strong odor of oil, which could indicate a leak.
Step 2: Basic Troubleshooting (Minimal Tools)
If the initial checks don't reveal the problem, you can move on to some basic troubleshooting steps that require minimal tools (a screwdriver, a flashlight, and possibly a multimeter).
- Burner Reset Button: Most oil burners have a reset button (usually red) on the burner housing. Press it once. Wait a few minutes to see if the burner starts. Important: Only press the reset button once. Repeatedly resetting the burner without addressing the underlying problem can damage the system and potentially create a fire hazard. If the burner doesn't start after one reset attempt, there's a more significant issue.
- Air Filter: Locate the air filter for your furnace. A dirty air filter restricts airflow, which can cause the burner to overheat and shut down. Remove the filter and hold it up to the light. If you can't see light through it, it's time to replace it. Replacing a dirty air filter is one of the easiest and most effective ways to maintain your heating system.
- Check the Nozzle (Advanced - Proceed with Caution): This step requires extreme caution and should only be attempted if you are comfortable working with potentially flammable materials. If you are not comfortable, skip this step and call a professional. The nozzle is responsible for spraying the oil into the combustion chamber. A clogged nozzle can prevent the burner from igniting.
- Safety First: Turn off the power to the burner at the circuit breaker and the emergency switch.
- Locate the Nozzle: The nozzle is located inside the burner assembly. You'll likely need a screwdriver to remove a cover plate.
- Inspect the Nozzle: Carefully remove the nozzle. Examine it for clogs or damage.
- Cleaning/Replacing: If the nozzle is clogged, you *might* be able to carefully clean it with a soft brush and a solvent designed for cleaning oil burner nozzles. However, it's generally recommended to replace the nozzle rather than try to clean it. Nozzles are relatively inexpensive and should be replaced annually for optimal performance. Make sure you get the correct replacement nozzle (size and spray angle) for your burner model.
- Reassemble: Carefully reassemble the burner, ensuring all connections are secure.
- Restore Power: Turn the power back on at the circuit breaker and the emergency switch. Try resetting the burner.
- Check the Cad Cell (Advanced - Requires Multimeter and Caution): The cad cell (cadmium sulfide cell) is a safety sensor that detects the presence of a flame. If the cad cell doesn't detect a flame, it will shut down the burner to prevent oil from being pumped into the combustion chamber without ignition.
- Safety First: Turn off the power to the burner at the circuit breaker and the emergency switch.
- Locate the Cad Cell: The cad cell is usually located near the flame in the burner assembly. It's a small, light-sensitive resistor.
- Test with Multimeter: Using a multimeter, you can test the cad cell's resistance when exposed to light and when in darkness. The resistance should change significantly when light is shined on it. If the resistance doesn't change, the cad cell is likely faulty and needs to be replaced. Consult your burner's service manual for specific resistance values.
- Replacement: Replacing the cad cell is a relatively simple task, but it's crucial to get the correct replacement.
- Reassemble: Carefully reassemble the burner.
- Restore Power: Turn the power back on at the circuit breaker and the emergency switch. Try resetting the burner.
Step 3: When to Call a Professional
There are situations where DIY troubleshooting is not only inadvisable but potentially dangerous. It's time to call a qualified HVAC technician if you encounter any of the following:
- Repeated Tripping of the Circuit Breaker: This indicates a serious electrical problem.
- Strong Odor of Oil: This could indicate a leak, which is a fire hazard.
- Visible Smoke: Smoke coming from the burner or chimney is a sign of incomplete combustion, which can be dangerous and inefficient.
- Unusual Noises: Loud banging, grinding, or hissing noises from the burner could indicate a mechanical problem.
- You Are Uncomfortable Working with Oil or Electrical Components: If you feel uncertain or uneasy about any of the troubleshooting steps, it's best to leave it to a professional.
- The Burner Fails to Start After Basic Troubleshooting: If you've checked the simple things and the burner still won't start, there's likely a more complex issue that requires specialized knowledge and equipment.
- You Suspect a Problem with the Oil Tank: Oil tanks can leak or corrode, and any work on the tank should be done by a qualified professional.
- Any Work Involving Fuel Lines: Manipulating fuel lines without proper training can be incredibly dangerous.
- If you have any doubt. It's always better to be safe than sorry.
Preventative Maintenance
The best way to avoid heating problems is to perform regular preventative maintenance. Here are some tips:
- Annual Tune-Up: Schedule an annual tune-up with a qualified HVAC technician. This includes cleaning the burner, adjusting the air-to-fuel ratio, inspecting the components, and testing the efficiency of the system.
- Replace the Air Filter Regularly: Check and replace the air filter every one to three months, or more frequently if you have pets or allergies.
- Keep the Area Around the Burner Clean: Remove any dust, debris, or flammable materials from the area around the burner.
- Monitor Your Oil Consumption: Keep track of how much oil you're using. A sudden increase in oil consumption could indicate a problem with the burner or the heating system.
- Consider a Smart Thermostat: A smart thermostat can help you optimize your heating schedule and save energy.
Conclusion
Understanding what an oil burner is used for and knowing how to troubleshoot common problems can save you time and money. By following the steps outlined in this article, you can diagnose and resolve many issues yourself. However, it's crucial to prioritize your safety and call a professional when necessary. Regular preventative maintenance is the key to keeping your oil-fired heating system running efficiently and reliably for years to come. Don’t hesitate to call an HVAC professional. They are there to help and keep you safe.