What Is The Ultimate Source Of Geothermal Energy

Let's tackle a common household frustration: a malfunctioning electric water heater. No hot water is a major inconvenience, but before calling a plumber, let's explore some basic troubleshooting steps you can safely undertake. Think of this as a detective game; we're looking for clues!
Troubleshooting Your Electric Water Heater: A Step-by-Step Guide
This guide focuses on basic electric water heaters. Gas water heaters require specialized expertise and should only be serviced by qualified professionals. Attempting repairs on a gas appliance without proper training can be extremely dangerous.
Step 1: Safety First!
Electricity and water are a dangerous combination! Before touching anything, the absolute first step is to:
- Turn off the breaker in your electrical panel that supplies power to the water heater. This is non-negotiable. Locate the correct breaker (usually labeled "Water Heater") and flip it to the "Off" position. Double-check that the water heater is indeed off by turning on a hot water faucet; no water should be running if you have an expansion tank. Be sure to turn the hot water faucet off after checking.
Step 2: Preliminary Checks
With the power safely off, we can begin our investigation:
- Check the thermostat setting: On most electric water heaters, you'll find access panels near the top and bottom of the tank. Behind these panels are thermostats. Use a screwdriver to carefully remove the access panel screws (be careful not to drop them). Remove any insulation. Look for a dial or a digital display. Is the thermostat set to a reasonable temperature (typically around 120-140°F or 49-60°C)? Sometimes the thermostat can be accidentally bumped or turned off.
- Check for reset buttons: Many electric water heaters have a high-temperature limit switch (also known as a "reset button") near the thermostat. It's usually a small, red button. If you see it, press it firmly. Sometimes, overheating can trip this switch. If it trips frequently, it indicates a more significant underlying problem.
- Visually inspect for leaks: Look around the base of the water heater, around the connections, and on the tank itself for any signs of water. Even a small leak can indicate a serious problem that requires professional attention. A rusty tank is a sign the water heater has failed and is in need of replacing.
Step 3: Checking the Power Supply
Even with the breaker on, there's a chance the water heater isn't receiving power. This requires a multimeter and some electrical knowledge. If you're not comfortable working with electricity, skip this step and call a qualified electrician.
Warning: Working with electricity can be dangerous. Only proceed if you are confident in your abilities and understand the risks.
- Safety First (Again!): Confirm the breaker is still off! Double-check!
- Access the Wiring: Carefully remove the access panel(s) covering the wiring connections. Again, remove any insulation.
- Use a Multimeter: Set your multimeter to measure AC voltage. Carefully touch the multimeter probes to the terminals where the wires connect to the heating elements. You should read approximately 220-240 volts. Do not touch any bare wires or metal components while the power is on!
- If no voltage is present: This indicates a problem with the electrical supply. Check the breaker in your panel again to ensure it hasn't tripped. If the breaker trips immediately when you turn it on, there's likely a short circuit somewhere in the water heater or the wiring. Call an electrician immediately!
Step 4: Simple Thermostat Adjustment/Replacement
If you've confirmed power is reaching the water heater, the thermostat might be the culprit. You can try adjusting it slightly or, if you're comfortable, replacing it.
- Adjusting the Thermostat: Use a small screwdriver to adjust the thermostat dial slightly higher (within the recommended temperature range). Wait a few hours and see if the water heats up.
- Replacing the Thermostat (Proceed with caution!):
- Turn off the breaker! (You knew that was coming, right?)
- Take a photo: Before disconnecting any wires, take a clear photo of the wiring configuration so you can reconnect everything correctly.
- Disconnect the Wires: Carefully disconnect the wires from the old thermostat. Use pliers to grip the connectors, not the wires themselves.
- Remove the Old Thermostat: The thermostat is usually held in place by clips or screws. Remove it carefully.
- Install the New Thermostat: Install the new thermostat, ensuring it's the exact same type as the old one. Connect the wires according to the photo you took.
- Replace the Insulation and Access Panel: Put the insulation back in place and reattach the access panel.
- Turn on the Breaker: Turn the breaker back on and wait a few hours to see if the water heats up.
Step 5: Checking the Heating Elements (Advanced - Proceed with Caution!)
If the thermostat seems to be working and the water still isn't heating, the heating elements may be faulty. This step requires a multimeter and a bit more technical skill. If you're not comfortable with this level of repair, call a professional.
Warning: Again, working with electricity can be dangerous. Only proceed if you are confident in your abilities and understand the risks.
- Turn off the breaker! (Seriously, make this a mantra).
- Drain the Tank (Partially): You'll need to drain the tank enough to expose the heating elements. Locate the drain valve near the bottom of the tank and attach a hose. Run the hose to a floor drain or outside. Open the valve and drain a few gallons of water. Be careful, the water may be hot!
- Access the Heating Elements: Remove the access panels and insulation covering the heating elements.
- Test the Heating Elements: Set your multimeter to measure resistance (Ohms). Disconnect one wire from the heating element. Touch the multimeter probes to the two terminals on the heating element. You should read a relatively low resistance value (typically between 10 and 20 Ohms). If you read infinite resistance (an open circuit) or very low resistance (a short circuit), the heating element is likely faulty and needs to be replaced.
- Replacing the Heating Element:
- Turn off the breaker! (Just checking if you're paying attention).
- Disconnect the Wires: Disconnect both wires from the heating element.
- Remove the Old Heating Element: The heating element is usually screwed into the tank. Use a special heating element wrench to unscrew it. Be prepared for a little bit of water to leak out.
- Install the New Heating Element: Apply Teflon tape to the threads of the new heating element and screw it into the tank. Tighten it securely with the heating element wrench.
- Connect the Wires: Connect the wires to the new heating element.
- Replace the Insulation and Access Panel: Put the insulation back in place and reattach the access panel.
- Refill the Tank: Close the drain valve and allow the tank to refill completely. Open a hot water faucet to bleed any air from the system.
- Turn on the Breaker: Turn the breaker back on and wait a few hours to see if the water heats up.
When to Call a Professional
While this guide covers some basic troubleshooting steps, there are many situations where calling a qualified plumber or electrician is the best course of action:
- If you're not comfortable working with electricity or gas.
- If you suspect a gas leak. Evacuate the area immediately and call your gas company.
- If you see signs of corrosion or rust on the tank. This indicates the tank is failing and needs to be replaced.
- If the breaker trips repeatedly. This indicates a short circuit or other electrical problem.
- If you've tried these troubleshooting steps and the water still isn't heating.
- If you have a tankless water heater. These appliances are more complex and require specialized knowledge.
Preventative Maintenance
To extend the life of your water heater and prevent future problems, consider these preventative maintenance tips:
- Flush the tank annually: This removes sediment that can build up and reduce efficiency.
- Check the anode rod: The anode rod is a sacrificial rod that protects the tank from corrosion. It should be inspected and replaced every few years.
- Insulate the water heater tank: This can help reduce heat loss and save energy.
- Lower the thermostat setting: A lower setting can save energy and reduce the risk of scalding.
By following these troubleshooting steps and preventative maintenance tips, you can keep your electric water heater running smoothly and avoid costly repairs. Remember, safety is always the top priority! If you're unsure about any step, don't hesitate to call a professional.
What Is The Ultimate Source Of Geothermal Energy
While we've been talking about water heaters, let's shift gears and explore the fascinating topic of geothermal energy. Geothermal energy taps into the Earth's internal heat, but what is the *ultimate* source of this heat?
The Earth's internal heat comes from two primary sources:
- Primordial Heat: This is the heat left over from the Earth's formation, approximately 4.5 billion years ago. During the planet's formation, gravitational accretion (the gradual accumulation of matter), collisions of planetesimals (small protoplanets), and the decay of short-lived radioactive isotopes generated enormous amounts of heat. Some of this heat is still trapped deep within the Earth's interior. Think of it as the embers from a long-ago cosmic bonfire.
- Radiogenic Heat: This is the heat generated by the radioactive decay of isotopes in the Earth's mantle and crust. Key radioactive elements include uranium, thorium, and potassium. These elements decay slowly over millions of years, releasing energy in the form of heat. This process is constantly replenishing the Earth's internal heat, ensuring a relatively stable source of energy over geological timescales.
The Relative Contributions
Determining the exact contribution of each source is a complex scientific endeavor, but current estimates suggest that:
- Radiogenic heat accounts for roughly 50-70% of the Earth's total heat flow.
- Primordial heat makes up the remaining 30-50%.
Therefore, while the Earth's primordial heat is significant, the ongoing decay of radioactive elements plays a slightly larger role in sustaining the Earth's internal heat engine.
From Deep Earth to Geothermal Power Plants
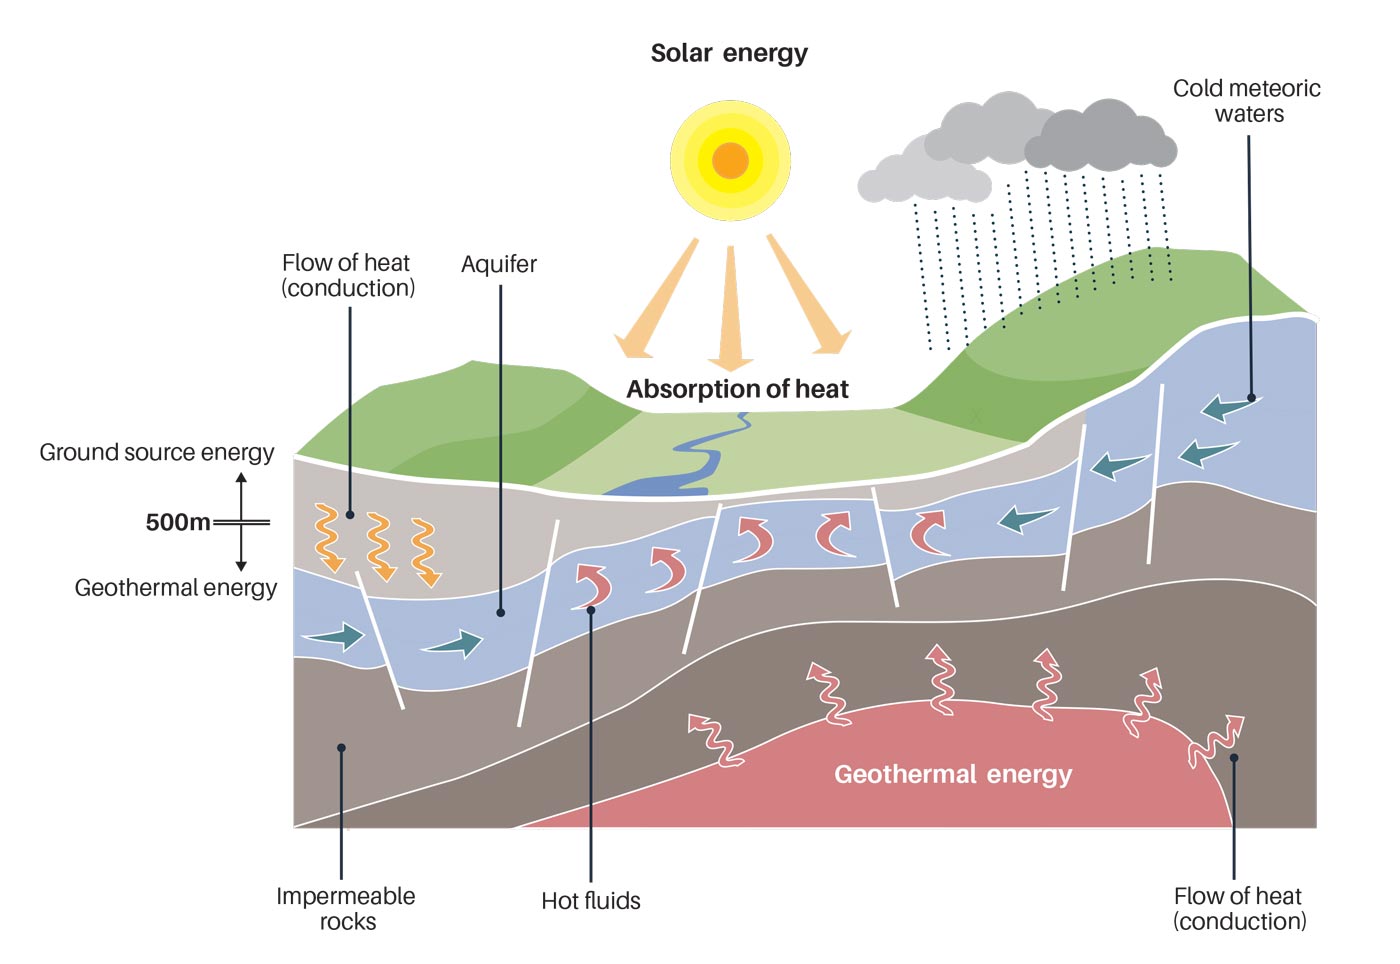
This heat, originating from these deep-seated sources, gradually flows outwards towards the Earth's surface. The geothermal gradient, which is the rate at which temperature increases with depth, varies depending on the location. In areas with active volcanism or tectonic activity, the geothermal gradient is much higher.
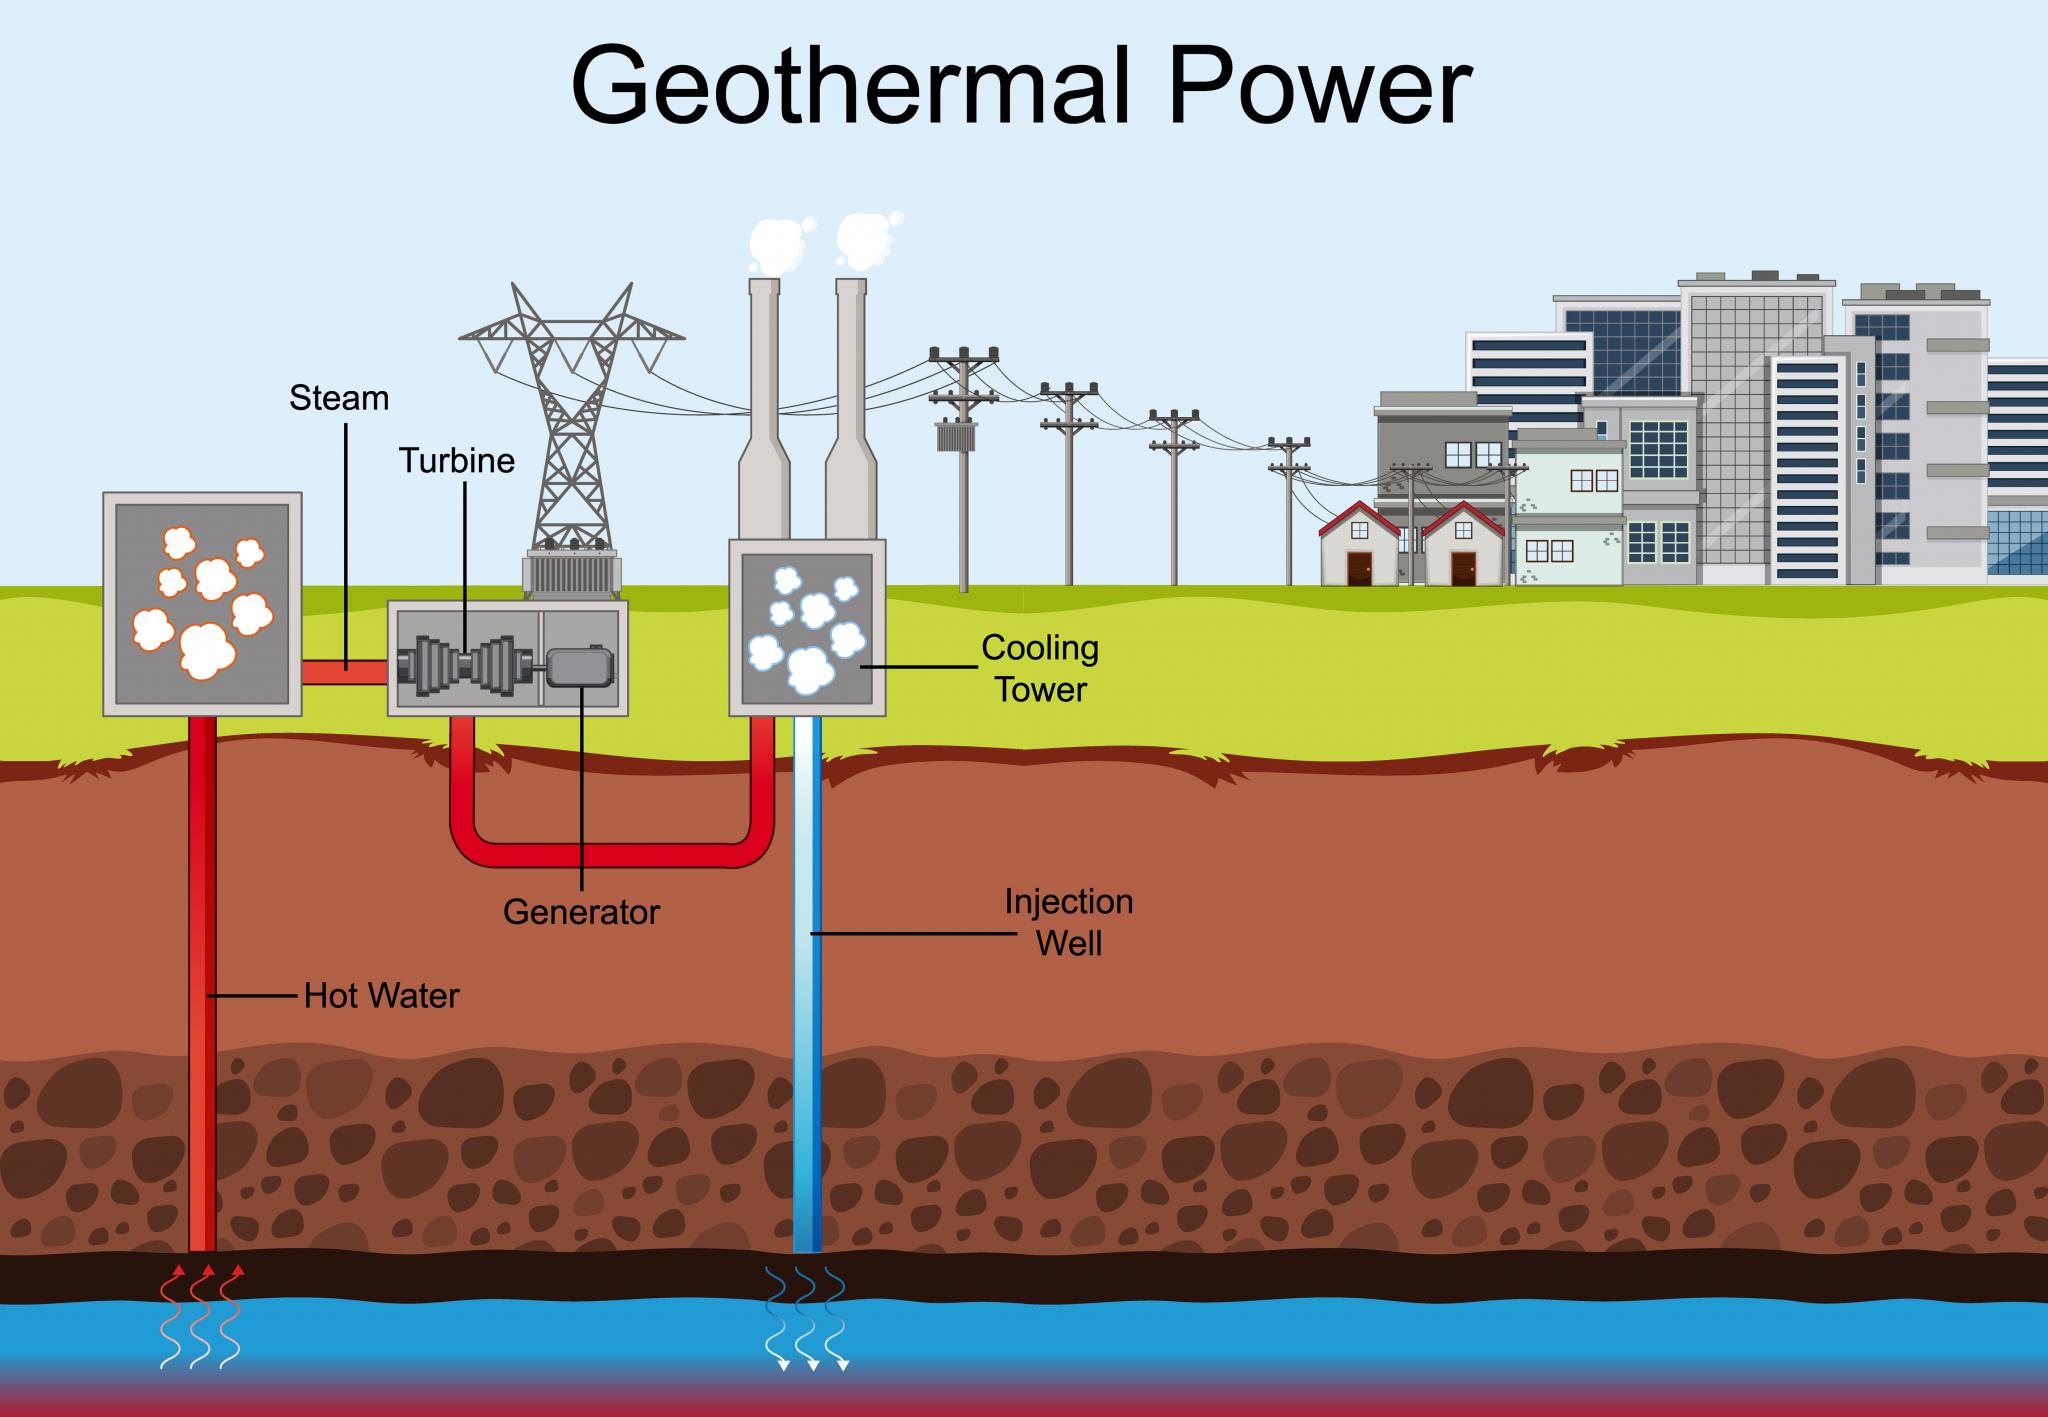
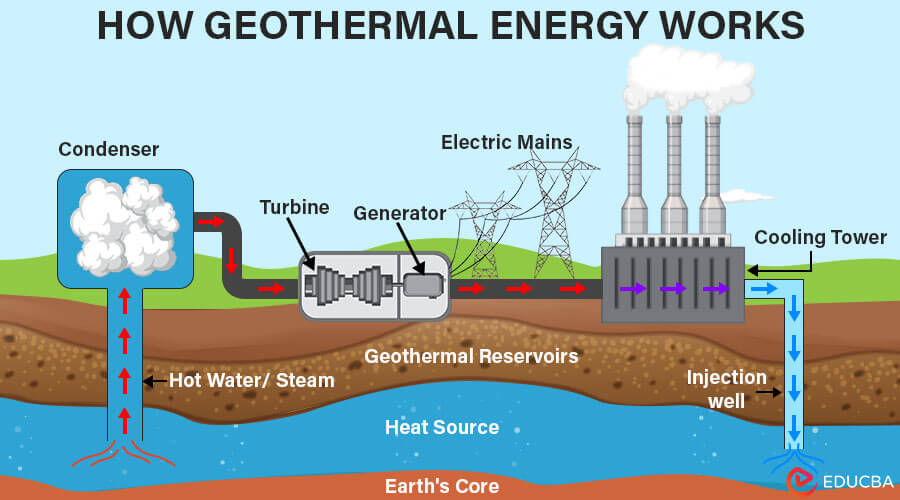
Geothermal power plants exploit this natural heat by tapping into underground reservoirs of hot water or steam. This hot water or steam is then used to drive turbines, which generate electricity. This process provides a clean and renewable energy source, although its availability is geographically limited to areas with accessible geothermal resources.
In conclusion, the ultimate source of geothermal energy is a combination of primordial heat from the Earth's formation and radiogenic heat from the decay of radioactive elements within the Earth's interior. These two sources work in tandem to maintain the Earth's internal heat, providing a valuable resource for geothermal energy production.