What Is Type L Copper Tubing Used For
Imagine waking up on a sweltering summer day only to find your air conditioner blowing warm air, or shivering through a winter night with your furnace sputtering cold air. A malfunctioning heating or cooling system is a common homeowner headache, often stemming from seemingly small issues that escalate if ignored. One potential culprit, especially in older homes, is the condition of your copper tubing, specifically Type L copper. But what exactly is Type L copper, and how does it relate to your HVAC woes?
Let's delve into understanding Type L copper and how to troubleshoot common heating and cooling problems it might be involved in.
Understanding Type L Copper Tubing
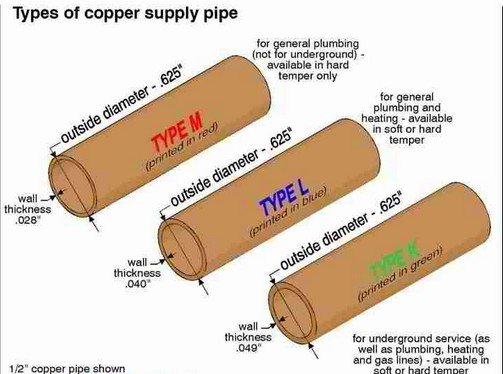
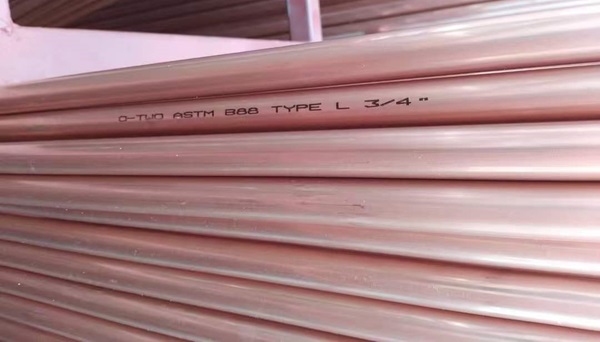
Type L copper tubing is a specific grade of copper pipe widely used in residential and commercial plumbing and HVAC systems. It's known for its medium wall thickness, providing a good balance between strength and cost-effectiveness. This makes it a popular choice for carrying pressurized water, refrigerant, and other fluids.
Why is it important? Because your HVAC system relies heavily on copper tubing to circulate refrigerant, the lifeblood of the cooling process. Leaks, corrosion, or damage to this tubing can severely impact your system's performance.
Where is Type L copper typically found in HVAC systems? You'll commonly find it in:
- Refrigerant lines: Connecting the outdoor condenser unit to the indoor evaporator coil. These lines carry refrigerant in gaseous and liquid forms.
- Water lines: In some systems, especially those using chilled water for cooling or hot water for heating, Type L copper is used for the water lines circulating to and from the air handler.
- Drain lines: Although often PVC, some older systems might use copper for condensate drain lines.
Troubleshooting a Weak or Non-Functional HVAC System
Let's explore a methodical approach to diagnosing common HVAC problems, with a focus on potential issues related to Type L copper tubing.
Step 1: Initial Assessment – No Tools Required
Before you grab any tools, start with a thorough visual and auditory inspection.
- Check the thermostat: Ensure it's set to the correct mode (heat or cool) and temperature. A simple setting error is surprisingly common.
- Inspect the air filter: A clogged air filter restricts airflow, reducing efficiency and potentially causing the system to overheat or freeze up. A dirty filter is the most frequent cause of poor HVAC performance.
- Listen for unusual noises: Banging, hissing, or rattling sounds can indicate mechanical problems or leaks. Pay close attention to the outdoor condenser unit, as it contains moving parts and is exposed to the elements.
- Visually inspect accessible copper tubing: Look for signs of corrosion (green or bluish deposits), kinks, dents, or obvious leaks. Check joints and fittings carefully. Focus on areas near connections and bends, as these are more prone to damage.
- Check the condensate drain line: Ensure it's not clogged or overflowing. A clogged drain line can cause water damage and shut down the system. Look for standing water near the indoor unit.
DIY Action: Replace the air filter if it's dirty. Ensure the thermostat is properly set. If the condensate drain line is clogged, you can carefully try to clear it with a wet/dry vacuum or a stiff wire (be gentle!).
Step 2: Basic Equipment Checks – Requires Simple Tools
If the initial assessment doesn't reveal the problem, grab a few basic tools for a more in-depth investigation.
- Multimeter: To check for voltage at the thermostat and the condenser unit. Safety First! Turn off the power at the breaker before working with electrical components. If you are not comfortable working with electricity, skip this step and call a professional.
- Refrigerant leak detector (optional but highly recommended): A refrigerant leak detector can pinpoint leaks in copper tubing that are not visible to the naked eye. Refrigerant leaks are a common cause of poor cooling performance.
- Fin comb: To straighten bent fins on the condenser unit. Bent fins restrict airflow. Be gentle!
What to check with these tools:
- Voltage at the thermostat: Ensure the thermostat is receiving power. A faulty thermostat can prevent the system from turning on.
- Voltage at the condenser unit: Verify that the condenser unit is receiving power. If not, check the breaker.
- Refrigerant leaks: Use the leak detector to scan along the copper tubing, especially at joints and fittings. A beeping sound indicates a leak. Even small refrigerant leaks can significantly reduce cooling efficiency.
- Condenser fins: Straighten any bent fins with the fin comb. This improves airflow and cooling efficiency.
DIY Action: If you find a breaker tripped, reset it. If the fins on the condenser unit are bent, carefully straighten them. If you suspect a refrigerant leak, you can temporarily seal small pinhole leaks with epoxy putty designed for refrigerant lines (this is a temporary fix only!).
Step 3: Advanced Diagnostics – Requires Specialized Equipment and Knowledge
If the problem persists after the basic checks, it's time to consider more advanced diagnostics that typically require specialized equipment and expertise.
- Pressure testing: Using gauges to measure refrigerant pressure in the system. This can indicate a refrigerant leak or other system imbalances. Requires specialized gauges and knowledge of refrigerant pressures.
- Superheat and subcooling measurements: Calculating superheat and subcooling to assess the system's refrigerant charge and overall performance. Requires specialized tools and training.
- Coil inspection: Inspecting the evaporator and condenser coils for dirt, corrosion, or damage. Requires disassembly of the unit.
- Ductwork inspection: Checking the ductwork for leaks, insulation damage, or obstructions. Requires access to the ductwork system.
When to call a professional:
- Refrigerant leaks: While a temporary epoxy repair might buy you some time, refrigerant leaks require professional attention. Refrigerant is harmful to the environment, and only certified technicians can properly handle and recharge the system.
- Electrical problems: If you're uncomfortable working with electricity or suspect a major electrical issue, call a qualified electrician or HVAC technician.
- Compressor issues: The compressor is the heart of the cooling system, and any problems with the compressor require professional diagnosis and repair.
- Any time you're unsure: If you're not comfortable performing a task or you're unsure about the diagnosis, it's always best to err on the side of caution and call a professional.
Type L Copper Specific Issues
While troubleshooting, keep these specific issues related to Type L copper tubing in mind:
- Corrosion: Copper can corrode over time, especially in humid environments or when exposed to certain chemicals. Look for green or bluish deposits on the tubing. Corrosion can weaken the tubing and lead to leaks.
- Pinhole leaks: These tiny leaks are often difficult to detect without a refrigerant leak detector. They can be caused by corrosion, vibration, or damage. Check around joints and fittings carefully.
- Kinks and dents: Kinks and dents in the copper tubing can restrict refrigerant flow and reduce system efficiency. Avoid bending or damaging the tubing during maintenance or repairs.
- Loose fittings: Over time, fittings can loosen due to vibration or temperature changes. Check all fittings for tightness. However, be careful not to overtighten them, as this can damage the tubing.
- Galvanic corrosion: When copper is in contact with dissimilar metals (like steel) in the presence of an electrolyte (like water), galvanic corrosion can occur. Ensure proper isolation between copper and other metals.
Preventative Maintenance Tips
Preventing problems is always better than fixing them. Here are some preventative maintenance tips to help keep your HVAC system running smoothly and extend the life of your Type L copper tubing:
- Regularly replace the air filter: This is the most important thing you can do to maintain your HVAC system. Replace the filter every 1-3 months, or more often if you have pets or allergies.
- Clean the condenser unit: Remove any debris (leaves, grass clippings, etc.) from around the condenser unit. Clean the fins with a garden hose (low pressure) to remove dirt and debris.
- Schedule regular maintenance: Have a qualified HVAC technician inspect your system annually. They can identify potential problems early and perform preventative maintenance tasks.
- Trim vegetation: Keep vegetation trimmed back from the condenser unit to ensure proper airflow. Maintain at least 2-3 feet of clearance around the unit.
- Insulate refrigerant lines: Insulate exposed refrigerant lines to prevent heat loss or gain. This improves efficiency and prevents condensation.
Summary: When to DIY and When to Call a Pro
Many basic HVAC troubleshooting steps are within the capabilities of the average homeowner. Replacing the air filter, cleaning the condenser unit, and checking for obvious leaks are all tasks you can handle yourself. However, when it comes to refrigerant leaks, electrical problems, or compressor issues, it's always best to call a professional.
DIY-Friendly Tasks:
- Replacing the air filter
- Cleaning the condenser unit
- Checking for obvious leaks
- Clearing the condensate drain line
- Straightening condenser fins
Tasks for the Pros:
- Refrigerant leaks
- Electrical problems
- Compressor issues
- Pressure testing
- Superheat and subcooling measurements
- Coil inspection
- Ductwork inspection
By understanding the role of Type L copper tubing in your HVAC system and following a methodical troubleshooting approach, you can often identify and resolve common problems yourself. However, always prioritize safety and don't hesitate to call a professional when the situation warrants it. A well-maintained HVAC system will keep you comfortable year-round and save you money on energy bills.