What Opens The Discharge Valve Of A Reciprocating Compressor
Imagine this: it's a sweltering summer day, and your air conditioner is wheezing more than cooling. Or perhaps it’s a frigid winter night, and your heat pump is blowing lukewarm air at best. A common culprit behind these comfort catastrophes often lurks within the heart of your system: the reciprocating compressor, and more specifically, its discharge valve.
This article will provide a practical guide to understanding what opens the discharge valve in your reciprocating compressor, and how to troubleshoot common issues related to its functionality. We'll equip you with a methodical approach to identify potential problems, empower you to perform basic checks, and – most importantly – teach you when it's time to call in the professionals.
Understanding the Reciprocating Compressor and its Discharge Valve
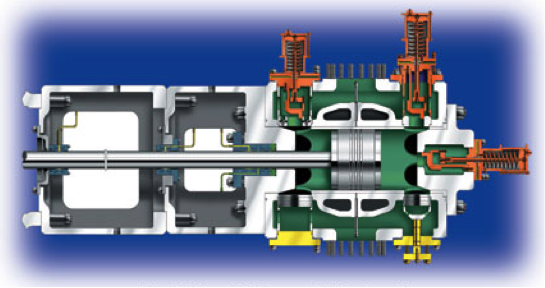
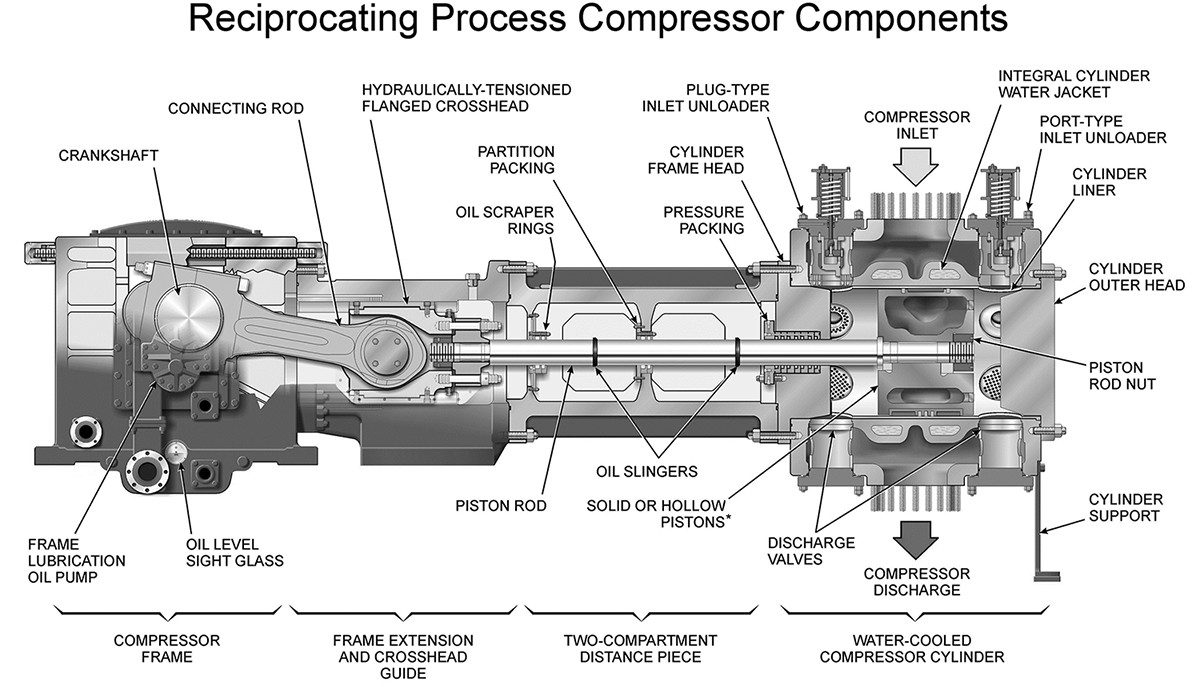
The reciprocating compressor is the workhorse of many air conditioning and heat pump systems. Think of it as a piston engine, but instead of burning fuel, it compresses refrigerant. This compression is essential for the refrigerant to absorb and release heat effectively, driving the cooling or heating process.
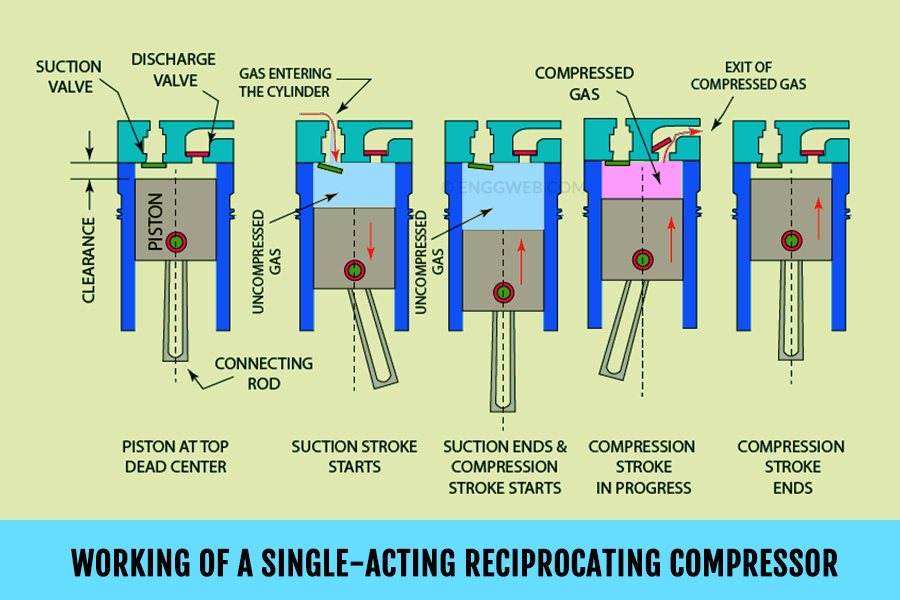
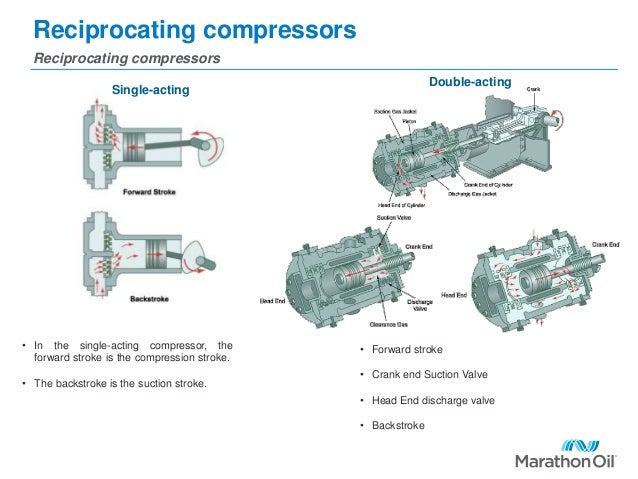
The discharge valve is a critical component of this process. It’s a one-way valve that allows the high-pressure, hot refrigerant gas to exit the compressor cylinder after it has been compressed. Crucially, it prevents the high-pressure gas from flowing back into the cylinder during the piston's return stroke. Essentially, it ensures the compressed refrigerant moves in the right direction.
The opening of the discharge valve is directly related to the pressure within the cylinder. As the piston compresses the refrigerant, the pressure inside the cylinder rapidly increases. When this pressure exceeds the pressure in the discharge line (plus the valve's spring pressure), the discharge valve opens, allowing the compressed refrigerant to escape.
Troubleshooting a Failing Discharge Valve: A Step-by-Step Approach
A malfunctioning discharge valve can lead to a variety of problems, including reduced cooling/heating capacity, increased energy consumption, and even complete compressor failure. Here's a step-by-step guide to help you diagnose potential issues:
Step 1: Preliminary Checks (No Tools Required)
Before diving into more complex diagnostics, start with these simple visual and auditory checks:
- Listen to the Compressor: A healthy compressor typically emits a steady hum. Unusual noises like banging, rattling, or excessive clicking can indicate internal problems, possibly related to the discharge valve or other components.
- Observe the System's Performance: Is the system cooling or heating adequately? If not, is it a gradual decline or a sudden drop in performance? This observation provides valuable clues.
- Check the Air Filter: A dirty air filter restricts airflow, which can overwork the compressor and contribute to valve problems. Replace the filter if it's dirty.
- Inspect the Outdoor Unit (if applicable): Ensure the outdoor unit is free from obstructions like leaves, debris, or snow. Proper airflow is crucial for heat exchange.
Step 2: Basic Electrical Checks (Requires a Multimeter and Safety Precautions)
Warning: Working with electricity can be dangerous. If you are not comfortable performing electrical tests, it is highly recommended to call a qualified HVAC technician. Turn off the power to the unit at the breaker box before proceeding.
- Check the Compressor Contactor: The contactor is an electrical switch that controls power to the compressor. Use a multimeter to verify that the contactor is engaging properly when the thermostat calls for cooling or heating. A faulty contactor can prevent the compressor from running, even if the discharge valve is working correctly.
- Check the Compressor Wiring: Inspect the wiring connections to the compressor for any signs of damage, corrosion, or loose connections. Tighten any loose connections and replace damaged wires.
Step 3: Assessing Compressor Performance (Requires Gauges and Expertise)
This step involves measuring the compressor's suction and discharge pressures. It requires specialized manifold gauges and a solid understanding of refrigeration principles. If you are not experienced with using manifold gauges and interpreting pressure readings, DO NOT attempt this step.
- Connect Manifold Gauges: Carefully connect the manifold gauges to the service ports on the compressor. Ensure the gauges are properly calibrated.
- Start the System: Turn on the system and allow it to run for a few minutes.
- Monitor Suction and Discharge Pressures: Observe the suction and discharge pressure readings. Low discharge pressure, especially when accompanied by normal or high suction pressure, can be a strong indicator of a leaking or damaged discharge valve. The compressor is trying to build pressure, but the valve isn't sealing properly, allowing the compressed refrigerant to leak back into the cylinder.
- Check Superheat and Subcooling: These measurements provide further insights into the system's overall performance and can help pinpoint other issues that may be contributing to the problem. However, interpreting superheat and subcooling requires advanced knowledge.
Step 4: Further Diagnostic Testing (For Professionals Only)
If the previous steps haven't provided a definitive answer, further diagnostic testing may be required. These tests typically involve specialized equipment and expertise and should only be performed by a qualified HVAC technician:
- Compressor Current Draw Test: This test measures the amount of electrical current the compressor is drawing. Abnormally high or low current draw can indicate internal problems, including valve issues.
- Oil Analysis: Analyzing the compressor oil can reveal the presence of contaminants or wear particles, which can damage the discharge valve and other compressor components.
- Crankcase Pressure Test: This test measures the pressure in the compressor crankcase. High crankcase pressure can indicate a leaking discharge valve or other internal problems.
- Refrigerant Analysis: Analyzing the refrigerant composition can identify contaminants or improper refrigerant charge, which can affect the compressor's performance and valve life.
DIY Actions You Can Take (Safely)
While diagnosing discharge valve problems often requires professional expertise, there are a few simple DIY actions you can take to potentially improve the situation:
- Ensure Proper Airflow: Clear any obstructions from the outdoor unit and replace the air filter regularly. Proper airflow helps prevent the compressor from overheating and reduces stress on the discharge valve.
- Check for Refrigerant Leaks: While you can't repair refrigerant leaks yourself (it's illegal and requires specialized equipment), you can visually inspect the refrigerant lines and connections for any signs of oil residue, which can indicate a leak. If you suspect a leak, contact a qualified HVAC technician.
- Thermostat Settings: Make sure your thermostat is set correctly and that the batteries are fresh. A malfunctioning thermostat can cause the compressor to cycle on and off excessively, which can wear out the discharge valve.
When to Call a Professional HVAC Technician
It’s crucial to recognize when the problem is beyond your DIY capabilities. Here are some scenarios that warrant a professional HVAC technician:
- Suspected Refrigerant Leaks: Handling refrigerant requires specialized equipment and EPA certification.
- Complex Electrical Issues: If you are not comfortable working with electricity, leave electrical troubleshooting to the professionals.
- Compressor Pressure Issues: Interpreting pressure readings and diagnosing compressor problems requires specialized knowledge and experience.
- Unusual Compressor Noises: Loud banging, rattling, or grinding noises are often signs of serious internal compressor damage.
- If DIY steps fail to resolve the issue: If you've tried the simple checks and actions outlined above and your system is still not performing properly, it's time to call a professional.
- Any doubt or uncertainty: When in doubt, always err on the side of caution and consult a qualified HVAC technician. They have the expertise and tools to diagnose and repair the problem safely and effectively.
Ignoring a malfunctioning discharge valve can lead to further damage to the compressor and other system components, resulting in costly repairs or even complete system replacement. By following the troubleshooting steps outlined in this article and knowing when to call for professional help, you can keep your air conditioning or heat pump system running smoothly and efficiently for years to come.
Ultimately, understanding the function of the discharge valve and taking a proactive approach to troubleshooting can save you time, money, and frustration. Remember, safety is paramount. If you’re ever unsure about a step, always consult a qualified HVAC technician. They're the experts, and their knowledge can ensure your system operates safely and efficiently, keeping you comfortable year-round.