What Orifice Size For Natural Gas

Natural gas appliances are common in many homes, powering everything from your furnace and water heater to your stove and fireplace. A crucial, yet often overlooked, component in these appliances is the orifice. Selecting the correct orifice size for natural gas is paramount for safe and efficient operation. Get it wrong, and you could face serious issues like incomplete combustion, carbon monoxide poisoning, or appliance damage.
Understanding the Orifice
The orifice is a small, precisely sized nozzle that controls the amount of natural gas flowing to the burner. It's like the carburetor of your gas appliance, metering the fuel supply. The size of the orifice is usually stamped directly onto the orifice itself. This marking will be in thousandths of an inch (e.g., "45" means 0.045 inches). Because natural gas is a very specific fuel with consistent BTU content across supply lines, the orifice size determines the perfect air-fuel ratio. If the correct orifice size for natural gas is not used, combustion will be dangerous.
Why Orifice Size Matters
Using the wrong orifice size can lead to several problems:
- Improper Combustion: An orifice that's too small results in a lean mixture (too much air, not enough gas), leading to weak flames and poor heating performance. An orifice that's too large creates a rich mixture (too much gas, not enough air), which causes sooting, inefficient burning, and dangerous carbon monoxide production.
- Carbon Monoxide (CO) Poisoning: This is a colorless, odorless, and deadly gas. Improper combustion due to an incorrect orifice size is a major cause of CO buildup in homes. Always have working CO detectors installed and regularly tested!
- Appliance Damage: Incomplete combustion can damage your appliance's heat exchanger, burners, and other components, leading to costly repairs or even appliance failure.
- Wasted Energy: Inefficient burning wastes fuel and increases your energy bills.
Identifying the Correct Orifice Size
Finding the right orifice size for your natural gas appliance involves several steps:
- Check the Appliance's Data Plate: The data plate is usually located on the appliance itself. It contains critical information, including the model number, BTU input rating, and the recommended orifice size for natural gas. This is the most reliable source of information. Look for terms like "manifold pressure" and "orifice drill size."
- Consult the Manufacturer's Manual: The appliance's manual should also specify the correct orifice size. If you've misplaced the manual, you can usually find a digital copy on the manufacturer's website.
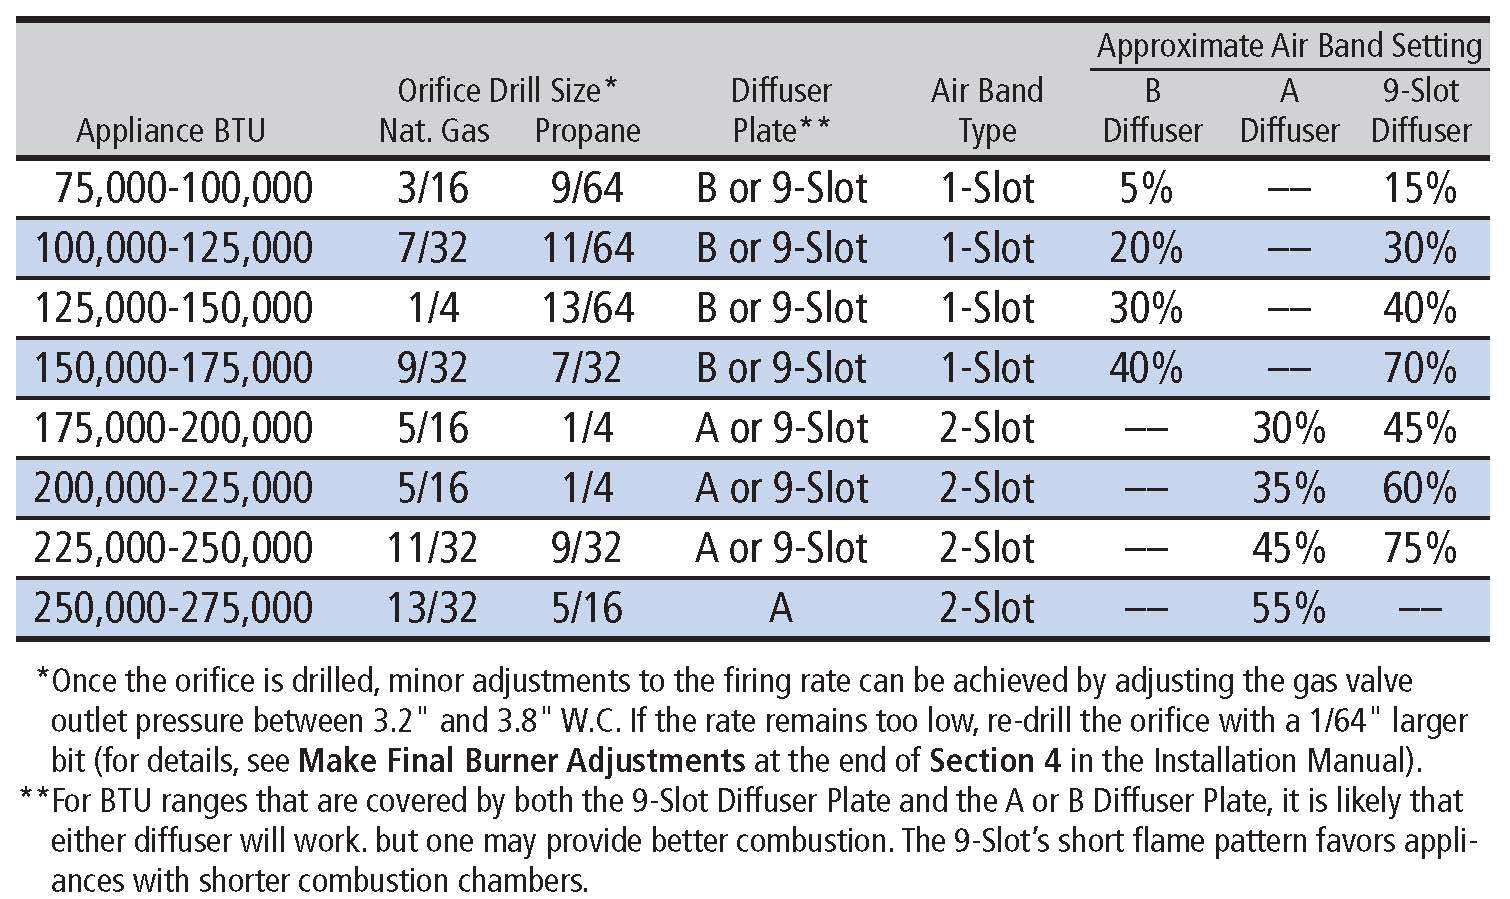
- Use an Orifice Size Chart: These charts correlate the appliance's BTU input rating with the appropriate orifice size. You can find these charts online or in HVAC reference materials. However, always double-check this information against the data plate or manual. Remember that elevation matters for orifice sizes.
- If Converting from Propane to Natural Gas (or vice-versa): Converting an appliance between propane and natural gas requires changing the orifice size and potentially other components. Propane has a higher BTU content than natural gas, so propane orifices are typically smaller. Never attempt to use an appliance designed for one fuel with the other without proper conversion!
Tools and Materials You'll Need (If Replacing an Orifice)
Important Safety Note: Working with natural gas can be dangerous. If you're not comfortable with this type of repair, call a qualified HVAC technician or licensed gas fitter. Only proceed if you fully understand the risks and follow all safety precautions.
- Appropriate Sized Wrench or Socket: To remove and install the orifice. Use the correct size to avoid damaging the orifice or the manifold.
- Orifice Set: The correct orifice size for natural gas replacement. Buy the correct size according to your make and model of gas appliance.
- Pipe Dope (Gas-Rated): To seal the threads of the orifice.
- Leak Detection Solution: A soap and water solution or commercial leak detector to check for gas leaks after installation.
- Screwdrivers: Various sizes for removing access panels and burner components.
- Vacuum or Brush: To clean the burner assembly.
- Work Gloves: To protect your hands.
- Safety Glasses: To protect your eyes.
- Carbon Monoxide Detector: To monitor CO levels after the repair.
- Adjustable Wrench: For adjusting the gas valve.
- Manometer: For measuring gas pressure.
Replacing a Natural Gas Orifice (Step-by-Step)
Warning: Before starting any repair, turn off the gas supply to the appliance at the shut-off valve. Ensure adequate ventilation. Never smoke or use open flames near a gas appliance.
- Turn off the Gas: Locate the gas shut-off valve near the appliance and turn it to the "off" position. Test that the gas is off by briefly trying to light the appliance.
- Access the Burner Assembly: Remove the appliance's access panels to expose the burner assembly. This may involve unscrewing several screws or clips. Consult your appliance's manual for specific instructions.
- Locate the Orifice: The orifice is usually located at the base of the burner, where the gas supply line connects. It may be hidden beneath a burner cap or other component.
- Remove the Old Orifice: Using the correct size wrench or socket, carefully unscrew the old orifice. Be careful not to damage the threads on the manifold.
- Clean the Burner Assembly: Use a vacuum or brush to remove any dust, debris, or corrosion from the burner assembly. This will help ensure proper combustion.
- Install the New Orifice: Apply a small amount of gas-rated pipe dope to the threads of the new orifice. Carefully screw it into the manifold, tightening it snugly but not overtightening.
- Reassemble the Appliance: Reinstall any burner caps or other components that you removed. Replace the appliance's access panels and secure them with the screws or clips.
- Turn on the Gas: Slowly turn the gas shut-off valve back to the "on" position.
- Check for Leaks: Apply leak detection solution to the orifice connection and any other gas fittings you disturbed. If you see bubbles forming, there's a gas leak. Tighten the connection or reapply pipe dope and recheck. If the leak persists, call a professional immediately.
- Test the Appliance: Turn on the appliance and observe the burner flame. The flame should be blue and steady, with no yellow tips or flickering. If the flame is not burning properly, consult the troubleshooting section below.
- Monitor for Carbon Monoxide: Use a carbon monoxide detector to monitor CO levels in the area around the appliance. If CO levels rise above acceptable limits, turn off the appliance and call a professional immediately.
Troubleshooting Common Issues
Even with the correct orifice size for natural gas, you may encounter problems. Here are some common issues and their potential solutions:
- Yellow or Orange Flames: This indicates incomplete combustion, usually due to insufficient air. Check for obstructions in the burner assembly or air inlets. Ensure the burner ports are clean. Consider adjusting the air shutter (if your appliance has one) to increase airflow. However, only do this after verifying the orifice size.
- Soot Buildup: This is another sign of incomplete combustion. Clean the soot and inspect the orifice and burner assembly. Make sure you are using the correct orifice size.
- Weak Flames: This could be due to a lean mixture (too much air, not enough gas) or low gas pressure. Check the gas pressure using a manometer. Consult a professional to adjust the gas pressure if necessary. Make sure you are using the correct orifice size.
- Pilot Light Problems: A pilot light that won't stay lit could be due to a dirty pilot orifice or a faulty thermocouple. Clean the pilot orifice with a thin wire or compressed air. Replace the thermocouple if necessary.
- Gas Leaks: If you detect a gas leak, immediately turn off the gas supply and call a professional. Do not attempt to repair a gas leak yourself.
When to Call a Professional
While some HVAC repairs can be tackled by DIY enthusiasts, others require the expertise of a qualified professional. Call a professional if:
- You're not comfortable working with natural gas.
- You suspect a gas leak.
- You're experiencing carbon monoxide problems.
- You're unable to diagnose or fix the problem yourself.
- The appliance requires extensive repairs or modifications.
- You are not sure that you have selected the correct orifice size for natural gas.
Cost Estimates for Professional Repairs
The cost of professional HVAC repairs varies depending on the type of repair, the complexity of the job, and your location. Here are some general cost estimates:
- Orifice Replacement: $75 - $200 (including labor and parts)
- Gas Leak Repair: $150 - $500 (depending on the severity and location of the leak)
- Carbon Monoxide Investigation: $100 - $300 (including CO testing and appliance inspection)
- Appliance Tune-Up: $100 - $300 (includes cleaning, inspection, and minor adjustments)
These are just estimates. Always get a firm quote from a qualified HVAC technician before authorizing any work.
Conclusion
Ensuring the correct orifice size for natural gas is crucial for the safe and efficient operation of your gas appliances. By understanding the importance of orifice size, identifying the correct size for your appliance, and following the steps outlined in this article, you can troubleshoot common problems and potentially save money on repairs. However, always prioritize safety and call a professional when in doubt. Never compromise on safety when working with natural gas!