What Size Expansion Tank For Water Heater
Imagine stepping into the shower, turning on the tap, and being greeted by a trickle of lukewarm water instead of the expected invigorating warmth. A failing water heater is a common household woe, disrupting daily routines and causing inconvenience. But before calling a plumber, let's explore some basic troubleshooting steps you can safely undertake to potentially resolve the issue yourself.
Understanding Your Water Heater & The Importance of an Expansion Tank
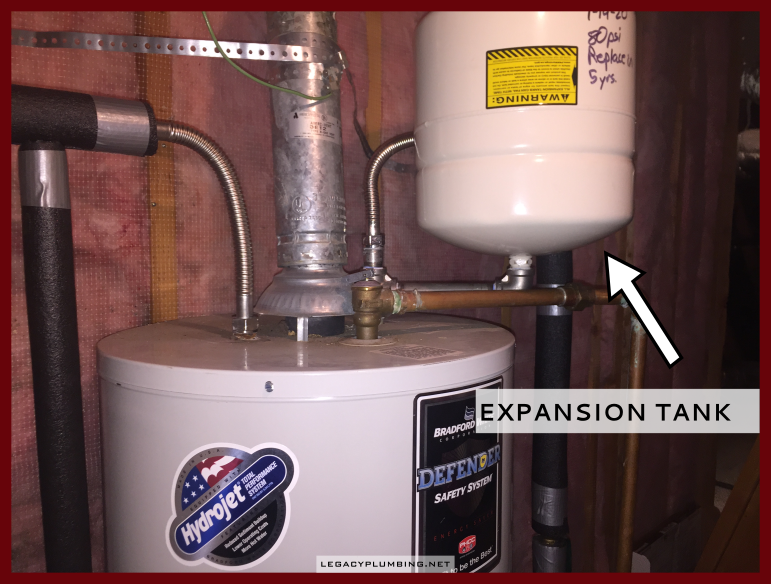
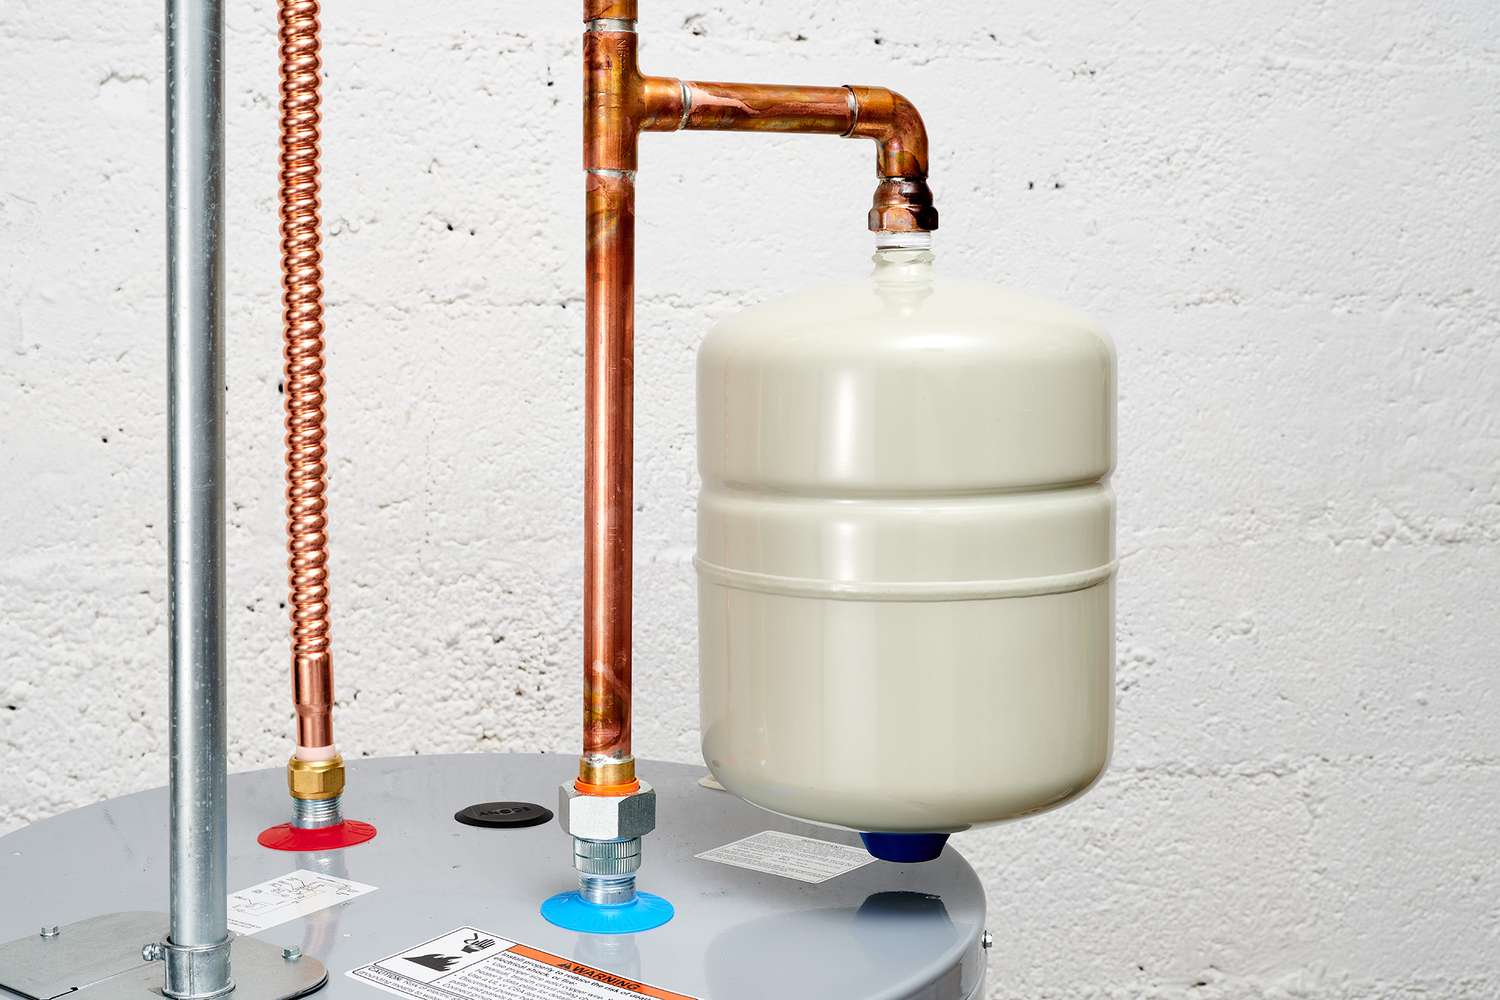
Before we dive into troubleshooting, let's briefly touch on the basics. Your water heater, typically a large cylindrical tank, heats water using either electricity or gas. The heated water is then supplied throughout your home via your plumbing system. A crucial component, often overlooked, is the expansion tank. As water heats, it expands. In a closed plumbing system (common in most modern homes with a backflow preventer), this expansion creates pressure. The expansion tank, a smaller tank connected to the water heater's cold water inlet, provides a space for this expanded water, preventing excessive pressure build-up. Without a properly sized and functioning expansion tank, you risk premature water heater failure, pipe leaks, and even bursts.
Why is the Expansion Tank Important?
- Pressure Relief: Prevents over-pressurization of your plumbing system.
- Prolongs Water Heater Life: Reduces stress on the water heater tank and components.
- Protects Pipes: Minimizes the risk of leaks and bursts due to excessive pressure.
- Saves Water: Prevents the T&P valve (Temperature and Pressure Relief valve) from constantly releasing water due to over-pressure.
Troubleshooting: No Hot Water or Insufficient Hot Water
Let's begin with the most common complaint: lack of hot water or insufficient hot water. We'll go through a logical process to identify the cause.
Step 1: Checking the Basics
First, rule out the simplest explanations. It sounds obvious, but ensure these are in order:
- Power Supply: Is the water heater plugged in (electric models)? Has a circuit breaker tripped? Check the breaker dedicated to the water heater in your electrical panel and reset it if necessary. If the breaker trips repeatedly, this indicates a more serious electrical problem requiring professional attention.
- Gas Supply (Gas Models): Is the gas supply on? Check other gas appliances to confirm gas service is active.
- Pilot Light (Older Gas Models): Is the pilot light lit? Refer to your water heater's manual for instructions on how to relight the pilot. If you smell a strong gas odor, immediately evacuate the area and call your gas company.
- Thermostat Setting: Is the thermostat set to an appropriate temperature? Most manufacturers recommend 120°F (49°C). Ensure the setting hasn't been accidentally lowered.
Step 2: Assessing the Expansion Tank
Now, let's turn our attention to the expansion tank. A faulty expansion tank can mimic other water heater problems, including a lack of hot water.
- Locate the Expansion Tank: It's typically a small, oblong tank located near the top of your water heater, connected to the cold water inlet pipe.
- Check for Waterlogging: Tap on the top and bottom of the tank. A waterlogged tank will feel heavy and full of water throughout. A properly functioning tank should feel hollow or sound different at the top than at the bottom.
- Check the Air Charge: The expansion tank is pre-charged with air to create a cushion. You can check this using a tire pressure gauge on the Schrader valve (similar to a tire valve stem) located at the top of the tank, usually hidden under a cap. Before checking the air charge, turn off the water heater breaker or gas supply and turn off the cold water supply to the water heater. Open a hot water faucet somewhere in the house to relieve pressure. The pressure should typically match your home's water pressure, often around 40-60 PSI. If there's no air pressure, or if water comes out when you press the valve core, the tank is likely faulty and needs replacement.
Step 3: Flushing the Water Heater
Sediment build-up in the bottom of the water heater tank can reduce its efficiency and available hot water. Flushing the tank removes this sediment.
- Turn off the power (electric) or gas (gas) to the water heater.
- Turn off the cold water supply to the water heater.
- Connect a garden hose to the drain valve at the bottom of the tank.
- Run the hose to a safe drainage point (e.g., a floor drain or outside).
- Open a hot water faucet somewhere in the house to allow air to enter the tank.
- Carefully open the drain valve. The initial water will likely be murky and contain sediment.
- Let the water drain until it runs clear. You may need to open and close the cold water supply valve briefly to stir up the sediment.
- Close the drain valve.
- Close the hot water faucet you opened earlier.
- Slowly turn the cold water supply back on. Allow the tank to fill completely.
- Turn the power (electric) or gas (gas) back on.
Step 4: Checking the Temperature and Pressure Relief (T&P) Valve
The T&P valve is a safety device that releases water if the temperature or pressure inside the tank gets too high. A constantly leaking T&P valve indicates a problem.
- Locate the T&P valve: It's usually located on the top or side of the water heater.
- Inspect the valve: If it's constantly dripping or leaking, it might be faulty.
- Test the valve (Exercise caution, hot water will be released): Carefully lift the test lever on the valve for a few seconds. Water should flow freely. Release the lever, and the valve should snap shut and stop leaking. If it continues to leak after testing, it likely needs replacement.
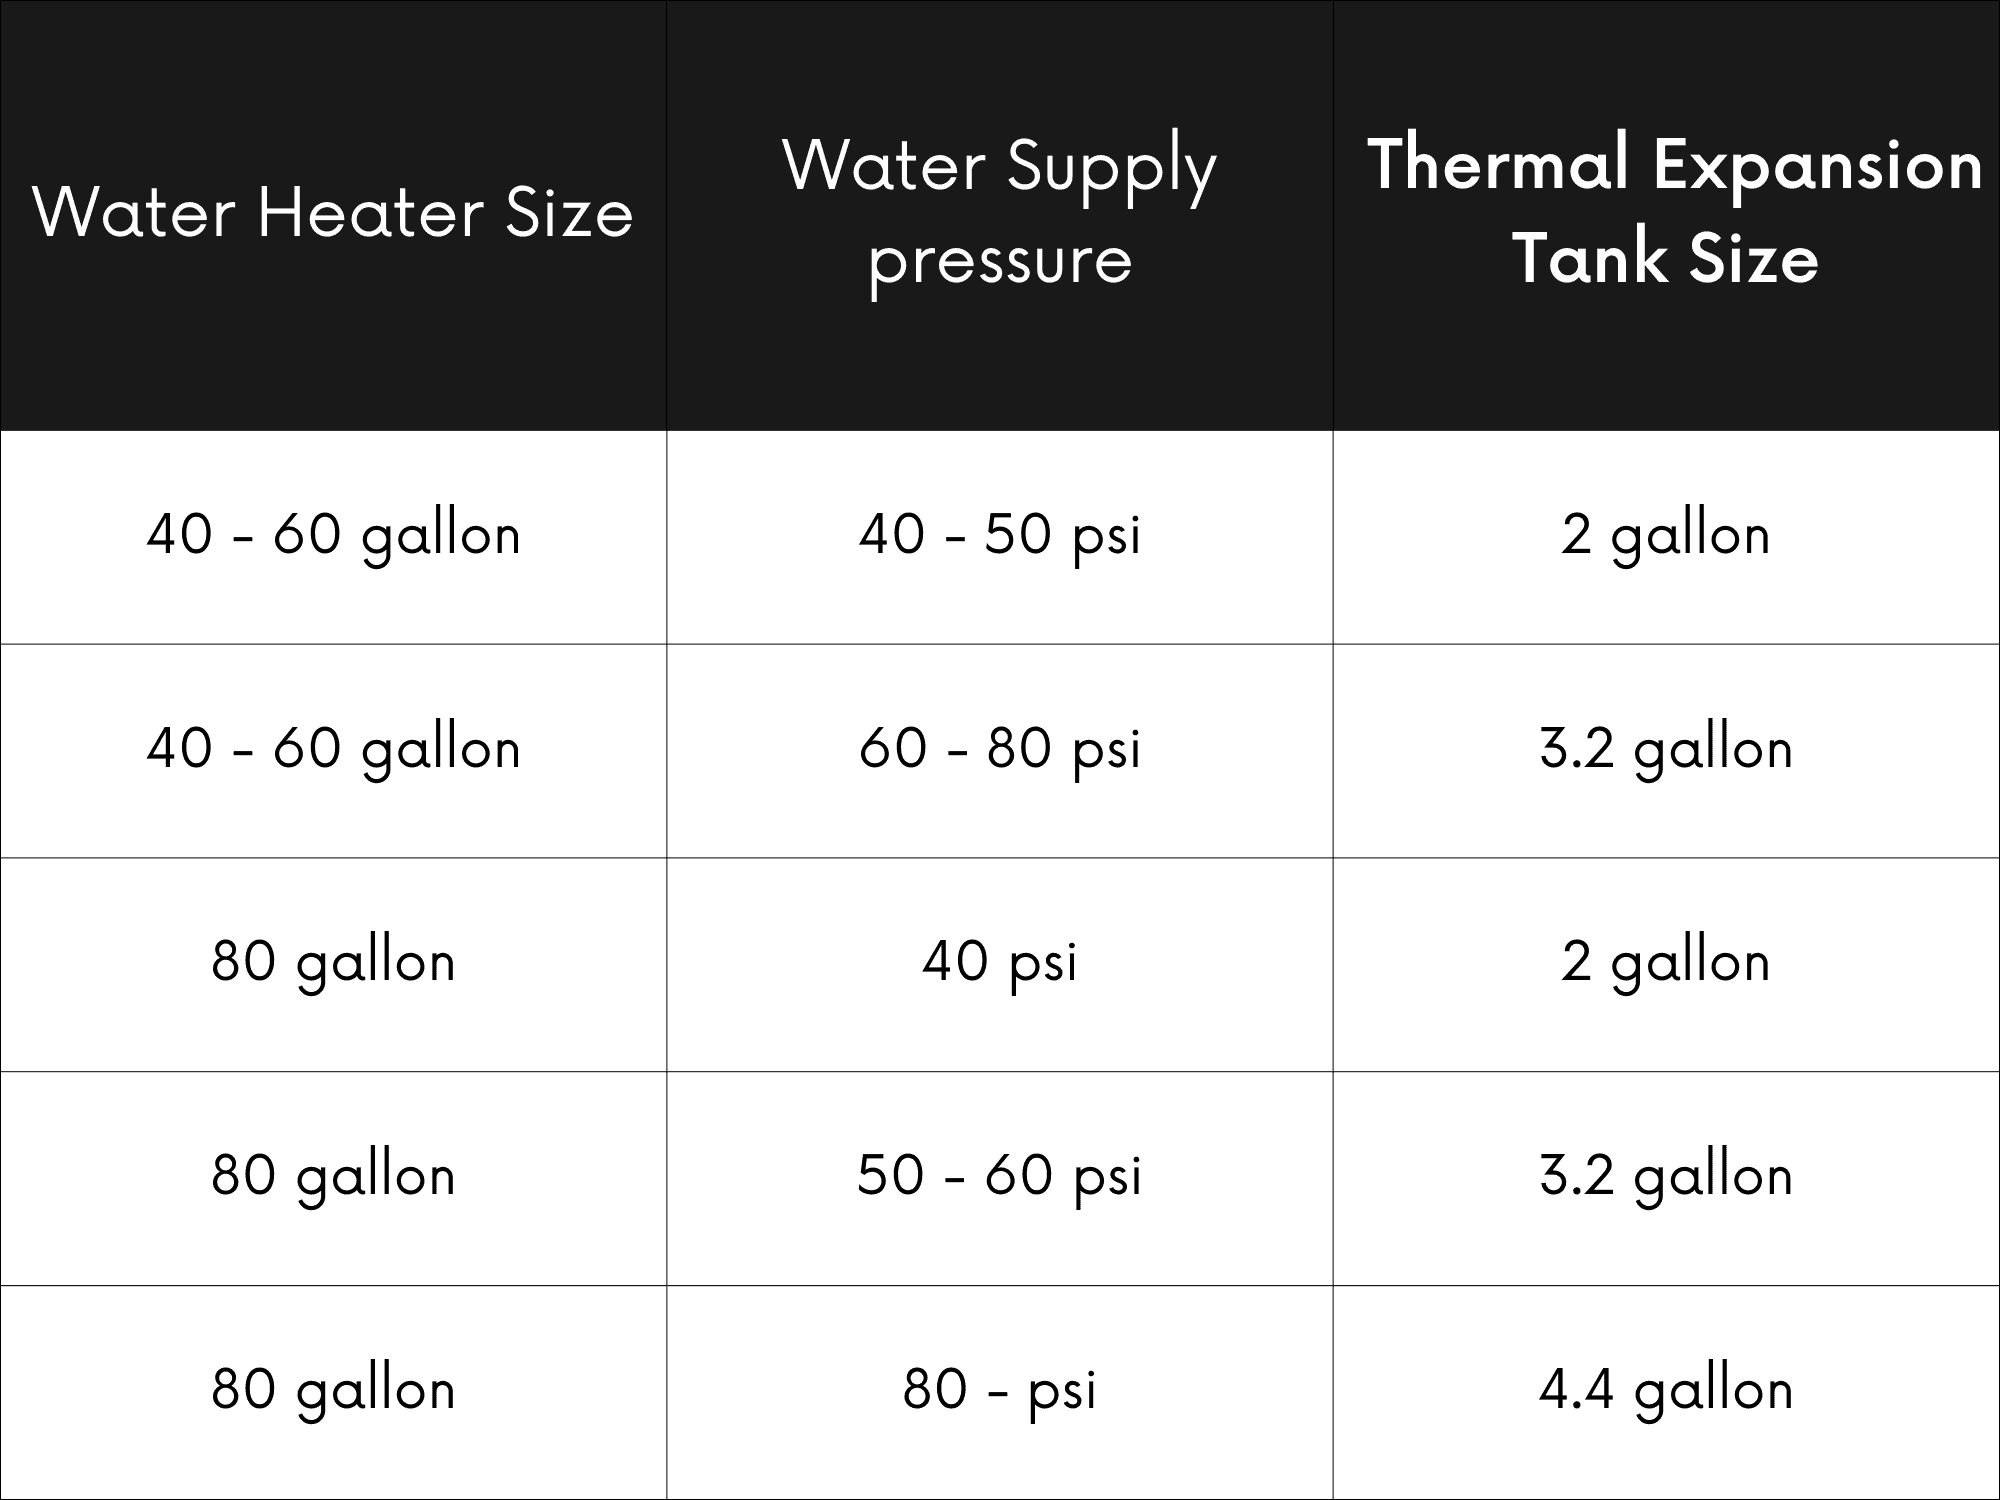
What Size Expansion Tank Do I Need?
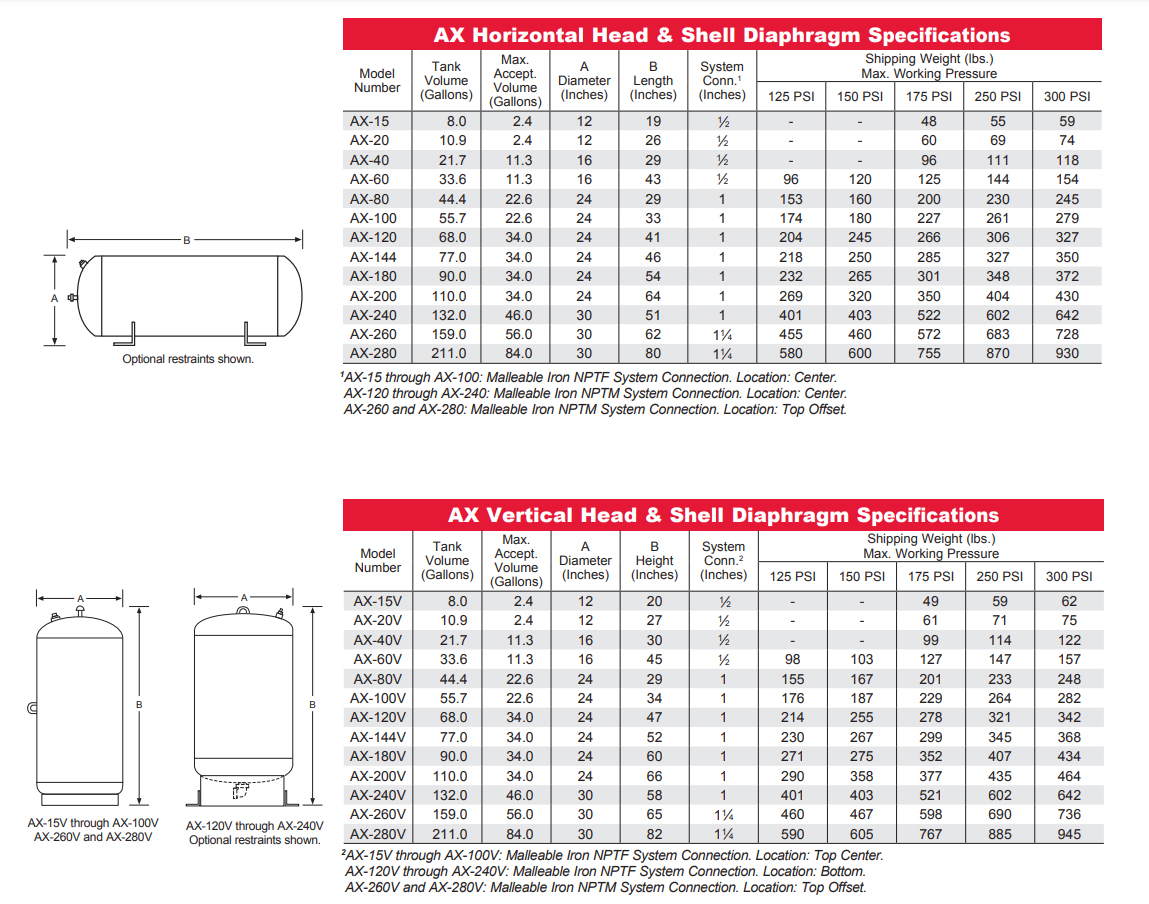
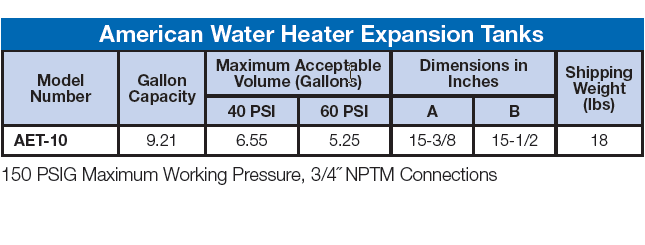
Choosing the correct size expansion tank is crucial for its proper function. The size depends on your water heater's tank capacity and your home's water pressure. Here's a simplified guide:
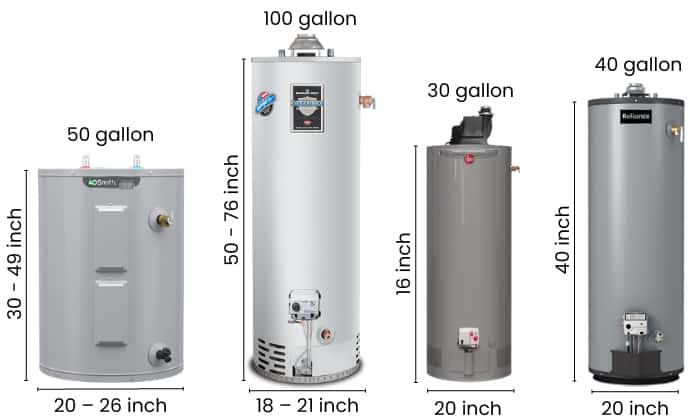
- Water Heater Capacity: Larger water heaters require larger expansion tanks.
- Water Pressure: Higher water pressure requires a larger expansion tank.
General Guidelines:
- 40-Gallon Water Heater: Typically requires a 2-gallon expansion tank.
- 50-Gallon Water Heater: Typically requires a 2-gallon to 4.5-gallon expansion tank.
- 60-80 Gallon Water Heater: Typically requires a 4.5-gallon expansion tank or larger.
Important Considerations:
- Consult the Expansion Tank Manufacturer's Sizing Chart: The most accurate way to determine the correct size is to consult the manufacturer's sizing chart, which takes into account your specific water heater capacity and water pressure. These charts are usually available on the manufacturer's website or in the product documentation.
- Err on the Side of Larger: If you're unsure, it's generally better to choose a slightly larger expansion tank than one that's too small. An undersized tank won't provide adequate pressure relief.
- Consider Future Needs: If you anticipate needing a larger water heater in the future, you might consider sizing the expansion tank accordingly now.
Simple DIY Fixes & When to Call a Professional
Some basic fixes, like resetting a tripped breaker, relighting a pilot light (if you're comfortable and familiar with the process), or flushing the tank, are safe for most homeowners. Replacing a faulty T&P valve or expansion tank can also be a DIY project for those with some plumbing experience.
When to Call a Professional:
- Electrical Issues: Any problems with the water heater's electrical wiring should be handled by a qualified electrician. This includes repeated breaker tripping, sparking, or burning smells.
- Gas Leaks: If you suspect a gas leak, evacuate the area immediately and call your gas company.
- Complex Plumbing Repairs: If you're uncomfortable working with plumbing or the problem seems more complex than a simple part replacement, it's best to call a licensed plumber.
- Water Heater Replacement: Replacing an entire water heater is a significant undertaking best left to professionals. They can ensure proper installation and compliance with local codes.
- Suspect Tank Damage: If you see any signs of rust, leaks, or bulging on the water heater tank itself, it's a sign of serious damage, and you should replace the unit immediately.
Replacing the Expansion Tank: A DIY Guide (For Experienced Homeowners)
Disclaimer: Working with plumbing can be tricky. If you're not comfortable with these steps, please consult a qualified plumber. Ensure you have the necessary tools and safety equipment.
- Gather Supplies: New expansion tank (correct size), pipe wrench, adjustable wrench, Teflon tape, bucket, safety glasses.
- Turn Off Water and Power/Gas: Turn off the water heater's power (breaker) or gas supply. Turn off the cold water supply to the water heater.
- Relieve Pressure: Open a hot water faucet in the house to relieve pressure in the system.
- Drain the Old Tank: Locate the drain valve on the old expansion tank (if present). Attach a hose and drain any water into a bucket. If there's no drain valve, carefully loosen the fitting connecting the tank to the pipe to allow water to drain. Be prepared for some water spillage.
- Disconnect the Old Tank: Using pipe wrenches, carefully disconnect the old expansion tank from the plumbing. Hold the pipe leading to the water heater with one wrench while loosening the fitting on the tank with the other to avoid twisting the pipes.
- Prepare the New Tank: Wrap the threads of the new expansion tank's connection with Teflon tape. This will help create a watertight seal.
- Install the New Tank: Carefully screw the new expansion tank into the plumbing fitting. Tighten securely with pipe wrenches, being careful not to overtighten. Ensure the tank is properly supported.
- Turn On Water and Power/Gas: Slowly turn the cold water supply back on to the water heater. Allow the tank to fill completely. Then, turn the power (electric) or gas (gas) back on to the water heater.
- Check for Leaks: Carefully inspect all connections for leaks. Tighten fittings as needed.
- Recharge the Tank (If Necessary): Some expansion tanks require you to adjust the air pressure to match your home's water pressure. Refer to the manufacturer's instructions.
Preventative Maintenance
Regular maintenance can significantly extend the life of your water heater and prevent problems. Consider these tips:
- Flush the Tank Annually: This removes sediment build-up.
- Check the T&P Valve Regularly: Test the valve a couple of times a year.
- Inspect the Anode Rod: The anode rod is a sacrificial metal rod that protects the tank from corrosion. It should be inspected and replaced every few years. This is a more complex task best left to a professional.
- Monitor Water Pressure: Ensure your home's water pressure is within the recommended range (typically 40-60 PSI). A pressure regulator can help maintain consistent pressure.
By following these troubleshooting steps and performing regular maintenance, you can keep your water heater running efficiently and avoid costly repairs. Remember, when in doubt, always consult a qualified professional.



:max_bytes(150000):strip_icc()/installing-an-expansion-tank-2719066-hero-375405ad9eaa426a880e3ed978ba00f5.jpg)