What Size Mini Split For 200 Square Feet
Is your mini-split struggling to keep your 200 square foot room comfortable? Are you experiencing inconsistent temperatures, high energy bills, or a system that seems to be constantly running without delivering adequate heating or cooling? You're not alone. Many homeowners face similar challenges. This article will guide you through a practical troubleshooting process to diagnose and potentially resolve the issue, helping you determine whether a simple fix is in order or if it's time to call in the professionals.
Step 1: Understanding the Basics – Is Your Mini-Split Properly Sized?
Before diving into troubleshooting, it's crucial to confirm that your mini-split is appropriately sized for your 200 square foot space. A unit that's too small will struggle to keep up, while one that's too large will cycle on and off frequently, leading to poor efficiency and potentially uneven temperatures.
How Many BTUs Do You Need?
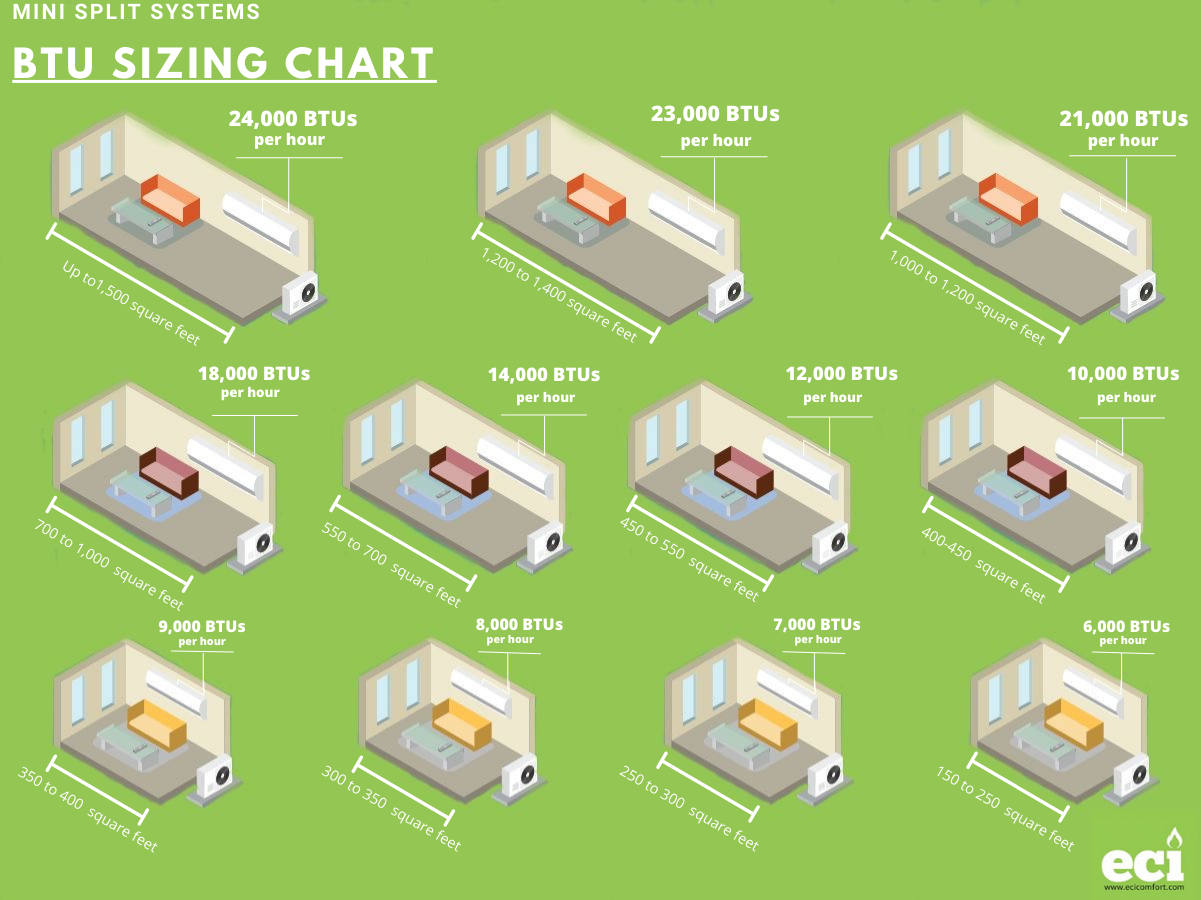
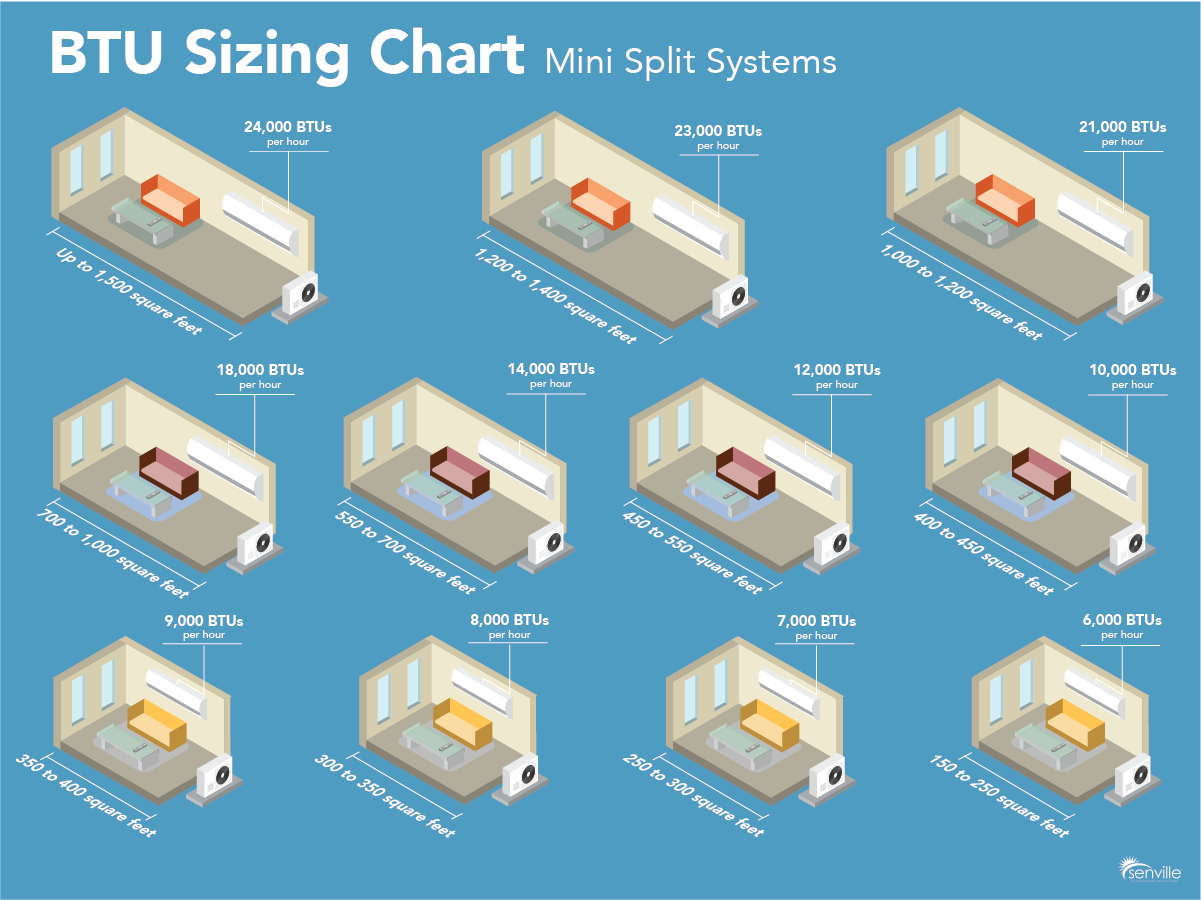
The general rule of thumb is that you need approximately 20 BTUs (British Thermal Units) per square foot for cooling. For heating, this can vary depending on your climate. For a 200 square foot room:
- Cooling: 200 sq ft x 20 BTU/sq ft = 4,000 BTU
Many mini-splits are available in sizes close to this, such as 5,000 or 6,000 BTU. A slight overestimation is generally better than underestimating, especially if the room has a lot of sunlight, high ceilings, or is poorly insulated.
Important: Consider factors beyond square footage, such as window size and direction, insulation quality, ceiling height, and the room's use (e.g., a kitchen generates more heat).
Verify Your Unit's BTU Rating
Without Tools: Check the model number on the outdoor unit and the indoor unit. Search online for the specifications of your specific model. This will tell you its BTU rating for both cooling and heating. If your unit is significantly smaller than 4,000-6,000 BTU, this could be the primary cause of your issues.
If the BTU rating is insufficient, this is a problem that requires professional resolution. You'll need to consult with an HVAC technician to determine the appropriate size for your room and potentially replace the existing unit.
Step 2: Basic Troubleshooting – Things You Can Check Yourself
Let's move on to troubleshooting steps you can take without specialized tools. These are simple checks that can often reveal common problems.
1. Check the Air Filter
A dirty air filter is the most common culprit behind poor mini-split performance. A clogged filter restricts airflow, making the unit work harder and reducing its ability to heat or cool effectively.
Without Tools: Locate the air filter (usually behind a removable panel on the indoor unit). Remove the filter and inspect it. If it's visibly dirty or clogged with dust and debris, it needs cleaning or replacement.
DIY Action: Wash reusable filters with mild soap and water, then allow them to dry completely before re-installing. Replace disposable filters with new ones. Clean or replace your filter every 1-3 months, or more frequently if you have pets or allergies.
2. Inspect the Outdoor Unit
The outdoor unit, also known as the condenser, is responsible for releasing heat during cooling and absorbing heat during heating. Obstructions around the unit can significantly impact its performance.
Without Tools: Inspect the outdoor unit for any obstructions, such as leaves, branches, snow, or overgrown vegetation. Ensure there's at least 2-3 feet of clearance around the unit.
DIY Action: Remove any visible debris from around the unit. Gently clear away any obstructions from the fins (the metal grates on the sides of the unit). Do not use a pressure washer, as this can damage the fins.
3. Verify Thermostat Settings
Sometimes the simplest solutions are the easiest to overlook. Ensure your thermostat is set correctly for your desired temperature and mode (heating or cooling).
Without Tools: Confirm that the thermostat is set to the correct mode (heating or cooling). Check the setpoint temperature to ensure it's appropriate. Verify that the thermostat batteries are fresh (if applicable).
DIY Action: Adjust the thermostat settings as needed. Replace the batteries if they are low. Refer to your mini-split's user manual for specific thermostat instructions.
4. Check for Airflow Obstructions Inside the Room
Obstructions inside the room can prevent the mini-split from effectively circulating air.
Without Tools: Ensure that furniture, curtains, or other objects are not blocking the airflow from the indoor unit.
DIY Action: Rearrange furniture or move obstructions to allow for better airflow. Make sure vents are not blocked by rugs or other items.
Step 3: More Advanced Troubleshooting (Basic Equipment Required)
These steps require some basic equipment and a bit more technical understanding. If you're uncomfortable with any of these steps, it's best to consult with a professional.
1. Check the Condenser Fins for Debris
While you visually inspected the outdoor unit, you may need to do a more thorough cleaning of the condenser fins. Dirt and debris can accumulate between the fins, reducing airflow and efficiency.
Basic Equipment Needed: Fin comb, soft brush, garden hose with a gentle spray nozzle.
DIY Action: Turn off the power to the outdoor unit at the breaker. Use the fin comb to gently straighten any bent fins. Use the soft brush to remove loose debris. Rinse the fins with a gentle stream of water from the garden hose. Avoid using high pressure, as this can damage the fins.
2. Inspect the Refrigerant Lines
Refrigerant leaks can significantly reduce the mini-split's performance. While you can't detect leaks directly without specialized equipment, you can look for signs of potential issues.
Basic Equipment Needed: Flashlight.
DIY Action: Carefully inspect the refrigerant lines (the copper pipes connecting the indoor and outdoor units) for any signs of damage, such as dents, kinks, or corrosion. Look for oily residue or ice buildup on the lines, which could indicate a leak.
If you suspect a refrigerant leak, do not attempt to repair it yourself. This requires specialized equipment and knowledge. Contact a qualified HVAC technician immediately. Refrigerant is harmful to the environment and should only be handled by trained professionals.
3. Check the Voltage Supply
Insufficient voltage can cause the mini-split to operate inefficiently or even damage the unit.
Basic Equipment Needed: Multimeter.
DIY Action (Use Extreme Caution!): If you are comfortable and knowledgeable about electrical work, use a multimeter to check the voltage at the outdoor unit's disconnect switch. Compare the reading to the voltage specified on the unit's nameplate. If the voltage is significantly lower than the specified voltage, contact an electrician to investigate the issue.
Warning: Working with electricity can be dangerous. If you are not comfortable using a multimeter or working with electrical components, DO NOT attempt this step. Contact a qualified electrician.
Step 4: When to Call a Professional
While many mini-split issues can be resolved with simple troubleshooting and DIY actions, some problems require the expertise of a qualified HVAC technician. Here are some situations where professional help is essential:
- Refrigerant Leaks: As mentioned earlier, refrigerant leaks require specialized equipment and expertise to repair.
- Electrical Issues: If you suspect an electrical problem, such as low voltage or a faulty capacitor, it's best to consult with an electrician.
- Compressor Problems: The compressor is the heart of the mini-split system. If it's making unusual noises or not functioning properly, it's likely a serious issue that requires professional attention.
- Frozen Evaporator Coil: If the evaporator coil (located inside the indoor unit) is frozen, it could indicate a refrigerant issue, airflow problem, or other underlying problem.
- Consistent Inadequate Heating or Cooling After Troubleshooting: If you've tried all the troubleshooting steps and your mini-split is still not performing adequately, it's time to call in a professional.
Remember: Safety should always be your top priority. If you are unsure about any aspect of troubleshooting or repair, it's best to err on the side of caution and contact a qualified HVAC technician.
Final Thoughts
By following these troubleshooting steps, you can potentially identify and resolve many common issues affecting your mini-split's performance in your 200 square foot room. Remember to prioritize safety and consult with a professional when necessary. Regular maintenance, such as cleaning the air filter and keeping the outdoor unit free of debris, can help prevent problems and extend the life of your mini-split system. Hopefully, this article will help you to maintain a comfortable environment for your home.