What Size Of Window Ac Do I Need

Are you sweating buckets even with your window AC unit cranked up, or shivering despite the "cool" air it's blowing? You're not alone. A common homeowner headache is an inadequately sized window AC unit. It's frustrating, wastes energy, and ultimately leaves you uncomfortable. This article will guide you through troubleshooting whether your AC is the right size for your room, and what you can do about it.
Step 1: Recognizing the Symptoms – Is Your AC Struggling?
Before you start calculating BTUs, let's pinpoint the signs that your AC unit isn't pulling its weight. Look for these telltale indicators:
- The unit runs constantly without ever reaching your desired temperature.
- Uneven cooling: Some areas of the room are cold, while others remain stuffy.
- High energy bills: Your electricity bill spikes significantly when the AC is running.
- The room feels humid: The AC isn't effectively removing moisture from the air.
- Short cycling: The AC turns on and off frequently, without cooling the room properly. This indicates it's reaching its thermostat setting prematurely, likely because it's struggling.
If you're experiencing one or more of these issues, it's time to investigate whether your window AC is the right size for the job.
Step 2: Gathering Information – Room Size and Existing AC Specs
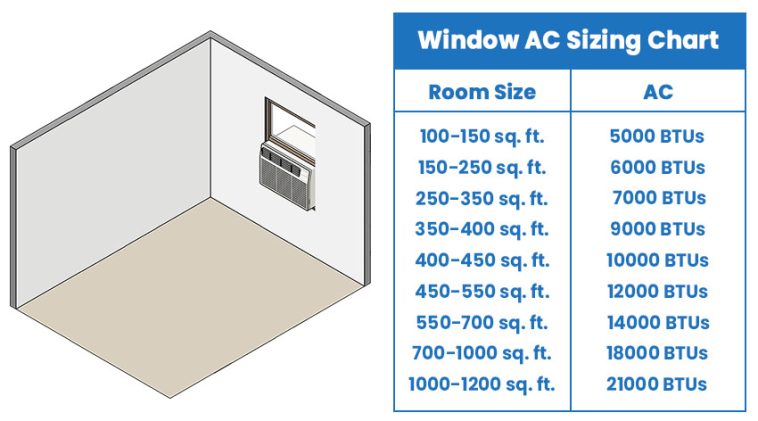
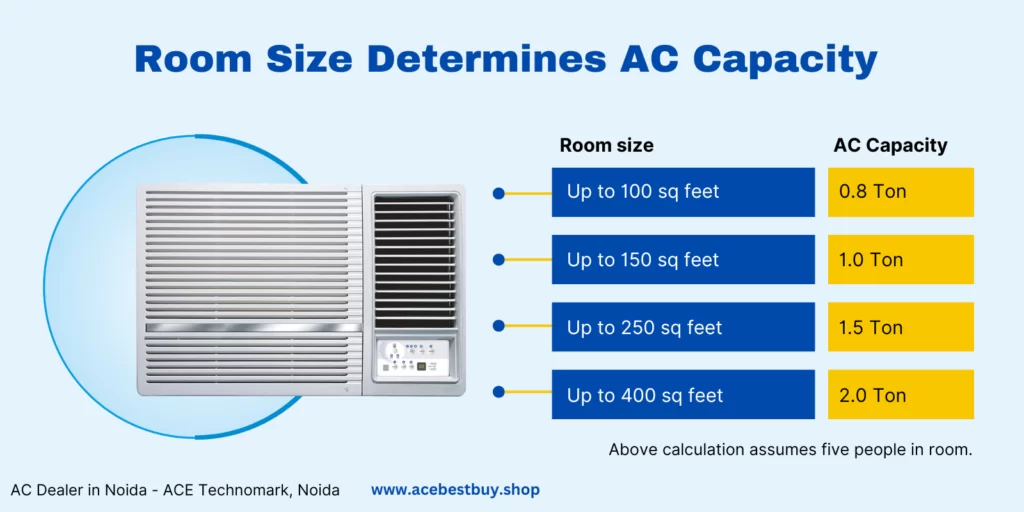
Now, let's gather the essential data. You'll need to determine your room's square footage and find the BTU (British Thermal Units) rating of your current AC unit.
2.1 Measuring Your Room: No Tools Needed!
Measuring your room is surprisingly simple. Here's how:
- Measure the length of the room along one wall, from corner to corner.
- Measure the width of the room along an adjacent wall, from corner to corner.
- Multiply the length by the width to get the square footage of the room.
Example: If your room is 12 feet long and 10 feet wide, the square footage is 12 x 10 = 120 square feet.
2.2 Finding Your AC Unit's BTU Rating: Look for the Label!
Your AC unit's BTU rating is usually printed on a label located on the side, back, or top of the unit. It's often near the model number and energy efficiency information. Look for a number followed by "BTU" or "BTU/h." If you can't find the label, check the owner's manual or search for the model number online.
Step 3: The BTU Calculation – Is Your AC Strong Enough?
The general rule of thumb is that you need 20 BTUs per square foot of living space. However, this is a baseline and several factors can increase or decrease the required BTU amount.
3.1 The Basic Calculation:
Multiply your room's square footage by 20 to get the minimum recommended BTU rating.
Example: For a 120 square foot room, the minimum recommended BTU rating is 120 x 20 = 2400 BTU.
3.2 Adjusting for Additional Factors: Fine-Tuning the Calculation
The basic calculation is a good starting point, but you'll need to adjust it based on these factors:
- Sun Exposure: Is the room heavily exposed to sunlight? If so, increase the BTU requirement by 10%. This is especially true for west-facing rooms.
- Number of Occupants: Are there usually more than two people in the room? If so, add 600 BTUs for each additional person.
- Kitchen Use: Is the room a kitchen? If so, add 4,000 BTUs.
- Insulation: Is the room poorly insulated? If so, increase the BTU requirement by 10-15%. Older homes often have less insulation.
- Ceiling Height: Does the room have unusually high ceilings (over 8 feet)? If so, you might need to increase the BTU requirement, as there's more volume to cool. Consider professional advice for unusually high ceilings.
Let's revisit our example of a 120 square foot room, but now factor in some of these variables.
Example (Adjusted): 120 square foot room, west-facing (10% increase), usually has 3 people (1 extra person).
Basic BTU Requirement: 2400 BTU
Sun Exposure Adjustment: 2400 x 0.10 = 240 BTU increase
Occupant Adjustment: 600 BTU increase
Total Recommended BTU: 2400 + 240 + 600 = 3240 BTU
This revised calculation shows that a 2400 BTU unit might be insufficient for this particular 120 square foot room.
Step 4: Comparing Your AC Unit's BTU Rating to the Recommended BTU
Now, compare the BTU rating of your existing AC unit to the recommended BTU calculated in Step 3. If your AC unit's BTU rating is significantly lower than the recommended BTU, it's likely undersized.
Important Note: It's generally better to slightly oversize your AC unit than to undersize it. An undersized unit will struggle to cool the room, run constantly, and wear out prematurely. A slightly oversized unit will cool the room more quickly and cycle on and off less frequently, potentially saving energy in the long run.
Step 5: Simple DIY Checks (No Tools Needed!)
Before concluding that your AC is undersized, perform these simple checks to rule out other potential problems:
- Air Filter: Is the air filter clean? A clogged air filter restricts airflow, making the AC work harder. Replace or clean the filter regularly (usually every 1-3 months).
- Airflow Obstructions: Are there any furniture or curtains blocking the airflow from the AC unit? Ensure that the air vents are clear and unobstructed.
- Sealing Gaps: Are there gaps around the AC unit's installation in the window? Seal any gaps with weather stripping or foam to prevent warm air from entering the room.
- Window Coverings: During the hottest part of the day, close blinds or curtains to block sunlight and reduce heat gain.
Step 6: Advanced DIY Checks (Basic Equipment Required – Use with Caution!)
If the simple checks don't resolve the issue, you can perform these more advanced checks. Safety First! Disconnect the AC unit from the power outlet before attempting any of these checks.
- Coil Cleaning: Over time, the AC unit's coils (both the evaporator coil on the inside and the condenser coil on the outside) can become dirty and reduce its efficiency. You can carefully clean these coils using a soft brush and a fin comb. Be gentle to avoid damaging the delicate fins.
- Fin Straightening: The fins on the coils can become bent or damaged, further restricting airflow. Use a fin comb to carefully straighten any bent fins.
- Check the Condensate Drain: If the AC unit has a condensate drain, make sure it's not clogged. A clogged drain can prevent the unit from properly removing moisture from the air. You can usually clear the drain with a small piece of wire or a pipe cleaner.
Warning: Working with electrical appliances can be dangerous. If you're not comfortable performing these checks, or if you're unsure about anything, consult a qualified HVAC technician.
Step 7: When to Call a Professional – Don't Risk It!
In some situations, it's best to leave the troubleshooting to the professionals. Call a qualified HVAC technician if:
- You suspect a refrigerant leak: Refrigerant leaks can be harmful to the environment and require specialized equipment to repair.
- The AC unit is making unusual noises: This could indicate a problem with the compressor or other internal components.
- The AC unit is tripping the circuit breaker: This could indicate an electrical problem.
- You've performed the DIY checks and the AC is still not working properly.
- You are not comfortable performing any of the DIY checks, especially those involving electrical components.
Attempting to repair complex AC problems without the proper training and equipment can be dangerous and may void your warranty.
Step 8: Replacing Your Window AC Unit – Choosing the Right Size
If you've determined that your AC unit is undersized and all other troubleshooting steps have failed, it's time to consider replacing it with a unit that has the correct BTU rating. When selecting a new AC unit, remember to factor in all the variables discussed in Step 3, including sun exposure, number of occupants, and insulation.
Pro Tip: Look for Energy Star certified AC units. These units are more energy-efficient and can save you money on your energy bills over the long term.
By following these steps, you can confidently diagnose whether your window AC unit is the right size for your room and take appropriate action to ensure your comfort. Remember to prioritize safety and consult a professional when necessary.