Where Are The Coils In An Ac Unit

Imagine this: It's a sweltering summer afternoon, and your air conditioner suddenly stops blowing cold air. The initial wave of discomfort quickly turns to panic as you realize just how much you rely on that cool breeze. Before calling in a costly HVAC technician, let's explore some simple troubleshooting steps you can take, focusing specifically on understanding and (safely!) checking the coils in your AC unit.
Understanding AC Coils: The Heart of Cooling
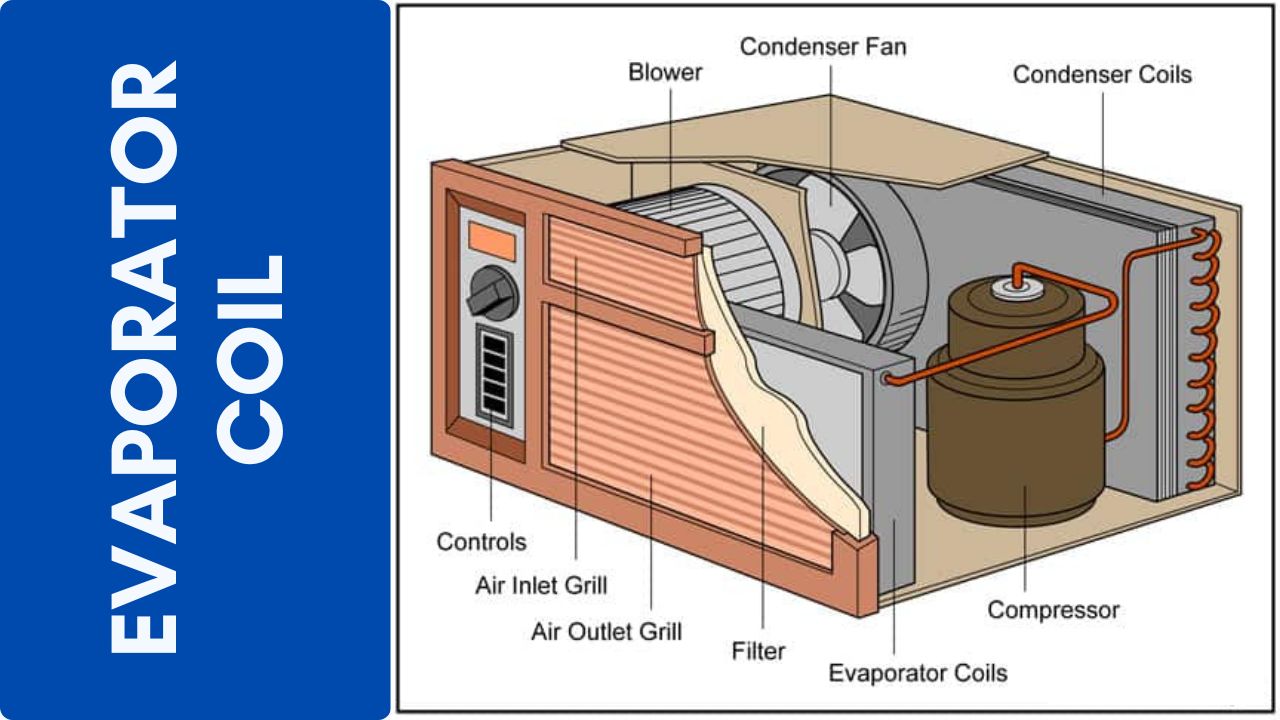
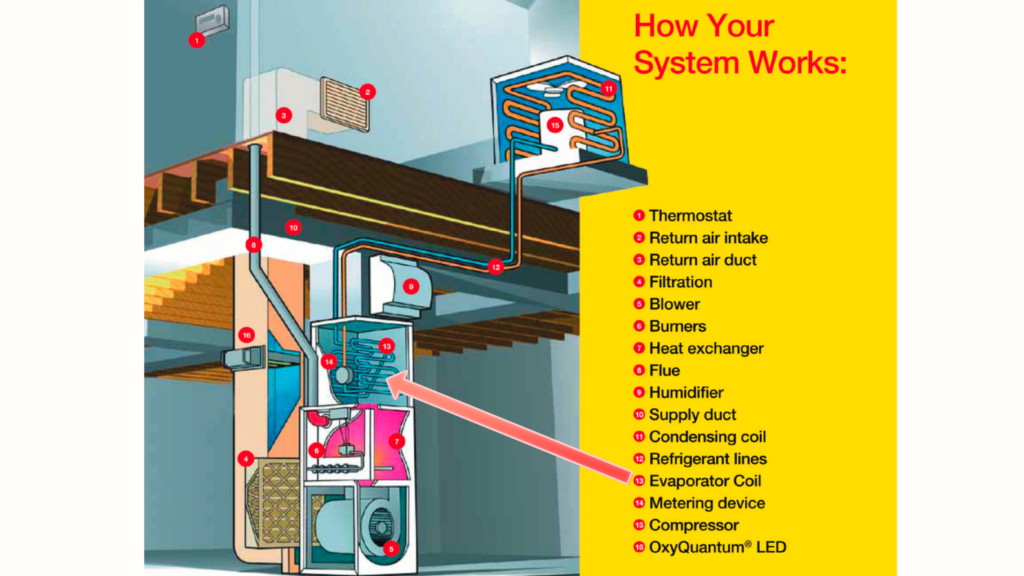
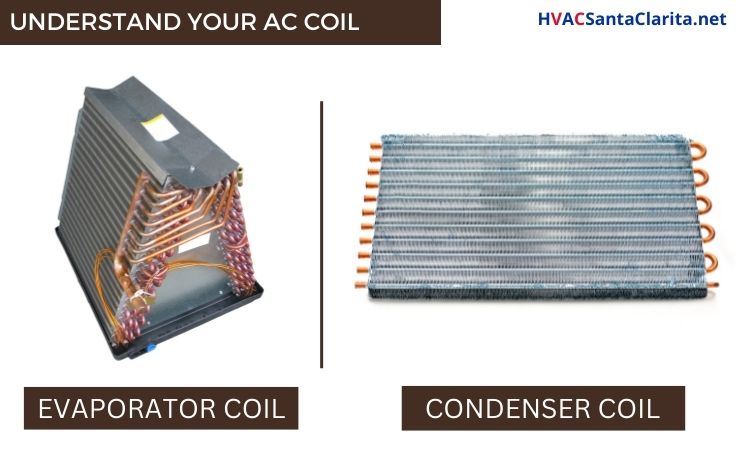
The coils in your AC unit are essentially the engine that drives the cooling process. They're responsible for absorbing heat from inside your home and releasing it outside. There are two main types:
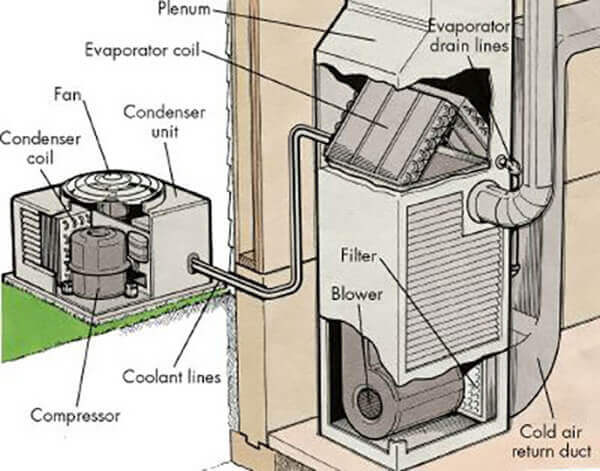
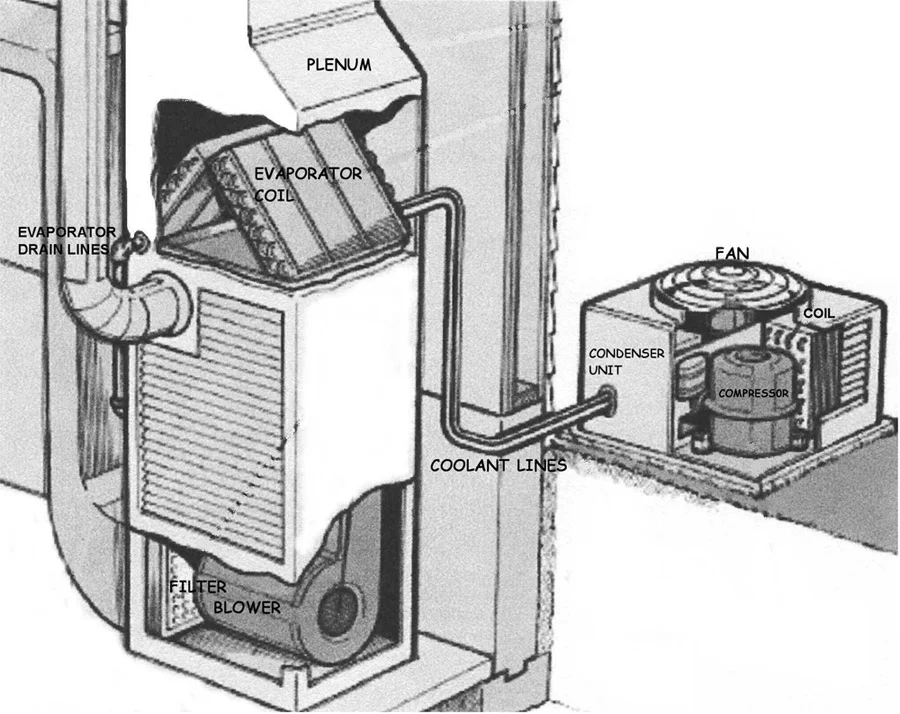
- Evaporator Coil: Located inside your indoor unit, this coil absorbs heat from the air blowing across it. Refrigerant inside the coil evaporates, hence the name, as it soaks up the heat.
- Condenser Coil: Located in the outdoor unit, this coil releases the heat absorbed by the evaporator coil. The refrigerant condenses back into a liquid, ready to repeat the cycle.
Dirty or damaged coils severely reduce the AC's efficiency, leading to poor cooling, higher energy bills, and potential system failure. Let's get started with some easy checks.
Step 1: Safety First! Disconnect the Power
This is crucial. Before doing anything else, disconnect the power to both the indoor and outdoor units. Locate the circuit breakers that control your AC system in your electrical panel and switch them off. For the outdoor unit, there's often a separate disconnect switch located near the unit itself – turn that off as well. This ensures you're working in a safe environment and minimizes the risk of electrical shock. Never skip this step!
Step 2: Inspect the Indoor Unit (Evaporator Coil Location)
The evaporator coil is typically located inside the indoor air handler unit. This could be in your attic, basement, or a closet.
Finding the Evaporator Coil:
- Turn off the AC and disconnect the power. (We can’t stress this enough.)
- Locate the Indoor Unit: This is the part of your AC system that blows air into your home, usually connected to your ductwork.
- Access Panel: Look for a removable access panel on the air handler. It's usually secured with screws or clips.
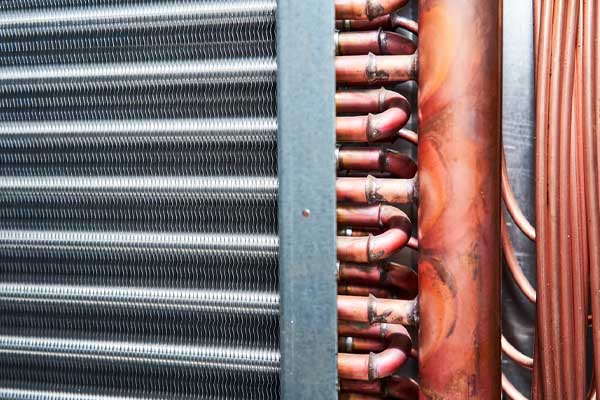
- Inside the Air Handler: Once the panel is removed, you should see the evaporator coil. It often looks like a series of closely spaced fins.
Checking the Evaporator Coil:
- Visual Inspection: Look for excessive dust, dirt, or mold buildup. Clogged coils restrict airflow and reduce cooling efficiency.
- Icing: If you see ice formation on the coil, it could indicate a refrigerant leak, airflow issues, or a frozen coil. Do not attempt to melt the ice with a heat source!
Step 3: Inspect the Outdoor Unit (Condenser Coil Location)
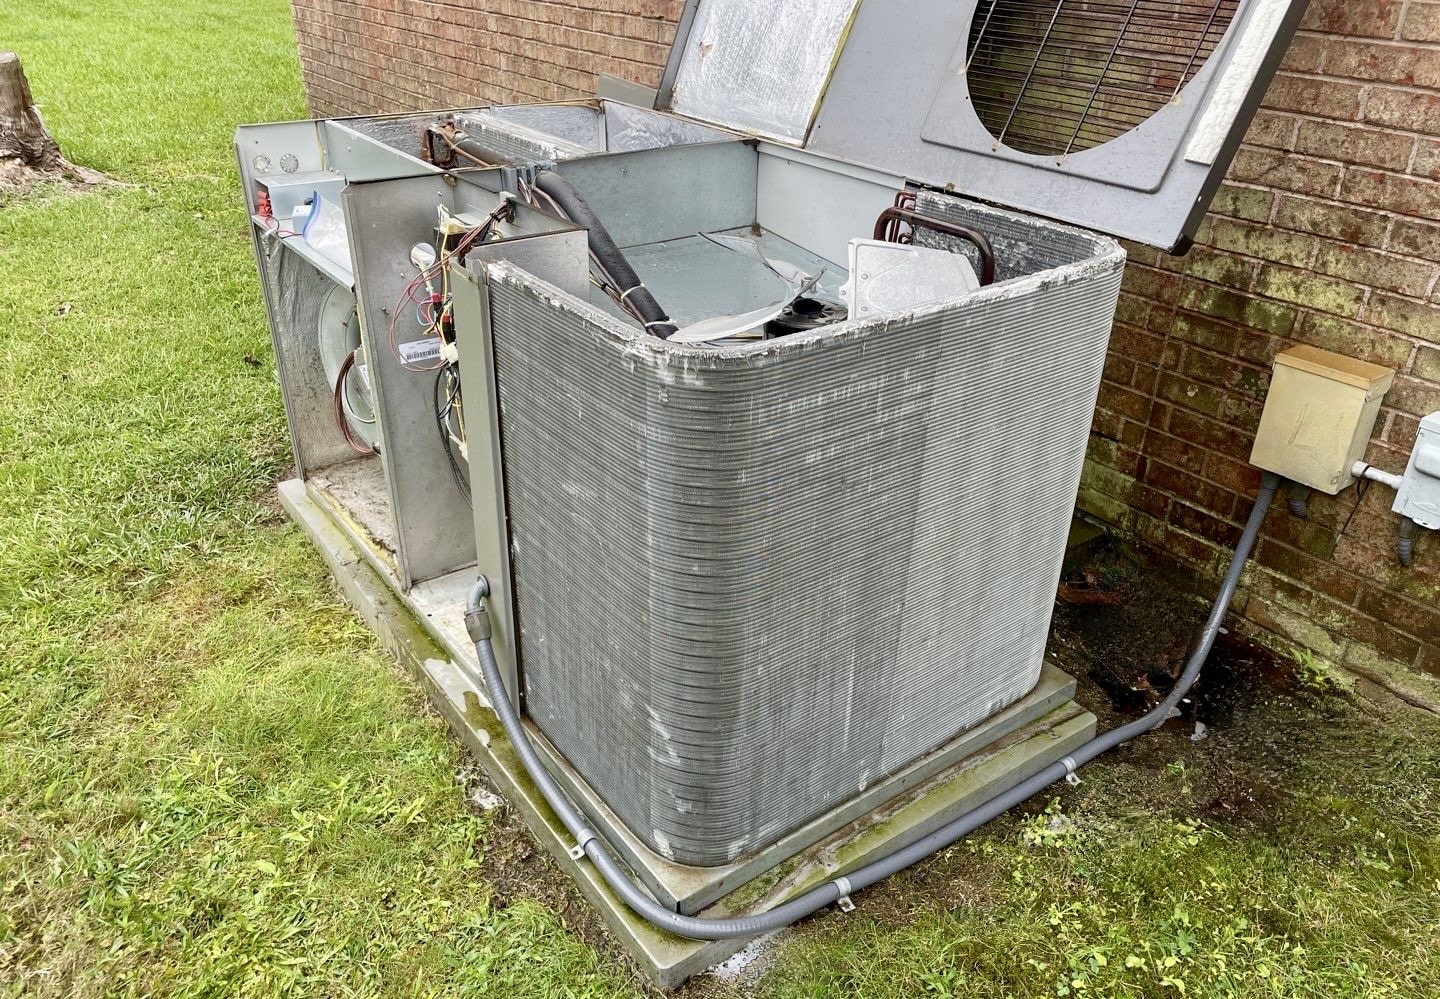
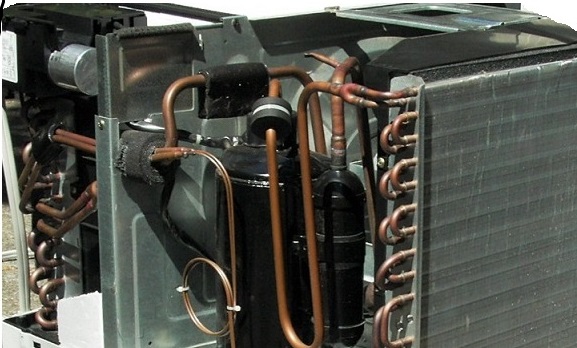
The condenser coil is housed inside the outdoor unit. This is the large metal box that sits outside your house.
Finding the Condenser Coil:
- Turn off the AC and disconnect the power. (Repeat after me!)
- Locate the Outdoor Unit: It's usually on a concrete slab next to your house.
- Access: The condenser coil is typically visible behind a protective metal grill. Some units might require removing panels for better access.
Checking the Condenser Coil:
- Visual Inspection: Again, look for dirt, leaves, grass clippings, or other debris blocking the coil. These obstructions prevent proper airflow and reduce cooling.
- Bent Fins: Check for bent or damaged fins. These fins help dissipate heat, and bent ones reduce efficiency.
Step 4: Cleaning the Coils (DIY Fixes)
If you find your coils are dirty, cleaning them can often restore proper cooling performance. Here's how:
Cleaning the Evaporator Coil:
- Vacuuming: Use a soft brush attachment on your vacuum cleaner to gently remove loose dust and debris from the coil. Be careful not to damage the delicate fins.
- Coil Cleaner: For more stubborn dirt, you can use a commercially available evaporator coil cleaner. Follow the manufacturer's instructions carefully. Make sure the cleaner is specifically designed for AC coils.
- Rinsing (Optional): If the coil is heavily soiled, you can gently rinse it with a low-pressure spray of water. Ensure the unit is completely dry before restoring power.
Cleaning the Condenser Coil:
- Hose with a Nozzle: Use a garden hose with a spray nozzle to gently wash away dirt and debris from the outside of the coil. Spray from the inside out to avoid pushing debris further in.
- Fin Comb: If you find bent fins, use a fin comb (available at most hardware stores) to carefully straighten them. This improves airflow and efficiency.
- Coil Cleaner: As with the evaporator coil, you can use a condenser coil cleaner for stubborn dirt.
Step 5: Check the Air Filter (Crucial for Evaporator Coil Health)
A dirty air filter is a major cause of reduced airflow and can lead to a frozen evaporator coil. Check your air filter regularly (usually monthly) and replace it with a clean one. This simple step can prevent many AC problems.
Step 6: Check for Obstructed Airflow (Indoor & Outdoor)
Ensure that nothing is blocking the airflow to either the indoor or outdoor unit. This includes:
Indoor Unit:
- Furniture: Make sure furniture or curtains aren't blocking the vents.
- Closed Vents: Ensure vents are open in the rooms you want to cool.
Outdoor Unit:
- Plants: Trim any bushes or plants that are growing too close to the unit.
- Debris: Remove any debris that may have accumulated around the unit.
Step 7: Checking Power Supply and Settings
Sometimes, the problem isn't the coils themselves, but a simple issue with the power or settings.
- Circuit Breakers: Double-check that the circuit breakers for your AC unit haven't tripped. Reset them if necessary.
- Thermostat: Ensure your thermostat is set to "cool" and the temperature is set low enough. Also, check the batteries in your thermostat.
- Disconnect Switch: For the outdoor unit, confirm that the disconnect switch is in the "on" position.
When to Call a Professional: Don't DIY These!
While many of the above steps are safe and easy to perform, some AC repairs should always be left to qualified HVAC technicians. These include:
- Refrigerant Leaks: Handling refrigerant requires specialized equipment and training. Leaking refrigerant is harmful to the environment and can pose health risks.
- Compressor Problems: The compressor is the heart of the AC system, and repairs are complex and often require specialized tools.
- Electrical Issues: Any electrical repairs beyond checking circuit breakers should be handled by a licensed electrician. Never attempt to repair electrical components if you are not qualified.
- Major Component Replacements: Replacing the evaporator coil, condenser coil, or other major components requires specialized knowledge and equipment.
- Icing Problems: If your coil is icing up frequently, it indicates a more serious problem that needs professional diagnosis and repair.
Specifically, if you suspect a refrigerant leak, notice any unusual smells (like a sweet, chemical odor), or see signs of electrical damage, immediately contact a qualified HVAC technician.
Prevention is Key: Regular Maintenance
The best way to avoid AC problems is to perform regular maintenance. This includes:
- Changing the Air Filter Regularly: As mentioned earlier, this is crucial for maintaining good airflow and preventing coil problems.
- Cleaning the Coils Annually: Schedule a professional AC tune-up annually, which includes cleaning the coils and checking the refrigerant levels.
- Clearing Debris: Regularly clear any debris from around the outdoor unit.
- Professional Inspection: Have your AC system inspected by a qualified technician every few years to identify and address potential problems before they become major issues.
Conclusion: Empowering You to Troubleshoot (Safely!)
By understanding the location and function of the coils in your AC unit, and by following these simple troubleshooting steps, you can often diagnose and fix minor problems yourself, saving you time and money. Remember to always prioritize safety and disconnect the power before working on any electrical appliance. If you encounter any issues that are beyond your comfort level or expertise, don't hesitate to call a qualified HVAC technician. A little preventative maintenance goes a long way to ensuring your AC system keeps you cool and comfortable all summer long. You've got this!