Where Is The Ambient Air Temperature Sensor Located

Understanding the location of your vehicle's ambient air temperature sensor (AAT sensor) is crucial for diagnosing and addressing a range of automotive issues. This sensor plays a vital role in various systems, from your air conditioning to your engine management. This guide will provide a comprehensive overview of where to find it and why it's important.
What is an Ambient Air Temperature Sensor?
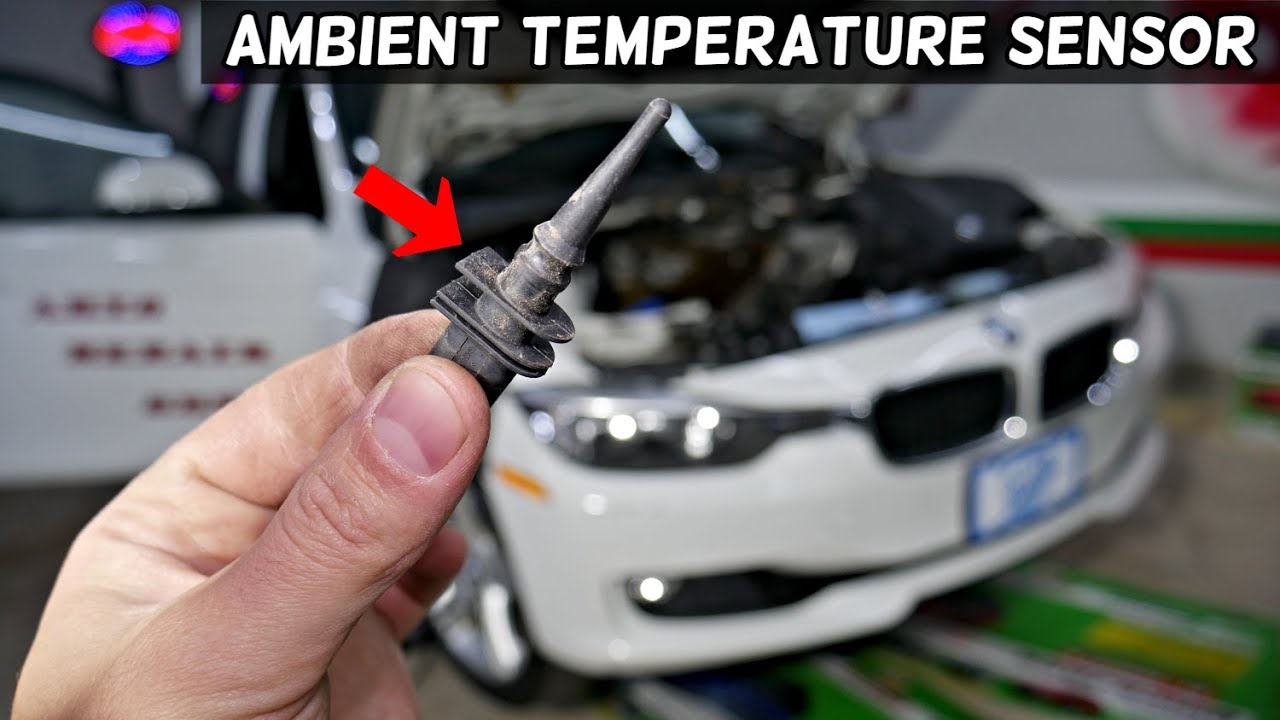
The ambient air temperature sensor, as the name suggests, measures the temperature of the air surrounding your vehicle. It’s a simple device, typically a thermistor, which changes its electrical resistance based on the temperature. The car's computer (ECU or ECM) interprets this resistance change to determine the outside temperature.
Think of it as your car's personal weather station, providing a crucial piece of information to ensure optimal performance.
Why is the AAT Sensor Important?
The data from the AAT sensor is used by several of your car's systems:
- Automatic Climate Control: The AAT sensor is critical for your automatic climate control system. It helps the system determine how much heating or cooling is needed to maintain the desired cabin temperature. If the sensor is malfunctioning, your AC might blow hot air on a cold day or vice versa. The system uses the outside temperature as a baseline and adjusts its operation accordingly.
- Engine Management: The engine control unit (ECU) uses the ambient air temperature to fine-tune the air-fuel mixture. Colder air is denser, requiring more fuel for optimal combustion. A faulty AAT sensor can lead to poor fuel economy, rough idling, and even difficulty starting the engine, particularly in cold weather.
- Display on Dashboard: Most modern cars display the outside temperature on the dashboard. This information comes directly from the AAT sensor. While seemingly trivial, this display allows you to monitor the system's functionality.
- Defrosting System: In some vehicles, the AAT sensor can influence the operation of the defrosting system. For example, it may prevent the AC compressor from engaging when the outside temperature is too low, protecting the system from damage.
- Transmission Control: In some advanced vehicles, the transmission control module (TCM) uses the ambient temperature data to optimize shifting strategies, particularly in cold weather conditions.
Common Locations of the AAT Sensor
The placement of the AAT sensor varies depending on the vehicle make, model, and year. However, there are a few common locations you can check:
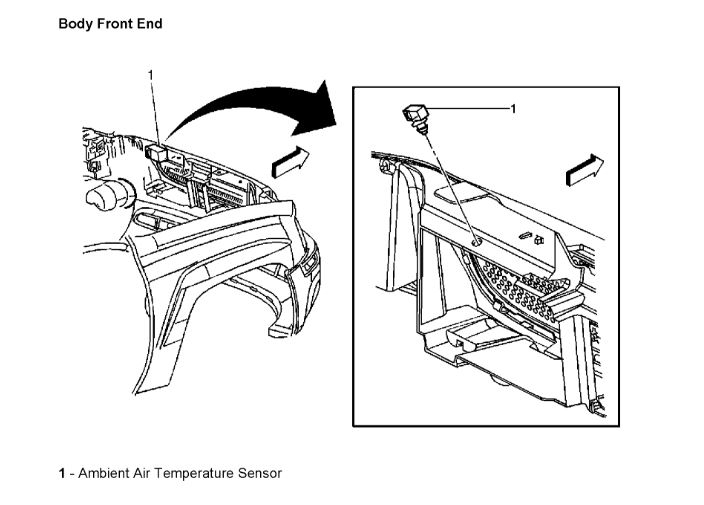
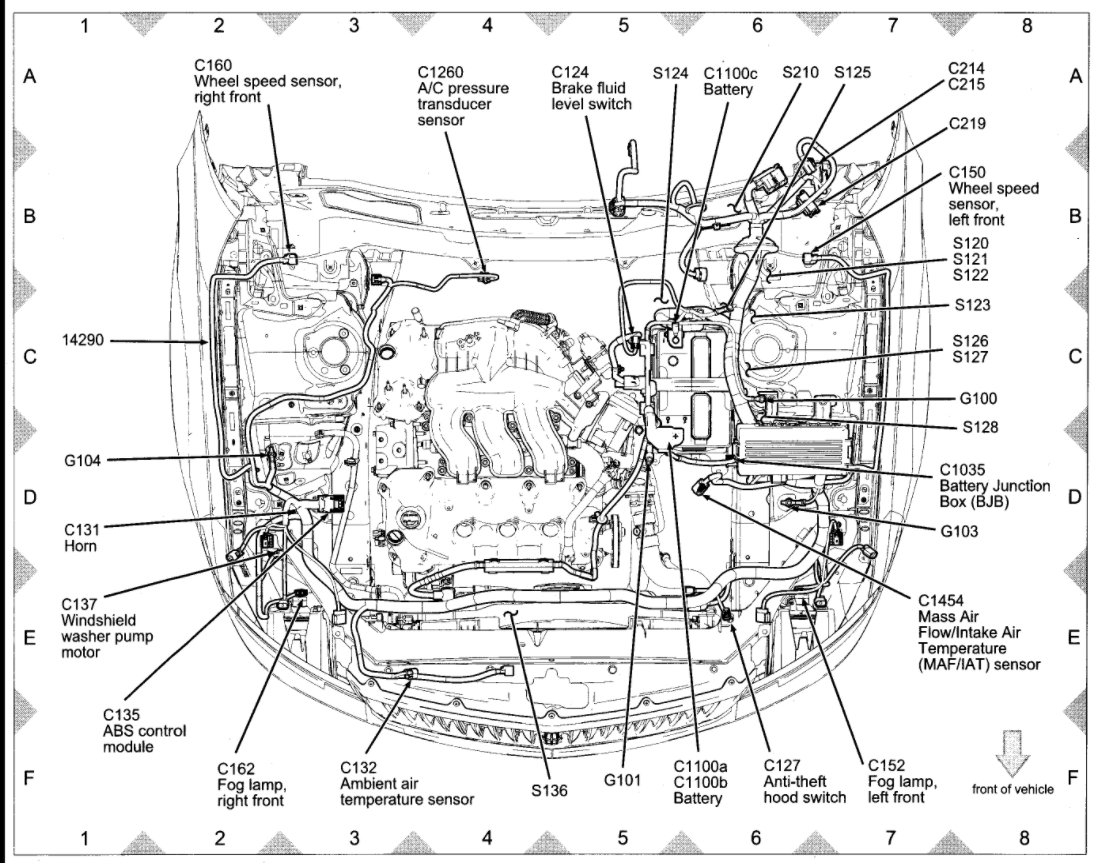
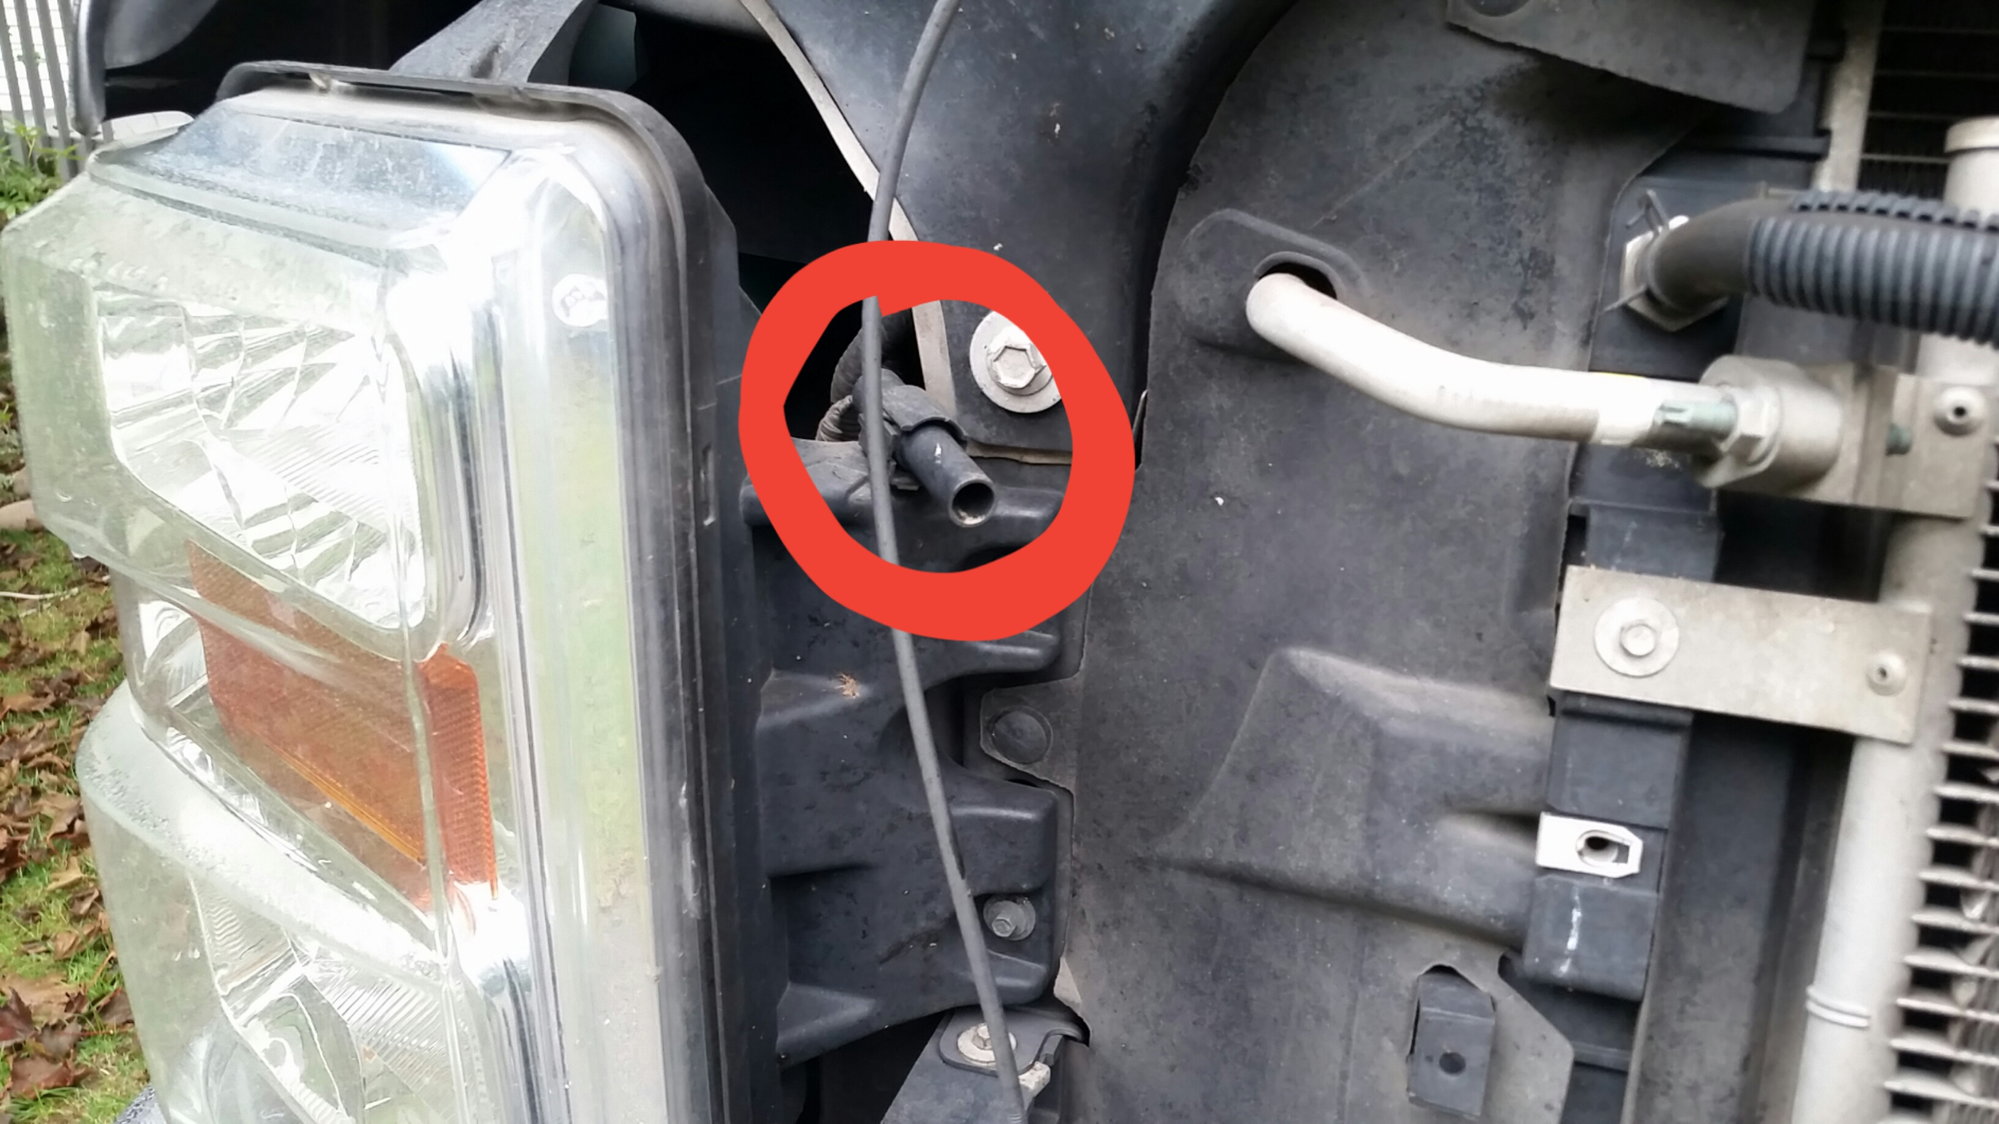
1. Behind the Front Bumper
This is perhaps the most common location. The sensor is often mounted to the bumper reinforcement or the lower grille, usually on the driver's side or in the center. Being exposed to the outside air directly allows for accurate temperature readings.
Why here? This location offers a relatively unobstructed airflow, ensuring the sensor accurately measures the ambient temperature without being significantly affected by engine heat. It's also easily accessible for replacement or repair.
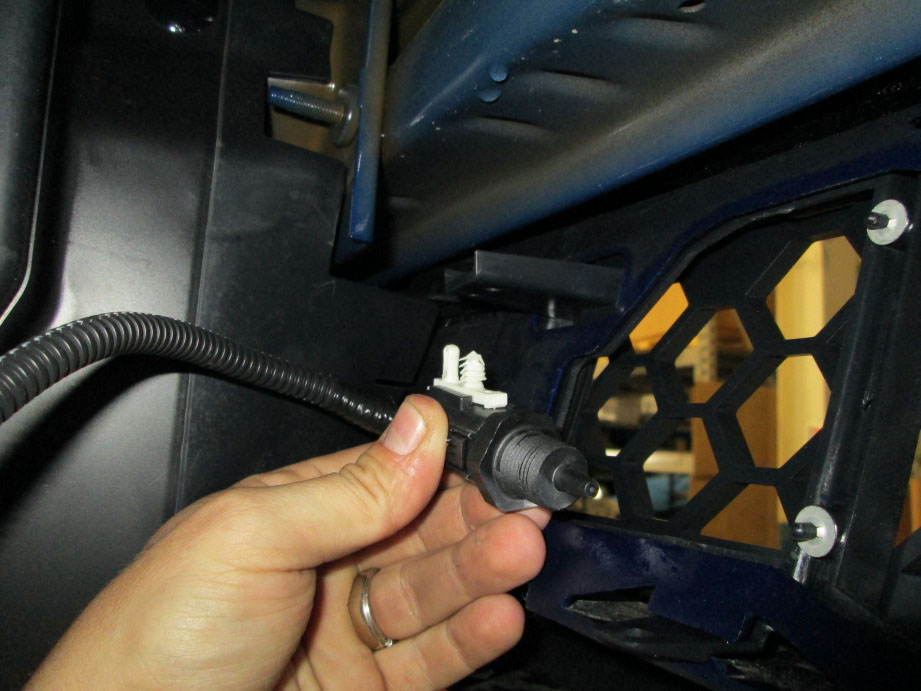
How to find it: Look for a small, plastic sensor with a wire harness attached. It might be tucked away, so you may need to use a flashlight. You might need to partially remove the bumper cover for better access.
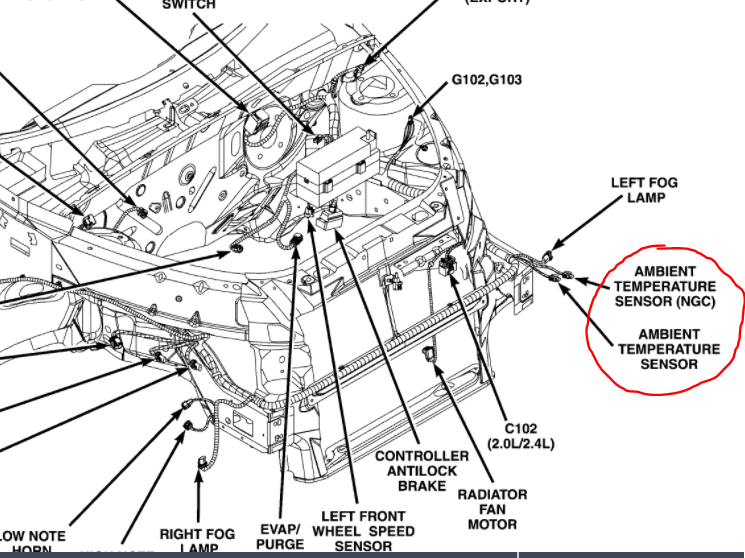
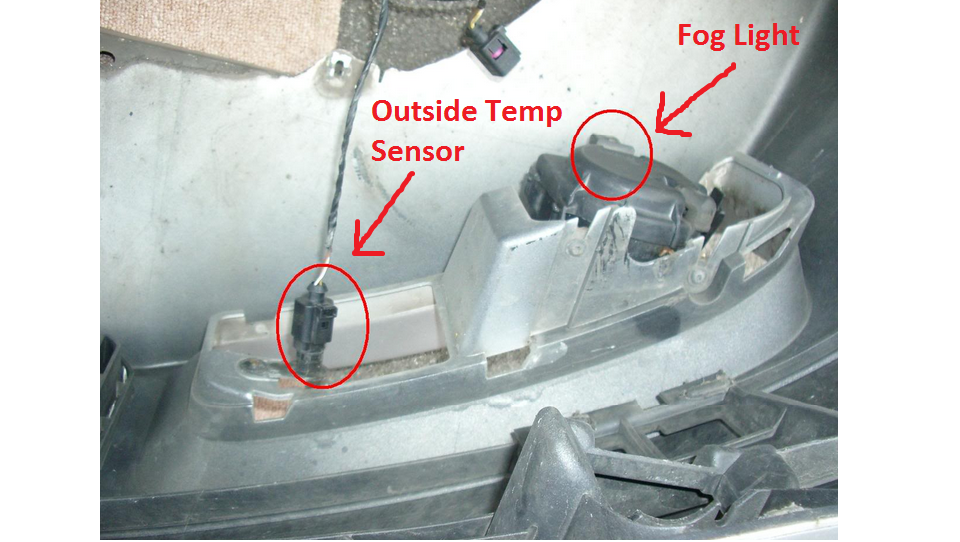
2. Behind the Grille
Similar to the bumper location, some vehicles place the AAT sensor behind the front grille. This provides good airflow while offering some protection from road debris. Again, the driver's side is a common placement, though it can also be centrally located.
Why here? The grille location offers a balance between exposure to airflow and protection from direct impact. It's often a less vulnerable location than the lower bumper area.
How to find it: Check behind the grille slats, looking for a small sensor. You may be able to see it without removing the grille, but removal might be necessary for closer inspection.
3. Near the Radiator Support
In some vehicles, the AAT sensor is mounted on or near the radiator support. This location provides a stable mounting point and can be easily wired into the vehicle's electrical system.
Why here? This location is often chosen for its proximity to other engine components and wiring harnesses, simplifying the installation process. However, it can be more susceptible to heat from the engine.
How to find it: Look around the radiator support, which is the metal structure that supports the radiator. The sensor will likely be attached to this support with a clip or screw.
4. Inside the Side Mirror Housing
Some newer vehicles, especially those with advanced climate control systems, may have the AAT sensor integrated into the side mirror housing. This location offers a relatively shielded environment and can provide a more accurate reading by minimizing the influence of road surface temperature.
Why here? This location is chosen for accuracy, as it's less affected by heat radiating from the road. It's also a more aesthetically pleasing location, as the sensor is hidden within the mirror housing.
How to find it: This location is the trickiest to access. You'll likely need to remove the mirror glass and potentially the entire mirror housing to access the sensor. Consult your vehicle's repair manual for specific instructions.
5. Underneath the Hood Latch
Less commonly, the AAT sensor might be found near the hood latch mechanism. This is typically on the support structure near the front of the engine bay.
Why here? This location offers a protected space and easy access for wiring.
How to find it: Look around the hood latch assembly for a small sensor with a wire connector. You might need a flashlight to see it clearly.
Troubleshooting a Faulty AAT Sensor
A malfunctioning AAT sensor can manifest in several ways:
- Incorrect Temperature Display: The most obvious symptom is an inaccurate temperature reading on your dashboard. The temperature might be consistently too high, too low, or simply erratic.
- Air Conditioning Problems: Your AC might not work properly, blowing hot air when it should be cold or vice versa. The system may struggle to maintain a consistent temperature. Think of refrigerant as the 'blood' of your AC system, carrying heat from inside to outside. A faulty sensor can disrupt this process.
- Poor Fuel Economy: If the ECU is receiving incorrect temperature data, it might miscalculate the air-fuel mixture, leading to reduced fuel efficiency.
- Engine Performance Issues: A faulty sensor can cause rough idling, hesitation, or difficulty starting the engine, especially in cold weather.
- Check Engine Light: In some cases, a faulty AAT sensor can trigger the check engine light. A diagnostic scan will reveal the specific error code associated with the sensor.
Diagnosing a Faulty AAT Sensor
Before replacing the AAT sensor, it's important to rule out other potential causes. Here are a few diagnostic steps:
- Visual Inspection: Check the sensor and its wiring for any signs of damage, corrosion, or loose connections.
- Scan for Error Codes: Use an OBD-II scanner to check for any diagnostic trouble codes (DTCs) related to the AAT sensor. Common codes include P0070, P0071, P0072, and P0073.
- Multimeter Testing: Use a multimeter to measure the sensor's resistance at different temperatures. Compare your readings to the manufacturer's specifications to determine if the sensor is functioning correctly. This usually involves looking up the resistance values at specific temperatures in your vehicle's service manual.
- Wiring Check: Use a multimeter to check the wiring harness for continuity and voltage. A broken wire or a short circuit can cause the sensor to malfunction.
Replacing the AAT Sensor
Replacing the AAT sensor is usually a straightforward process, but it's essential to follow the correct steps to avoid damaging your vehicle.
- Locate the Sensor: Use the information in this guide to locate the AAT sensor on your vehicle.
- Disconnect the Wiring Harness: Carefully disconnect the wiring harness from the sensor.
- Remove the Old Sensor: Depending on the mounting method, you may need to use a screwdriver or wrench to remove the old sensor.
- Install the New Sensor: Install the new sensor in the same location as the old one.
- Connect the Wiring Harness: Reconnect the wiring harness to the new sensor.
- Test the System: Start your vehicle and check the temperature display to ensure the new sensor is working correctly. You may need to clear any error codes that were previously stored in the ECU.
Important Note: Always consult your vehicle's repair manual for specific instructions and torque specifications. If you're not comfortable performing the replacement yourself, it's best to take your vehicle to a qualified mechanic.
Conclusion
The ambient air temperature sensor is a small but vital component of your vehicle. Understanding its location and function can help you diagnose and address a variety of issues, from AC problems to engine performance issues. By following the steps outlined in this guide, you can troubleshoot a faulty sensor and potentially save yourself a trip to the mechanic. Remember to always consult your vehicle's repair manual and exercise caution when working on your car.
By being proactive and informed, you can keep your car running smoothly and enjoy a comfortable and efficient driving experience.