Where To Locate Carbon Monoxide Detector
A common worry for homeowners is knowing if their carbon monoxide (CO) detectors are properly placed. After all, these devices are your first line of defense against a silent, deadly killer. Incorrect placement can render them ineffective, providing a false sense of security. This article will guide you through understanding where to locate your CO detectors for optimal protection.
Understanding Carbon Monoxide and Its Behavior
Before we dive into placement, it's crucial to understand how carbon monoxide behaves. CO is a colorless, odorless, and tasteless gas produced by the incomplete burning of fossil fuels. This means you can't detect it yourself. More importantly, its density is *similar* to air. This is an important detail that often gets misinterpreted.
Many people mistakenly believe that CO rises like smoke. While warm air rises, CO mixes with the surrounding air relatively quickly. This means detectors should be placed where they can detect CO at breathing level.
Step-by-Step Guide to Diagnosing Your CO Detector Placement
Step 1: Identify Potential Sources of CO
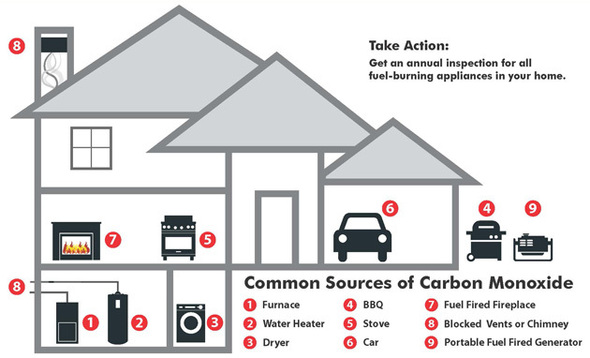
First, walk through your home and identify all potential sources of carbon monoxide. Common culprits include:
- Furnaces (especially gas-fired ones)
- Water heaters (gas or oil)
- Fireplaces (wood-burning or gas)
- Stoves and ovens (gas)
- Generators (portable)
- Vehicles (running in an attached garage)
- Grills (charcoal or gas – *never use indoors!*)
Make a note of the location of each of these appliances. This will be important in determining optimal detector placement.
Step 2: Check Current Detector Placement
Now, physically inspect the location of your current CO detectors. Ask yourself these questions:
- Are there detectors on every level of your home? This is a *critical* safety requirement.
- Are detectors located near sleeping areas? CO is most dangerous when you are asleep and unable to recognize the symptoms.
- Are detectors at least 10 feet away from fuel-burning appliances? Direct proximity to appliances can cause false alarms.
- Are detectors placed on the ceiling or wall? If on the wall, are they between knee and eye level?
- Are detectors obstructed by furniture, curtains, or other objects? Obstructions can prevent CO from reaching the detector.
- Are detectors near windows or doors that could introduce drafts? Drafts can dilute CO concentrations and delay detection.
Take detailed notes about any issues you find with the existing placement.
Step 3: Consult the Manufacturer's Instructions
This is often the *most overlooked* step, but it's crucial. Every CO detector is slightly different, and the manufacturer's instructions will provide the most accurate guidance for your specific model. Locate the manual that came with your detector (or download it from the manufacturer's website) and carefully review the recommended placement guidelines.
Pay close attention to any specific warnings or recommendations that differ from general guidelines.
Step 4: Analyze Your Findings and Identify Problems
Compare your notes from Steps 2 and 3 with the manufacturer's recommendations and the general best practices described above. Identify any discrepancies or areas where your current placement is suboptimal. Common problems include:
- Missing detectors on one or more levels of the home.
- Detectors too far from sleeping areas.
- Detectors too close to fuel-burning appliances.
- Detectors placed in corners or dead air spaces.
- Detectors obstructed by furniture.
- Detectors past their expiration date. (CO detectors have a limited lifespan, typically 5-10 years. Check the date printed on the detector.)
Simple, Safe DIY Fixes
Once you've identified the problems, you can take steps to correct them. Here are some simple, safe DIY fixes:
Relocating Existing Detectors
If a detector is in a suboptimal location, you can often simply move it. Follow these guidelines:
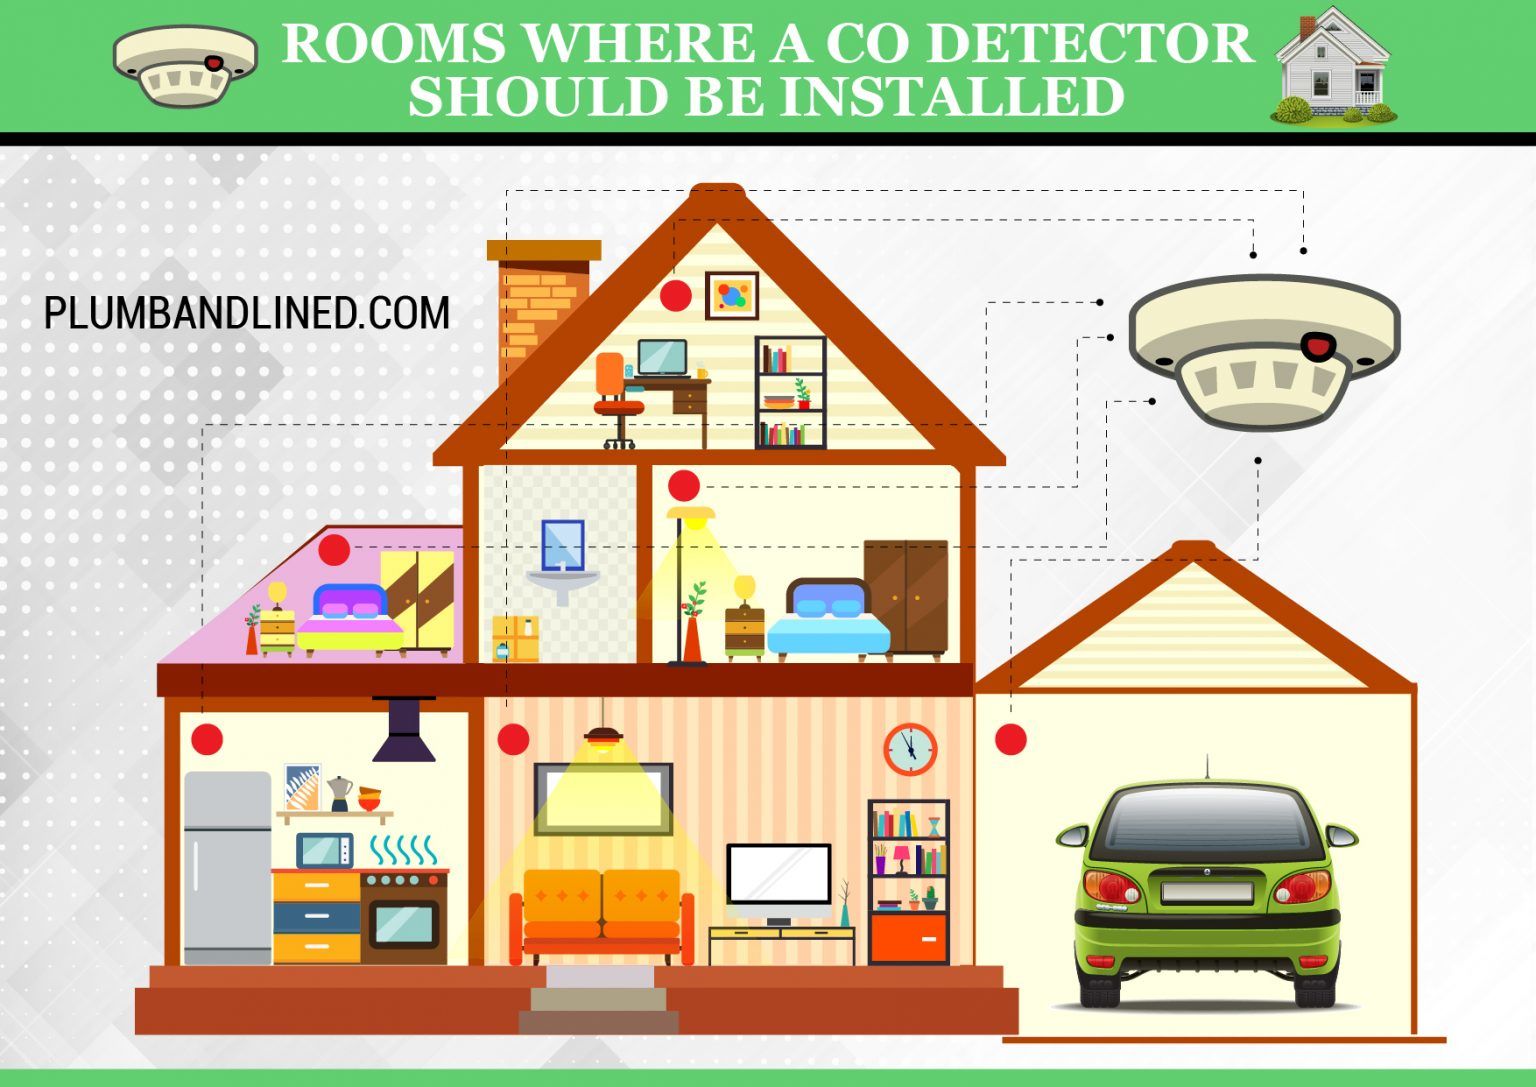
- Near sleeping areas: Place detectors in hallways outside bedrooms or inside each bedroom.
- On each level: Ensure at least one detector is on each level of your home, including the basement.
- Distance from appliances: Maintain a distance of at least 10 feet from fuel-burning appliances.
- Wall or ceiling placement: On walls, place detectors between knee and eye level. This allows for detection at breathing level. On ceilings, place them at least 4 inches from the wall.
- Avoid obstructions: Ensure detectors are not blocked by furniture, curtains, or other objects.
- Avoid drafts: Do not place detectors near windows, doors, or vents that could create drafts.
Carefully remove the detector from its current mounting and re-install it in the new location, following the manufacturer's instructions.
Installing New Detectors
If you need to add detectors to your home, choose a location that meets the criteria outlined above. Consider purchasing detectors with battery backup in case of a power outage.
- Select a location: Choose a spot that meets the placement guidelines.
- Mount the detector: Follow the manufacturer's instructions for mounting the detector. This typically involves attaching a mounting bracket to the wall or ceiling and then securing the detector to the bracket.
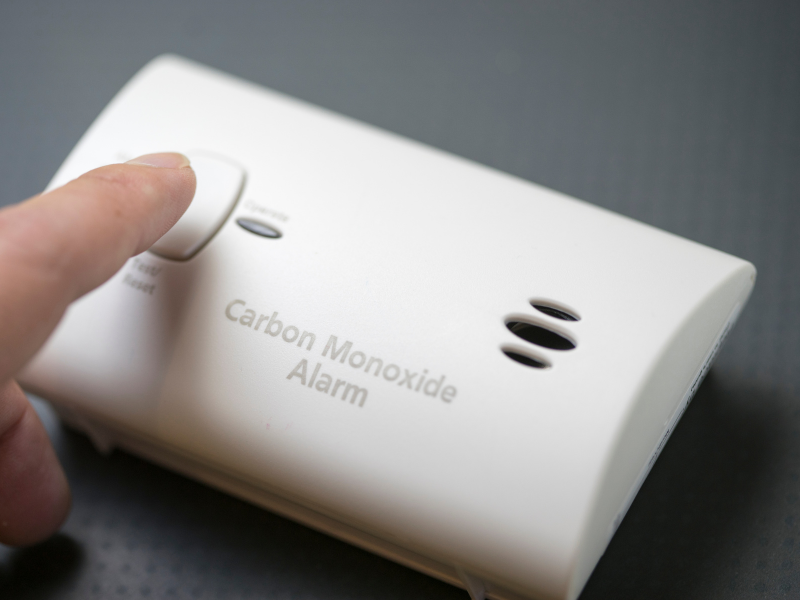
- Test the detector: After installation, test the detector to ensure it is working properly. Press the test button and listen for the alarm.
Replacing Expired Detectors
CO detectors have a limited lifespan, typically 5-10 years. Check the date printed on the detector and replace it if it has expired.
- Remove the old detector: Disconnect the power supply (if applicable) and remove the detector from its mounting.
- Install the new detector: Follow the manufacturer's instructions for installing the new detector.
- Test the detector: After installation, test the detector to ensure it is working properly.
Addressing False Alarms
False alarms can be frustrating and can lead people to disable their detectors, which is dangerous. If you experience frequent false alarms, try these steps:
- Check the battery: A low battery can sometimes trigger a false alarm. Replace the battery with a fresh one.
- Clean the detector: Dust and debris can accumulate inside the detector and trigger a false alarm. Use a vacuum cleaner with a brush attachment to gently clean the detector.
- Relocate the detector: If the detector is too close to a fuel-burning appliance, relocate it to a more suitable location.
When to Call a Professional
While many CO detector issues can be resolved with simple DIY fixes, there are certain situations that require professional intervention. Never hesitate to call a qualified HVAC technician, electrician, or your local fire department if you are unsure about anything.
Here are some scenarios where professional help is needed:
- You suspect a CO leak: If your CO detector is alarming and you or anyone in your household is experiencing symptoms of CO poisoning (headache, dizziness, nausea, vomiting, confusion, loss of consciousness), *evacuate the premises immediately* and call 911 or your local emergency number. Do not try to troubleshoot the problem yourself.
- You can't identify the source of a CO alarm: If your CO detector is alarming and you can't identify the source of the CO, call your local fire department or a qualified HVAC technician. They have specialized equipment to detect CO and identify the source of the leak.
- You are uncomfortable working with electrical wiring: If you need to install a hard-wired CO detector and you are not comfortable working with electrical wiring, hire a qualified electrician.
- You have persistent false alarms after trying DIY fixes: If you have tried all the DIY fixes for false alarms and the problem persists, call a qualified HVAC technician. There may be an underlying issue with your detector or your home's ventilation system.
- Your fuel-burning appliances are not functioning properly: If you suspect that your fuel-burning appliances are not functioning properly (e.g., you smell gas, you see soot near your furnace), call a qualified HVAC technician to inspect and repair the appliances.
Regular Maintenance is Key
Even with proper placement, CO detectors require regular maintenance to ensure they are functioning properly.
- Test your detectors monthly: Press the test button on each detector to ensure the alarm sounds.
- Replace batteries annually (unless using 10-year batteries): Even if the detector is hard-wired, it likely has a battery backup. Replace the battery annually to ensure it is functioning properly.
- Clean your detectors regularly: Use a vacuum cleaner with a brush attachment to gently clean the detectors and remove dust and debris.
- Replace detectors before their expiration date: CO detectors have a limited lifespan. Check the date printed on the detector and replace it before it expires.
Conclusion
Proper placement of carbon monoxide detectors is essential for protecting your family from this silent killer. By following the steps outlined in this article, you can diagnose potential problems with your current detector placement and implement simple, safe DIY fixes. Remember to consult the manufacturer's instructions for your specific model and to call a professional when necessary. Regular maintenance and vigilance are key to ensuring that your CO detectors are always ready to protect you.