Why Is My Ac Not Blowing Cold Air In Car
Few things are more frustrating than hopping into your car on a sweltering day, cranking up the AC, and being greeted with… warm air. It's a common problem, and while a completely broken AC system requires a professional, there are several things you can check and potentially fix yourself. This guide will walk you through a methodical troubleshooting process to get your car's AC blowing cold air again.
Step 1: Initial Checks – The No-Tool Zone
Before you even think about getting your hands dirty, let's start with the basics. These checks require no tools and can quickly identify some common culprits.
1.1: Check the AC Button and Settings:
This might sound silly, but it's the first thing to verify. Make sure the AC button is actually pressed! Also, confirm that the temperature setting is set to the coldest setting and that the blower fan is on a reasonable speed (not off or on the lowest setting).
1.2: Listen for the Compressor Clutch Engaging:
With the engine running and the AC turned on full blast, pop the hood and listen near the AC compressor (usually located at the front of the engine, driven by a belt). You should hear a distinct *click* as the compressor clutch engages. This indicates the compressor is trying to turn on. If you don't hear the click, it could be a sign of an electrical issue, a faulty compressor, or low refrigerant. No click is a bad sign.
1.3: Check the Engine Temperature Gauge:
An overheating engine can prevent the AC from working. If your temperature gauge is running higher than normal, address the overheating issue first. Overheating can be caused by low coolant, a faulty thermostat, or a radiator problem.
1.4: Observe the Blower Fan Speed:
Is the blower fan blowing air with good force? If the fan seems weak even on high settings, the problem might be a blower motor resistor or a failing blower motor. A weak blower fan, even with cold air trying to come through, will feel like warm air.
Step 2: Inspecting Under the Hood – Visual Checks
Now we'll move on to some visual inspections. These require no tools but require you to be comfortable looking under the hood of your car. Remember to always work on a cool engine and be cautious of moving parts when the engine is running.
2.1: Check the Serpentine Belt:
The serpentine belt drives many accessories, including the AC compressor. Make sure the belt is in good condition – not cracked, frayed, or glazed. Also, ensure it's properly tensioned and hasn't slipped off any pulleys. A loose or damaged belt can prevent the compressor from engaging.
2.2: Inspect the AC Compressor:
Visually inspect the AC compressor itself. Look for any signs of damage, leaks, or excessive corrosion. While you can't diagnose internal problems, obvious external damage is a red flag. Also look for signs of dye around the AC compressor fittings.
2.3: Check the Radiator Fan:
Ensure the radiator fan is working correctly. This fan helps cool the engine and the AC condenser. If the fan isn't running, especially when the AC is on, it can lead to poor AC performance. The fan should be on whenever the AC is on and the car is not moving at highway speeds.
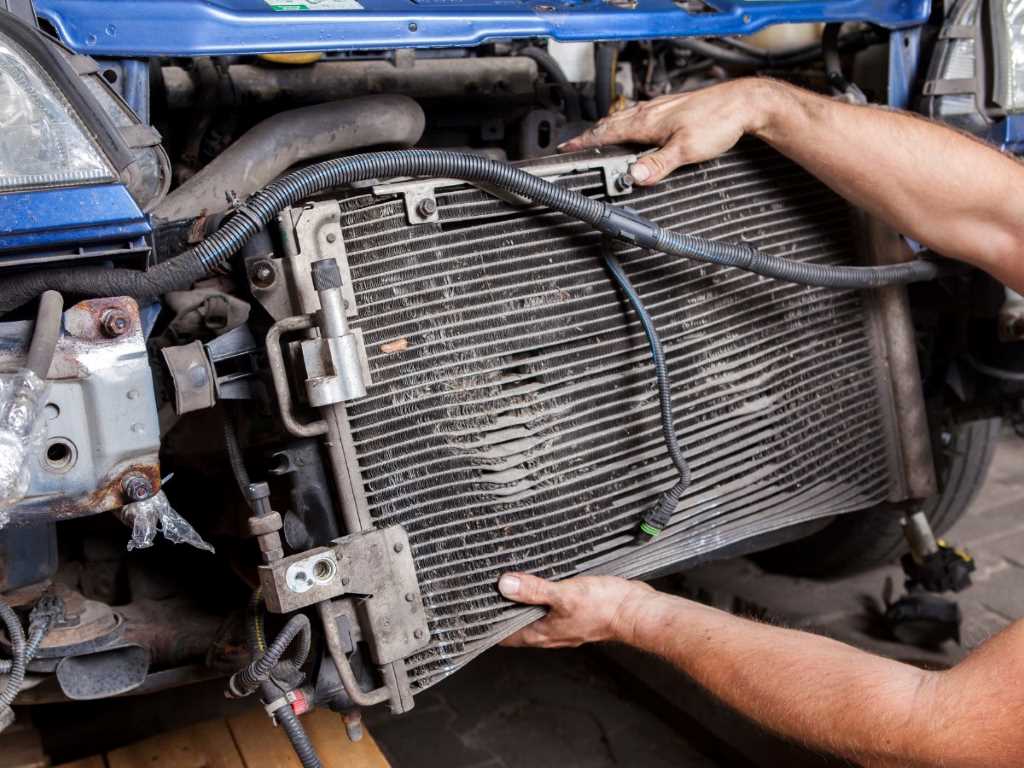
2.4: Look for Obstructions in Front of the Condenser:
The AC condenser is located in front of the radiator and looks similar to a smaller radiator. Make sure there are no leaves, bugs, or other debris blocking airflow through the condenser. Restricted airflow can significantly reduce AC efficiency. Use a garden hose to gently wash away any debris.
Step 3: Simple DIY Checks with Basic Equipment
These checks require a few basic tools, but they can help you narrow down the problem significantly.
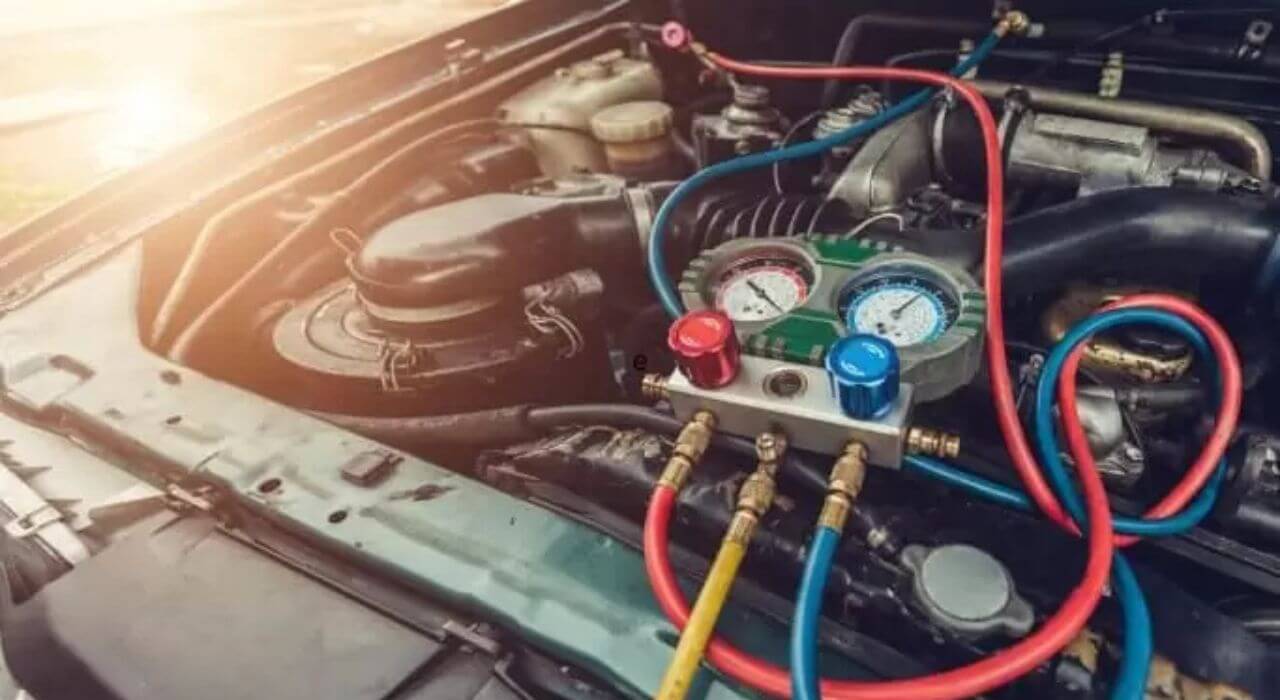
3.1: Checking Refrigerant Pressure with a Gauge Set (Caution Required!):
Important Safety Warning: Working with refrigerant can be dangerous. Wear safety glasses and gloves. If you are not comfortable with this step, take your car to a professional. Refrigerant can cause frostbite and blindness. Do not release refrigerant into the atmosphere, it is illegal.
A low refrigerant level is one of the most common causes of AC problems. You'll need an AC manifold gauge set and some basic knowledge of how to use it. These gauges connect to the high and low-pressure ports on your AC system. Identify these ports correctly – connecting to the wrong port can damage your system.
With the engine running and the AC on full blast, connect the gauges. Observe the pressure readings on both gauges. Compare these readings to the recommended pressure range for your vehicle (refer to your car's service manual or a reliable online source). Low pressure on the low side usually indicates a refrigerant leak. High pressure on the high side can indicate a clogged orifice tube or expansion valve, or too much refrigerant in the system.
If the pressure readings are significantly outside the normal range, it's best to consult a professional. Adding too much refrigerant can be as damaging as having too little.
3.2: Checking Fuses and Relays:
A blown fuse or a faulty relay can prevent the AC compressor from engaging. Locate the fuse box (usually under the dashboard or in the engine compartment) and check the fuses related to the AC system. Consult your car's owner's manual for the fuse layout.
Use a test light or multimeter to check for continuity across each fuse. Replace any blown fuses with fuses of the same amperage. Relays can also be tested by swapping them with a known good relay (like the horn relay, which is often the same type) to see if the AC starts working.
3.3: Inspecting the Cabin Air Filter:
A clogged cabin air filter can restrict airflow to the vents, making the AC seem less effective. The cabin air filter is usually located behind the glove compartment or under the dashboard. Remove the filter and inspect it. If it's dirty or clogged, replace it with a new one. A clean cabin air filter will improve airflow and AC performance.
Step 4: DIY Actions You Can Take
After performing the checks above, here are some simple DIY actions you can take based on your findings:
4.1: Add Refrigerant (With Caution!):
Only if you are sure the system is low on refrigerant and you are comfortable using gauges. Purchase a refrigerant recharge kit with a gauge. Follow the instructions carefully. Do not overfill the system. Monitor the pressure readings on the gauge as you add refrigerant. Stop when the pressure reaches the recommended range.
It's important to note that adding refrigerant is only a temporary fix if there is a leak in the system. The leak will need to be repaired to prevent the problem from recurring.
4.2: Replace Blown Fuses or Faulty Relays:
If you identified a blown fuse or a faulty relay, replace it with a new one of the same type and amperage. Make sure the new fuse is fully seated in the fuse box.
4.3: Replace the Cabin Air Filter:
Replacing a clogged cabin air filter is a simple and inexpensive way to improve AC performance and air quality inside your car.
4.4: Clean Debris from the Condenser:
Use a garden hose to gently wash away any leaves, bugs, or other debris blocking airflow through the condenser. Be careful not to damage the delicate fins of the condenser.
When to Call a Professional
While many AC problems can be addressed with DIY troubleshooting, there are times when it's best to call a professional. Here are some signs that the issue is beyond your capabilities:
- The compressor clutch is not engaging and you've already checked the fuses and relays. This could indicate a faulty compressor, a wiring problem, or a problem with the car's computer.
- The AC system is leaking refrigerant. Locating and repairing refrigerant leaks requires specialized equipment and expertise.
- The AC system has high pressure on the high side. This could indicate a clogged orifice tube or expansion valve, or too much refrigerant in the system. Diagnosing and repairing these issues requires specialized knowledge and equipment.
- You're uncomfortable working with refrigerant. Refrigerant can be dangerous if handled improperly.
- You've tried all the DIY steps and the AC is still not blowing cold air. This could indicate a more complex problem that requires professional diagnosis and repair.
Don't hesitate to consult a qualified mechanic. A professional has the tools, knowledge, and experience to diagnose and repair even the most complex AC problems. Ignoring a problem can often lead to more costly repairs down the road.
Final Thoughts
Troubleshooting your car's AC system can seem daunting, but by following these steps, you can often identify and fix common problems yourself. Remember to always prioritize safety and consult a professional when you're unsure or uncomfortable. With a little patience and effort, you can get your car's AC blowing cold air again and enjoy a more comfortable driving experience.