Wiring Diagram Electric Furnace
One of the most frustrating experiences for a homeowner is waking up to a cold house in the middle of winter, only to find their electric furnace isn't working. Often, the issue isn't a major component failure, but a simple problem related to the wiring. Before calling a professional, understanding your furnace's wiring diagram and attempting some basic troubleshooting can potentially save you time and money. This guide provides a methodical approach to diagnosing and fixing common wiring problems in electric furnaces.
Understanding the Wiring Diagram
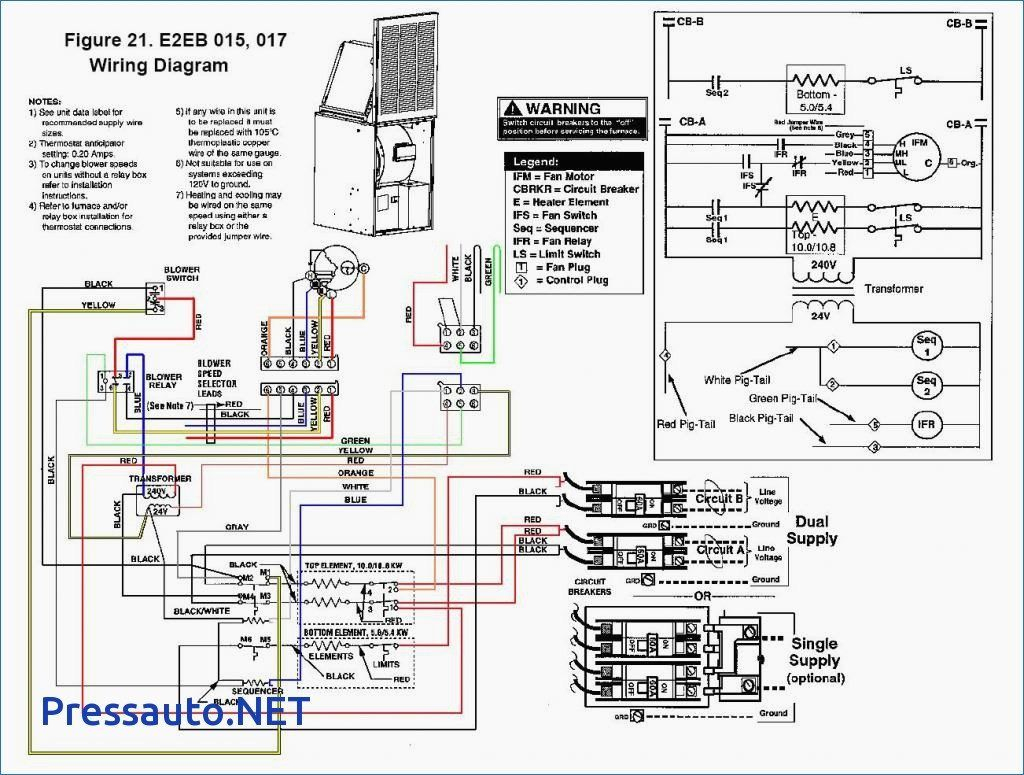
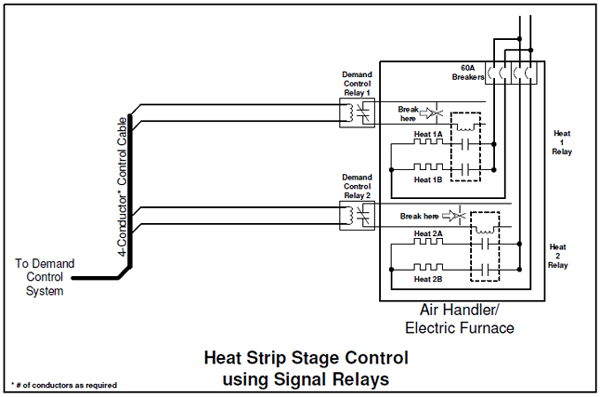
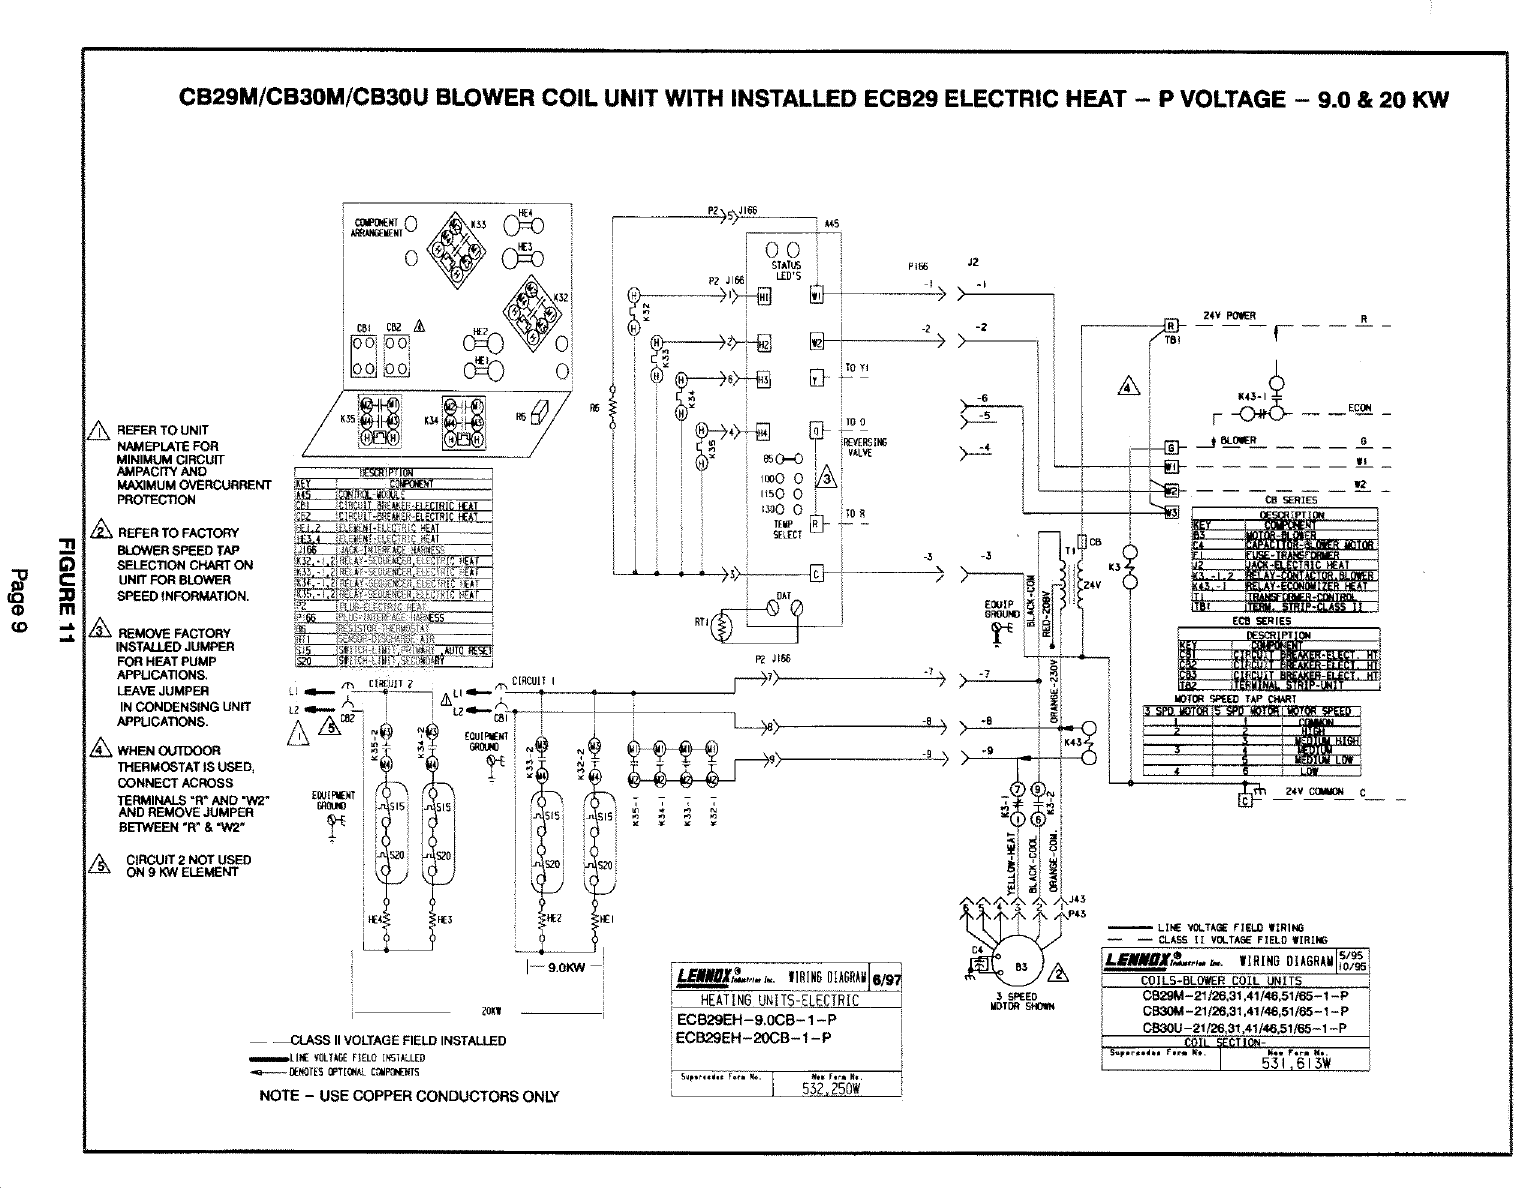
Your furnace's wiring diagram is essentially its electrical roadmap. It shows how all the components are connected – the thermostat, blower motor, heating elements (also called heating coils), relays, control board, and safety switches. Locating and understanding this diagram is the first and most crucial step.
Finding the Diagram: The wiring diagram is usually located inside the furnace, often on the inside of the access panel that you remove to service the unit. It might be a folded-up paper diagram or a sticker affixed to the cabinet. If you can't find it there, check the furnace's manual. You can often find a digital copy of the manual online using the furnace's make and model number.
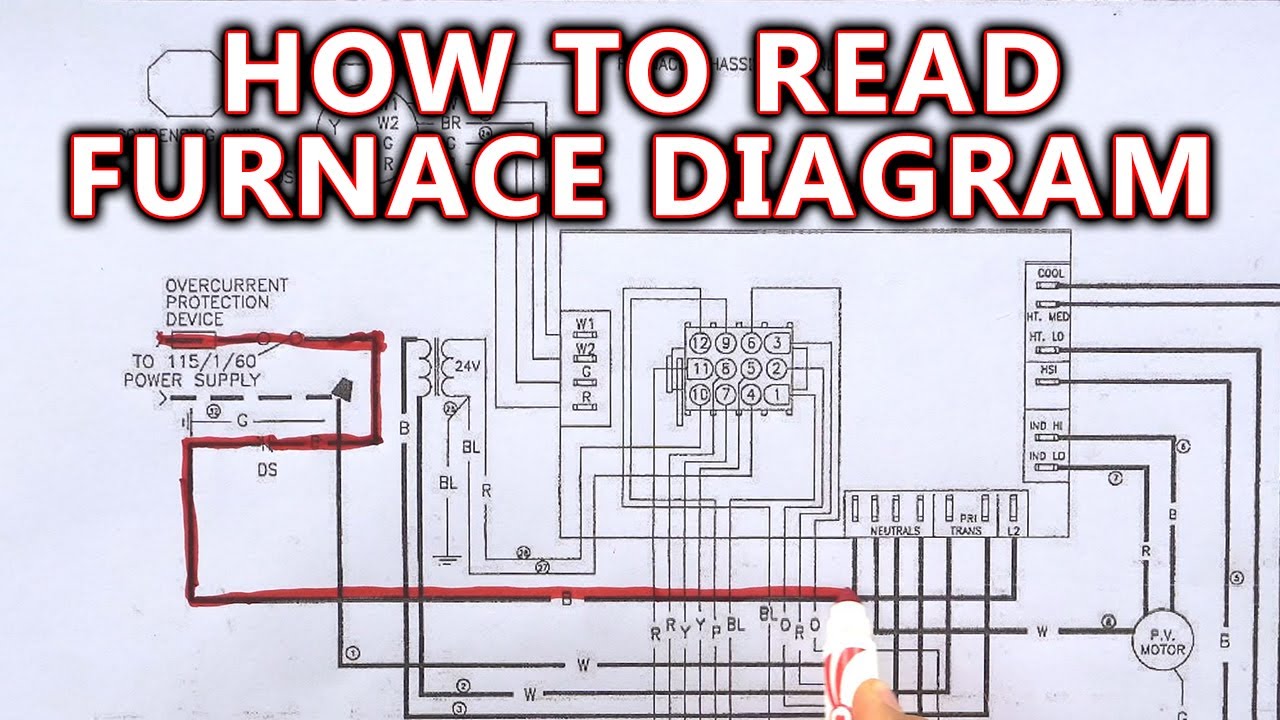
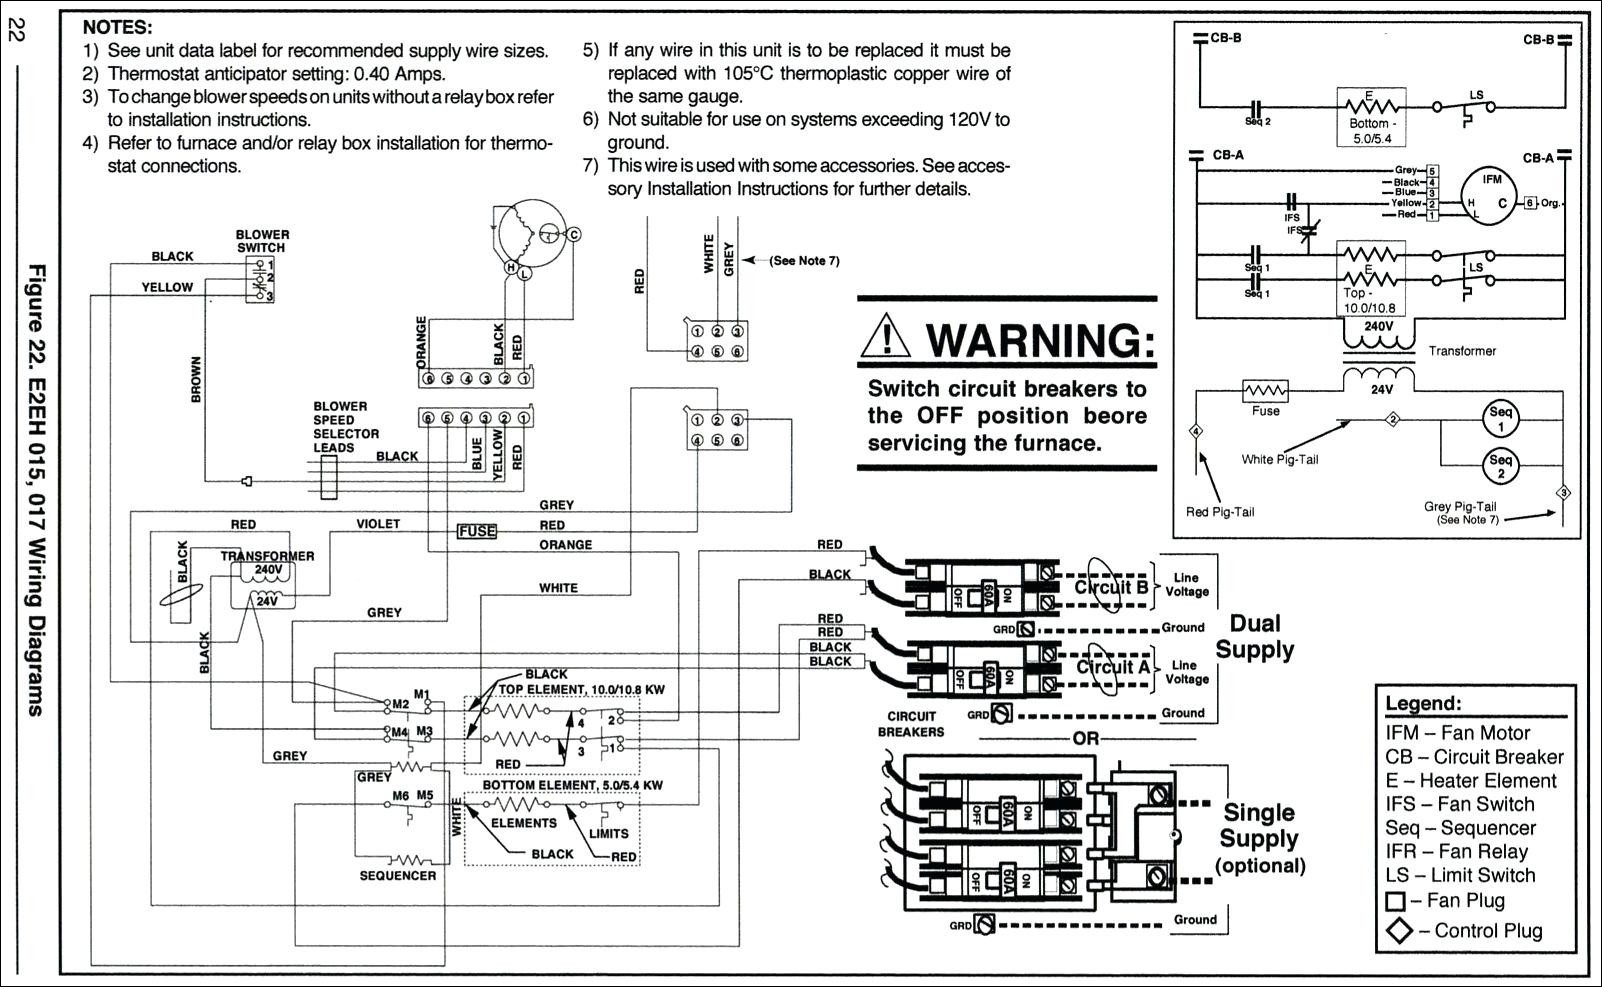
Deciphering the Diagram: Wiring diagrams can look intimidating at first glance, but understanding the basic symbols is key. Common symbols include:
- Circles: Often represent components like motors or transformers.
- Rectangles: Can represent switches, relays, or circuit boards.
- Lines: Represent wires connecting the components. Different line styles (solid, dashed, dotted) might indicate different voltage levels or functions.
- Letters/Abbreviations: Components and wires are usually labeled with abbreviations (e.g., "T" for thermostat, "M" for motor, "L1" and "L2" for power lines).
Take your time to study the diagram. Identify the major components and trace the wires connecting them. Pay attention to the labels and abbreviations. Many diagrams also include a legend explaining the symbols and abbreviations used.
Common Wiring Problems and Troubleshooting
Several common wiring issues can cause your electric furnace to malfunction. Here's a step-by-step guide to diagnosing and potentially fixing them:
Step 1: Safety First – Disconnect the Power!
This is the most important step. Before you touch anything inside the furnace, turn off the power at the circuit breaker that controls the furnace. Double-check that the power is off by using a non-contact voltage tester on the furnace's wiring. Never work on electrical equipment with the power on.
Step 2: Visual Inspection
Carefully inspect all the visible wiring inside the furnace. Look for:
- Loose Wires: Are any wires disconnected from their terminals? Pay close attention to connections at the thermostat, blower motor, heating elements, and control board.
- Burned or Charred Wires: This indicates a potential short circuit or overheating. Do not attempt to repair burned wires yourself if the damage is extensive or near the heating elements. Call a professional.
- Damaged Insulation: Is the insulation on any wires cracked, frayed, or missing? Exposed wires can cause short circuits.
- Corrosion: Look for corrosion on terminals and wire connections, especially if the furnace is in a damp environment.
Simple DIY Fix: If you find a loose wire, carefully reattach it to the correct terminal. Refer to the wiring diagram to ensure you're connecting it to the right place. Make sure the connection is secure. If you find minor damage to wire insulation, you can often repair it with electrical tape. Wrap the tape tightly around the damaged area, overlapping the undamaged insulation on either side.
Step 3: Thermostat Wiring
The thermostat is the brain of your heating system. Problems with the thermostat wiring are a common cause of furnace malfunctions.
Check the Connections: Remove the thermostat cover and inspect the wires connected to the terminals. Make sure they are securely attached and that there are no loose strands of wire that could be causing a short circuit.
Common Thermostat Wires:
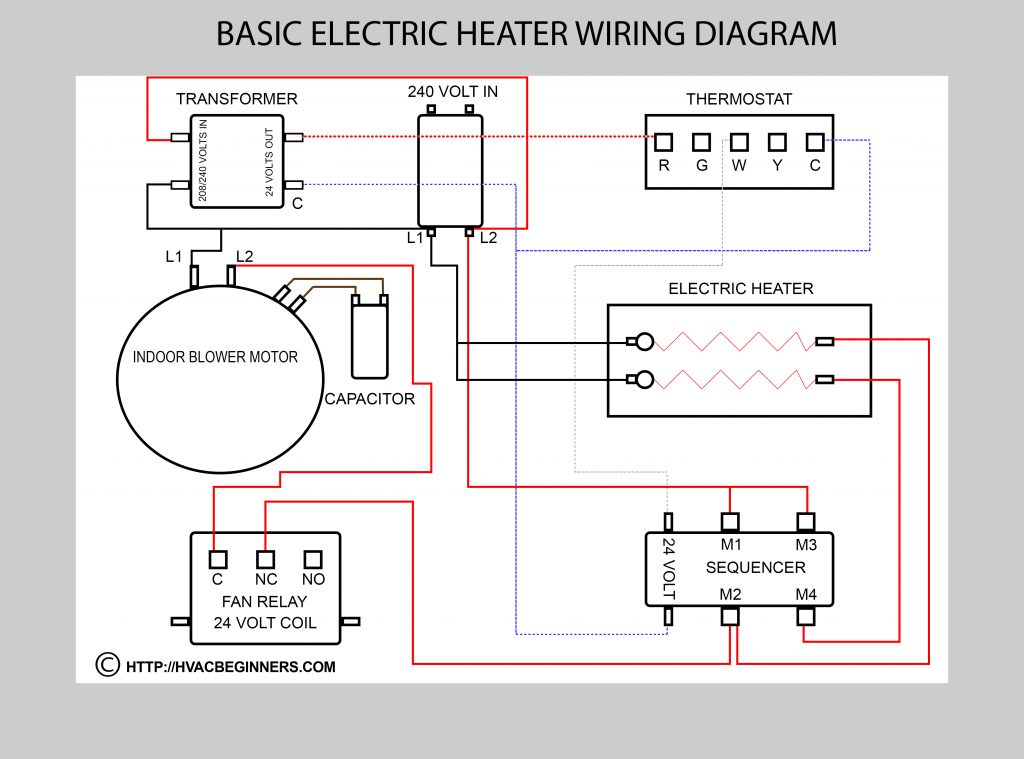
- R (Red): Power wire, usually 24 volts AC.
- W (White): Heat call wire. Sends a signal to the furnace to turn on the heat.
- G (Green): Fan wire. Controls the blower fan.
- Y (Yellow): Cooling call wire (for systems with air conditioning).
- C (Common): Common wire (required for some thermostats, especially smart thermostats).
Simple DIY Fix: If a wire is loose, reattach it to the correct terminal. If you suspect a wire is broken or damaged, you can try replacing it with a new piece of thermostat wire. Make sure to turn off the power to the furnace before working on the thermostat wiring.
Step 4: Blower Motor Wiring
The blower motor circulates the heated air throughout your home. If the blower motor isn't working, the furnace won't heat properly.
Check the Motor Connections: Locate the blower motor inside the furnace. Inspect the wires connected to the motor terminals. Look for loose wires, burned wires, or damaged insulation.
Check the Capacitor: Many blower motors use a capacitor to help them start. A faulty capacitor can prevent the motor from running. The capacitor is usually a cylindrical component located near the motor. Be extremely careful when working near capacitors, as they can store a dangerous electrical charge even after the power is turned off. Discharge the capacitor before touching it by shorting the terminals with an insulated screwdriver.
Simple DIY Fix: If you find a loose wire on the blower motor, reattach it securely. If the capacitor appears to be bulging or leaking, it needs to be replaced. Replacing a capacitor is generally considered a more advanced DIY task, and if you're not comfortable working with electrical components, it's best to call a professional.
Step 5: Heating Element Wiring
The heating elements are the heart of your electric furnace. They generate the heat that warms your home.
Check the Element Connections: Locate the heating elements inside the furnace. They are usually coiled wires or metal ribbons. Inspect the wires connected to the element terminals. Look for loose wires, burned wires, or damaged insulation. Heating element wiring often carries high voltage, so be extra careful when working in this area.
Check for Continuity: Use a multimeter to check the continuity of the heating elements. Continuity means that there is an unbroken electrical path through the element. If the element has no continuity, it is burned out and needs to be replaced.
Simple DIY Fix: If you find a loose wire on a heating element, reattach it securely. Replacing a heating element is generally considered a more advanced DIY task, especially if it involves disconnecting and reconnecting high-voltage wiring. If you're not comfortable working with high-voltage components, it's best to call a professional.
Step 6: Safety Switches and Limit Switches
Electric furnaces have safety switches and limit switches to prevent overheating and other dangerous conditions. These switches can sometimes trip, shutting down the furnace.
Locate the Switches: Safety switches and limit switches are usually small, rectangular components located near the heating elements or blower motor. They often have a small button that can be pressed to reset them.
Check for Tripped Switches: If you find a safety switch or limit switch, press the reset button. If the switch trips again immediately, there is likely a more serious problem that needs to be addressed by a professional.
Simple DIY Fix: Resetting a tripped safety switch or limit switch is a simple fix that can sometimes restore the furnace to operation. However, it's important to understand why the switch tripped in the first place. If the switch trips repeatedly, there is likely an underlying problem that needs to be addressed.
Step 7: Control Board Inspection
The control board is the brains of the operation, managing various functions within the furnace.
Careful Visual Examination: Inspect the control board for any visible signs of damage. Look for burnt components, loose connections, or signs of water damage. Often, you can smell a burning odor which might indicate the control board is failing.
Check the Fuses: Many control boards have fuses to protect the components. Use a multimeter to check the fuses for continuity. If a fuse is blown, replace it with a new fuse of the same amperage rating.
Simple DIY Fix: Replacing a blown fuse is a simple fix, but it's important to understand why the fuse blew in the first place. If the fuse blows repeatedly, there is likely a more serious problem that needs to be addressed. If you find any signs of burning, that calls for professional intervention.
When to Call a Professional
While many wiring problems can be diagnosed and fixed by homeowners, there are certain situations where it's best to call a professional HVAC technician:
- You are uncomfortable working with electricity. If you don't feel confident working with electrical components, it's always best to err on the side of caution and call a professional.
- You find extensive damage to the wiring. If you find burned or charred wires, significant damage to wire insulation, or widespread corrosion, it's best to call a professional.
- You suspect a major component failure. If you suspect that a major component like the blower motor, heating element, or control board is faulty, it's best to call a professional.
- You have tried the troubleshooting steps and the furnace still isn't working. If you have followed all the troubleshooting steps and the furnace still isn't working, there is likely a more complex problem that needs to be addressed by a professional.
- You are not able to safely discharge a capacitor. If you can't confidently discharge the capacitor, don't attempt to fix the unit yourself, call a professional.
Remember, your safety is the top priority. If you are ever unsure about something, it's always best to call a professional.
By understanding your furnace's wiring diagram and following these troubleshooting steps, you can potentially diagnose and fix common wiring problems, saving you time and money. However, always prioritize safety and don't hesitate to call a professional when needed.